i'm gathering the supplies to build a green mic preamp, and it appears nobody has brought this topic up on this forum in several years. the old forum posts link to Kev's green pre page, which appears to either no longer exist or has moved to another link. is this page available somewhere still? i have gathered a lot of information on the project, from the old forum posts and the page http://1176neve.tri…"]Green Mic Pre[/]="http://1176neve.tri…"]Green Mic Pre[/] and just have a couple minor questions, which i figure may be answered in Kev's page on this site. anyways, the questions are:
what type of caps are preferable? should the electrolytics be tantalum or does aluminum work fine? some are labeled, such as the .1uf poly's, but the rest are not.
thanks! :cool:

Comments
Kev is the best to talk too, but from the BOM the caps that are
Kev is the best to talk too, but from the BOM the caps that are not spec'd do not appear as critical. I would guess NPO or COG ceramic would be just fine. Some people are still against ceramic...
[="http://sound.westhost.com/articles/capacitors.htm"]Capacitor Characteristics[/]="http://sound.westho…"]Capacitor Characteristics[/]
I like this one too:
[[url=http://="http://greygum.net/…"]The "Sound" of Capacitors[/]="http://greygum.net/…"]The "Sound" of Capacitors[/]
I'll go with the ceramic. thanks for the reply and the links!
I'll go with the ceramic. thanks for the reply and the links!
also, i'm using this design: [="http://1176neve.tripod.com/id26.
also, i'm using this design: [="http://1176neve.tripod.com/id26.html"]New PSU[/]="http://1176neve.tri…"]New PSU[/] for the psu, so would this transformer be fine: [[url=http://="http://www.mouser.c…"]229A30 Hammond Transformers[/]="http://www.mouser.c…"]229A30 Hammond Transformers[/]? seems fine to me just didnt want to buy anything useless for this project. my plan is to include the whole psu including the transformer on a pcb- no problem right?
also, if i wanted to include switches to bypass the preamp or even switch polarity(which would just mean swapping the +/- output lines right?), would the switches have any noticeable influences on the signal? im planning on mounting them on the pcb so that off board wiring would not be necessary.
obviously off board wiring is inevitable, such as psu pcb to preamp pcb and to xlr connecters. any important considerations? wire gauge, insulation thickness, etc? to make it simple, i was considering for psu to preamp using pin connectors like this: [[url=http://[/URL]="http://www.allelect…:{i:0;s:40:%2203823345592a403b2f4a37a59384e7ab28f02be1%22;i:1;s:0:%22%22;}"]4-PIN CONNECTOR W/HEADER, 0.10" | AllElectronics.com[/]="http://www.allelect…:{i:0;s:40:%2203823345592a403b2f4a37a59384e7ab28f02be1%22;i:1;s:0:%22%22;}"]4-PIN CONNECTOR W/HEADER, 0.10" | AllElectronics.com[/] or even scrap ones taken from computers. any issues with this?
thanks in advance!
one more link about caps: http://www.johnhardyco.com/pdf/990-20
one more link about caps:
http://www.johnhardyco.com/pdf/990-2007.pdf
Check out his last page.....
I like toroidal xmfr's myself, but that should work just fine. Is this going to a commercial product or just for yourself? Some people would argue a bolted down transformer with a cable to pcb would handle the wear and tear of the road better. The idea here is the weight of the transformer, need adequate support.
Polarity switch is exchanging either the input or output XLR pins 2 and 3. Some argue that changing the input polarity can cause instabilities in the first stage of amplification.
For wiring I use shielded cable and tie one side of the shield to chassis ground. Canare makes a nice product CA-L-2B2AT
http://www.rpelectronics.com/Data/RPCAT-47.pdf
I use MTA style connectors generally, I like them as they are quick and easy, but they are vampire type connectors and you need to pay attention to the crimps. I have the crimp gun, it works well.
As for wire gauge, there is really very current to worry about. I use 18-20AWG for power and 22-28AWG for signal.
its just a project for myself and the unit will most likely sit
its just a project for myself and the unit will most likely sit in one place. the transformer is semi toroidal, so if i keep it as far as possible away from the audio circuitry will it still be an issue?
should be just fine happy building! one thing I don't get is th
should be just fine happy building!
one thing I don't get is the 48V rail, how does the Lm317 handle that? I have seen it done with the LM317 before, but usually they put a reference voltage or dc offset on the gnd pin...?
you know, i do not know how it handles the 48V rail. this is one
you know, i do not know how it handles the 48V rail. this is one of my first projects, so without much knowledge in how it works i'm just taking the designer's word for it. il post back once it is built whether it works!
when i hook up the xformer, should i hook up each 120V ac line to 1 and 2 separately, then short 1 to 3 and 2 to 4, and similarly on the secondary winding? the spec sheet is here: http://www.hammondmfg.com/pdf/5c0013.pdf
Primary 1 +3 tried together and 2 and 4 secondary tie 5 and 8 to
Primary 1 +3 tried together and 2 and 4
secondary tie 5 and 8 together to be your center tap for your circuit common.
As for the LM317 thing...
http://www.national.com/ds/LM/LM117.pdf
It can only have 40V difference between its input and output.... so this should work...
Check out this discreet version:
[[url=http://[/URL]="http://sound.westho…"]48V Phantom Feed Supply for Microphones[/]="http://sound.westho…"]48V Phantom Feed Supply for Microphones[/]
for more ideas. YOU COULD ALSO
use a TL783....
do you see any disadvantages to the way the 48V rail is set up n
do you see any disadvantages to the way the 48V rail is set up now? is it worth adopting a new version?
If i tie 5 and 8 together for my circuit common, does that mean i dont need true ground from a grounded 3-prong AC cable? or should i still tie the true ground to 5-8?
thanks for all the help!
Always ground the common line, even if it is done through extern
Always ground the common line, even if it is done through external equipment and a corresponding ground-lift switch on the pre-amp to avoid earth loops.
The 48V PP rail in the new PSU design is fine unless there is a short to ground, when the LM317 gets more than 40V input-output and destroys itself. This is only a problem for shorts internal to the pre-amp and not at the XLR connector, as there are 6K8 resistors between the XLR pins 2 and 3 and the 48V rail which act as current-limiters.
Well then, I'll be sure to double-check for shorts before housin
Well then, I'll be sure to double-check for shorts before housing the components! I'll add a ground lift switch as well.
I want to clear something up with the xformer- it came with a ho
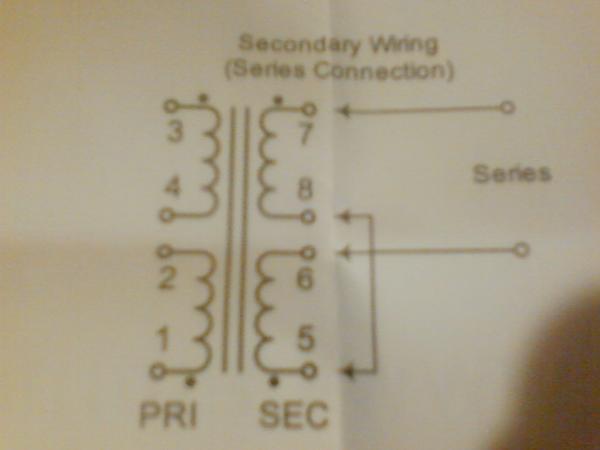
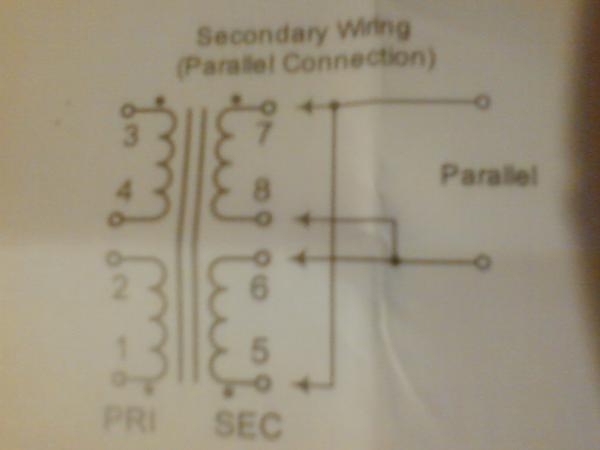
I want to clear something up with the xformer- it came with a hookup guide as there are 2 options for voltage output: 15V(0.4A) parallel and 30V(0.2A) series. Obviously i need two output lines cranking out 15V each, so do I want to hook up the secondary in series as Link suggested or in parallel to get 2x15V outputs? (Series seems to be the one that makes sense, i just want to be completely sure) By that logic, if I hooked it up parallel, would I get 2x7.5V outputs? What would be a good way to safely test the xformer with a multimeter to ensure it is functioning properly?
Here's the datasheet again: http://www.hammondmfg.com/pdf/5c0013.pdf my part being 229A30
Here's the hookup guide that came in the box:
Thanks for all your help!
Attached files

i just tested the xformer tying primary 1+3 and 2+4, and seconda
i just tested the xformer tying primary 1+3 and 2+4, and secondary hooked up series as according to the pic above, and with a confirmed 120V entering the primary I read 40V across secondary pins 6 and 7. I similarly measured 20V with the secondary hooked up in parallel. The unit clearly has the output ratings of 30V and 15V labeled. Did I get screwed over? or am I just measuring it wrong?
It's what you would expect from an economy transformer. The read
It's what you would expect from an economy transformer. The readings you got represent the output with no load, and the rating is the output you would expect at full load. The more copper and iron used in the transformer, the less the difference between unloaded and loaded output voltages, but the higher the cost (and weight).
The hook-up guide is drawn in a crazy way, but just connect the secondaries in series (your 40V reading). The centre-tap is then your output common.
getting close to finishing, but trying to drive through (hopeful
getting close to finishing, but trying to drive through (hopefully) a couple final minor road blocks before mounting it all to the chassis and firing it up.
1. The seemingly controversial topic of grounding has finally risen, and how i should ground each part in the chain. From what I've researched, it seems my best option is to keep the preamp common line earth grounded, but not chassis grounded. And at the xlr connectors, I should chassis ground pin 1 and connect the shield of the internal input/output off-board signal cable to pin 1 as well, but leave the other side of the shield(by the pcb) open. Does this sound like a safe hum-free solution?
2. Any general rule of thumb for twisting together off board wiring? I know balanced signal lines should be twisted, but for example I have 4-conductor molex connectors bringing the +15V, -15V, +48V, and ground lines between the preamp and psu. I just have them fairly loosely twisted to keep the bundle organized- will I find any issue with this?
Thanks for all the help so far!:biggrin:
after more research, it seems like a better option to do what i
after more research, it seems like a better option to do what i mentioned before, except earth ground the chassis and connect the circuit common line to chassis ground(or earth ground as they are connected) at one point on the psu with a ground lift switch, therefore I can float the preamp common if noise is an issue. And since my chassis is anodized...i suppose il have to create a fake "chassis ground" conductor. It won't matter that its only a single wire and not the full surface area of the rack...right?
No, that shouldn't matter, but it is a good idea to ensure that
No, that shouldn't matter, but it is a good idea to ensure that each panel of a metal chassis is connected to chassis ground. This may mean scraping away the anodizing on each panel around a fixing hole for a ground lug, and then wiring all of those together and to incoming mains earth.