So I was so interested in the 1612 Tubes I got to play with... I started a hybrid design. The concept is a vari-mu style compressor using the 1612 as the front end after a Jensen XFMR. I am thinking of then running LA2 style buffer and driver amplifier into a Jensen output XFMR. But the side chain will be solid state and use either a LOG amp or a THAT audio engine.. Sort of a complex blend of 50's tech with more modern tech...
The panel below is the feature set that I would want...I interested to hear your thoughts or wants for a compressor like this...

Comments
This sounds interesting! How are you planning to configure the 1
This sounds interesting! How are you planning to configure the 1612 in terms of which grids you use for the signal input and the for the modulation?
Looks cool. Dunno if its possible or practical, but an xformer
Looks cool. Dunno if its possible or practical, but an xformer in/out switch could be intersting for tonal options, and a hpf on the detection part, to hit the comp harder before pumping on full range signals could be cool.
Boswell, post: 465029, member: 29034 wrote: This sounds interest
At this point I am looking to do what the Gates limier did as a starting point, which has the control voltage being applied to Pin 5(Grid 3) of the 1612's
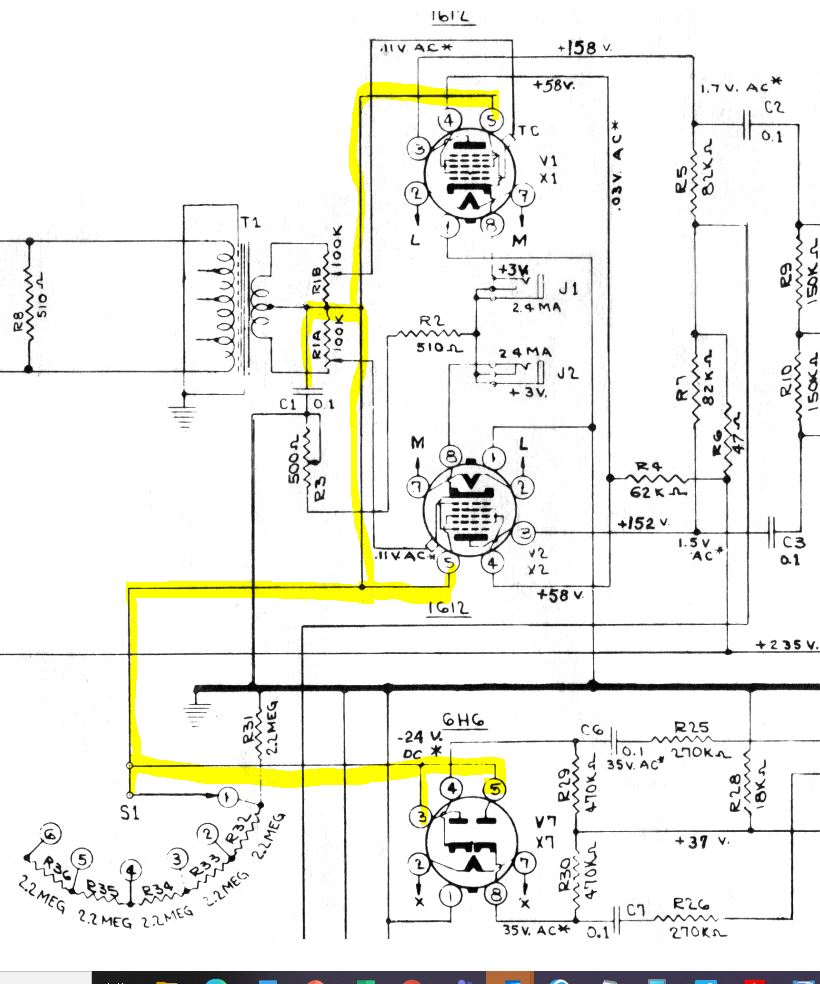

But instead of the 6H6 I would use a solid RMS detector and possible a peak detector to drive grid 3 through some form of conditioning circuit. I would run the input to into the TC cap connection.
Thanks Kmetal at this point I think I need the transformer for the tube voltages, it may be possible to eliminate it but it would take some more thought. The 60hz and 120Hz fitlers are meant to be fixed HPF filters on the detection circuit. I suppose this could be easily made variable though...good thought!
Rev2 of the front panel concept
Rev2 of the front panel concept

Looking good!
Looking good!
It would not be easy to by-pass the input transformer. It is use
It would not be easy to by-pass the input transformer. It is used as a phase-splitter, and also to sum the input signal and the control voltage, so the signal appears as the difference in voltage between G1 and G3.
My idea of the switchable xformer was pulled directly from the m
My idea of the switchable xformer was pulled directly from the millennia channel strip that allows bypassing of xformer and tube stages. I know next to nothing about gear design / EE. In the millennia demos its surprising how subtle the differences are with the different settings engaged.
My only other suggestion is a ratio control or a 1:1 setting. This stems from my love of using a silverface 1176ln compressor all buttons Out, on vocals for a very nice vocal distortion, ala old blues / rock. The more the singer digs in the more saturation. I much prefer it to the more common approach lately of using decapitator or saturation effect that is a static amount of distortion. The 1176 thing adds drama because it is level dependent.
Anyway just tossing it out there because i felt the gates unit link put a video of would have great vocal saturation characteristics for that type of sound.
kmetal, post: 465069, member: 37533 wrote: My only other sugge
Thanks I think I can do a 1:1 ratio...thats exactly the kind of input I am seeking, great idea!
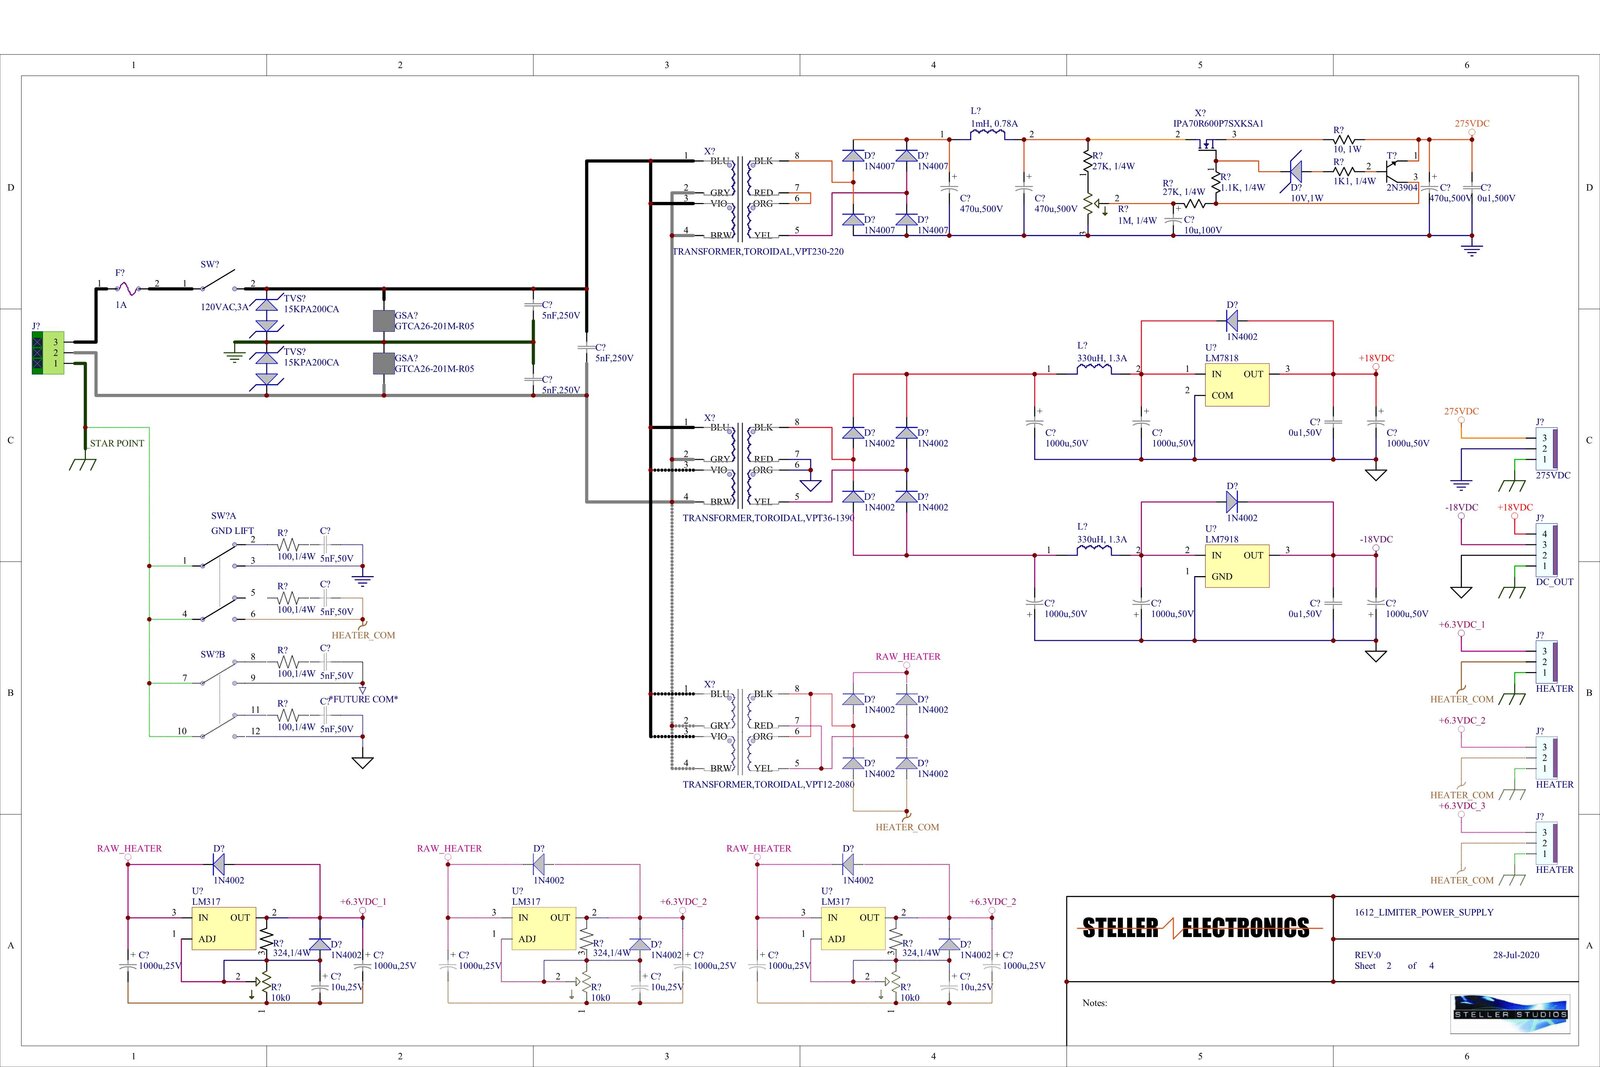
here is the first draft of the power supply...I am not planning
here is the first draft of the power supply...I am not planning on regulating the 275Vdc rail, but this concept has worked in the past to stabilize and set the voltage... the plan is to have 4-6 tubes on this so I will need additional 6.3Vdc current..so I think I will need to add another transformer for the tube heaters and split the load across two or three LM317's....
It's very nice to follow the creation with you like that ! :)
It's very nice to follow the creation with you like that ! :)
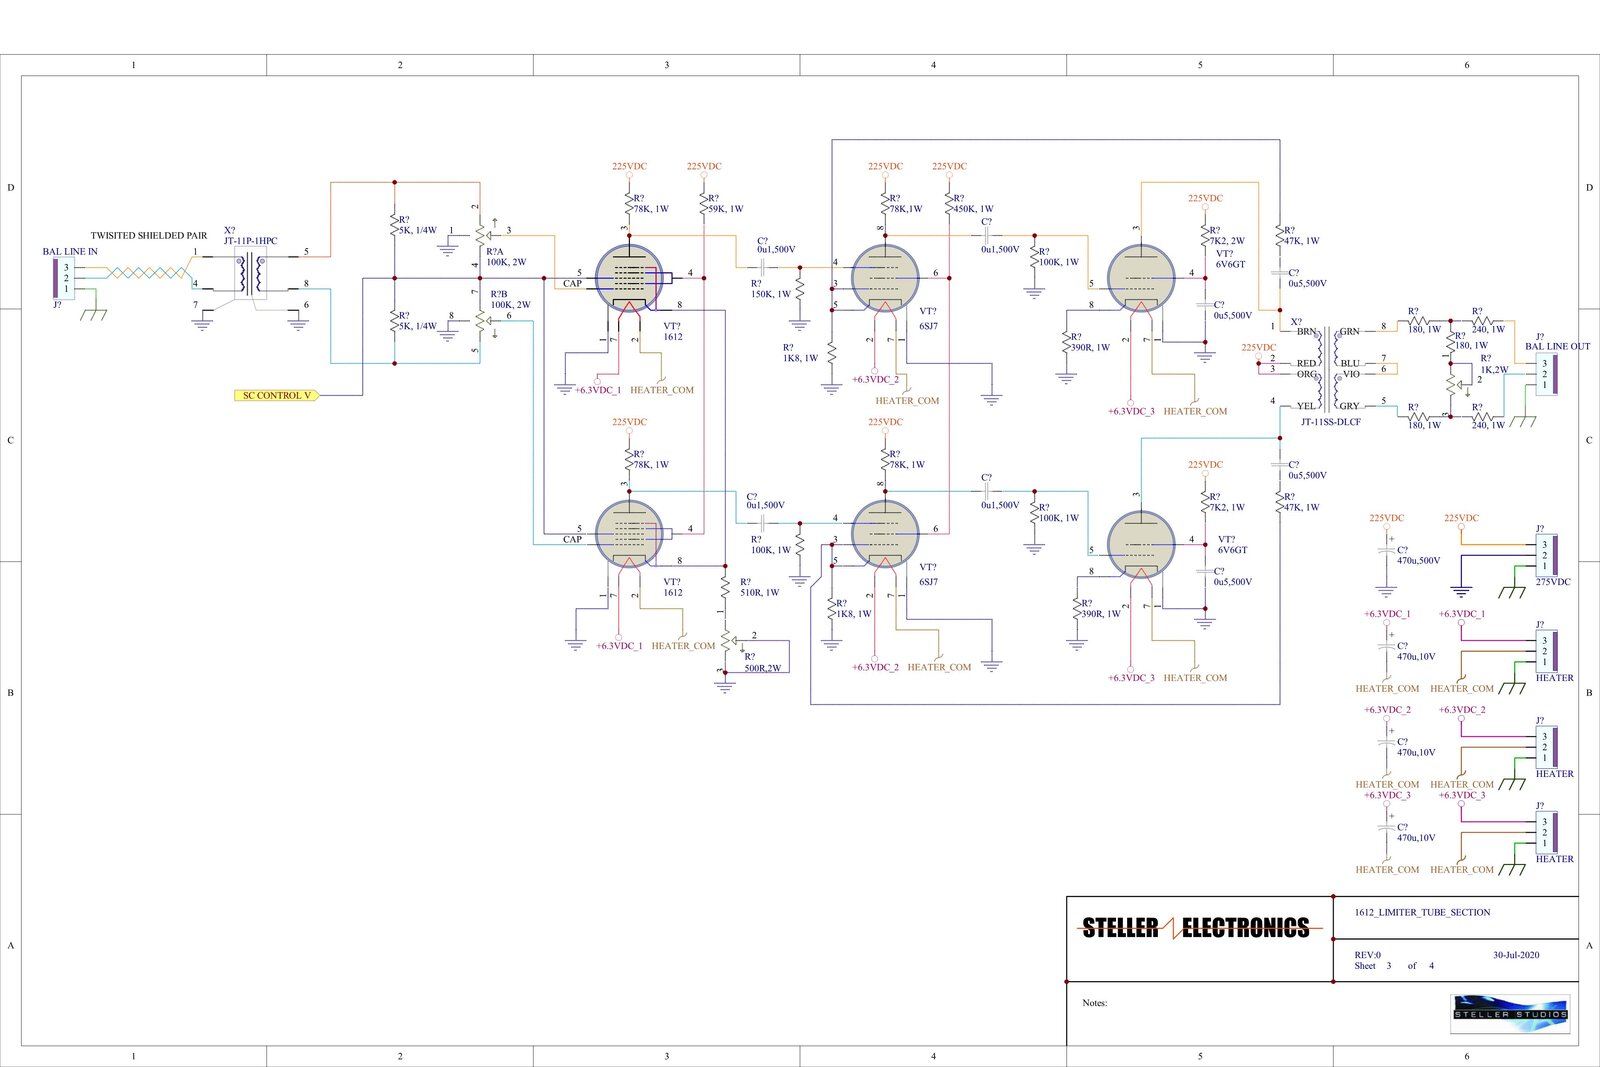
First paper Draft of the tube section is done... this far from d
First paper Draft of the tube section is done... this far from done...I know are several errors in this schematic .... I will need to figure out the biasing resistors values, but I think I am in the ballpark. I will build up a prototype and add pots to tune and find the optimal bias point. For the output transformer I am not 100% sure I can use the Jensen transformer shown, I am really hopping for an off the shelf solution.... In general I tried to stay true to the Gates 39B circuit....let me know your thoughts. Thanks!
Interesting! I'll be very excited to hear how this comes along.
Interesting! I'll be very excited to hear how this comes along.
Here is my first thoughts on the side chain control circuit. I a
Here is my first thoughts on the side chain control circuit. I am using the THAT 4301 mainly because I have a few, but these could easily be converted to any RMS detector... For the peak detector I just did the a a simple standard opamp based peak detector. I am trying to keep this very simple to start with so the attack and release is very minimal, anyway have a look let me your thoughts.

Some refinements and corrections... 1612 Power Supply 1) I
Some refinements and corrections...
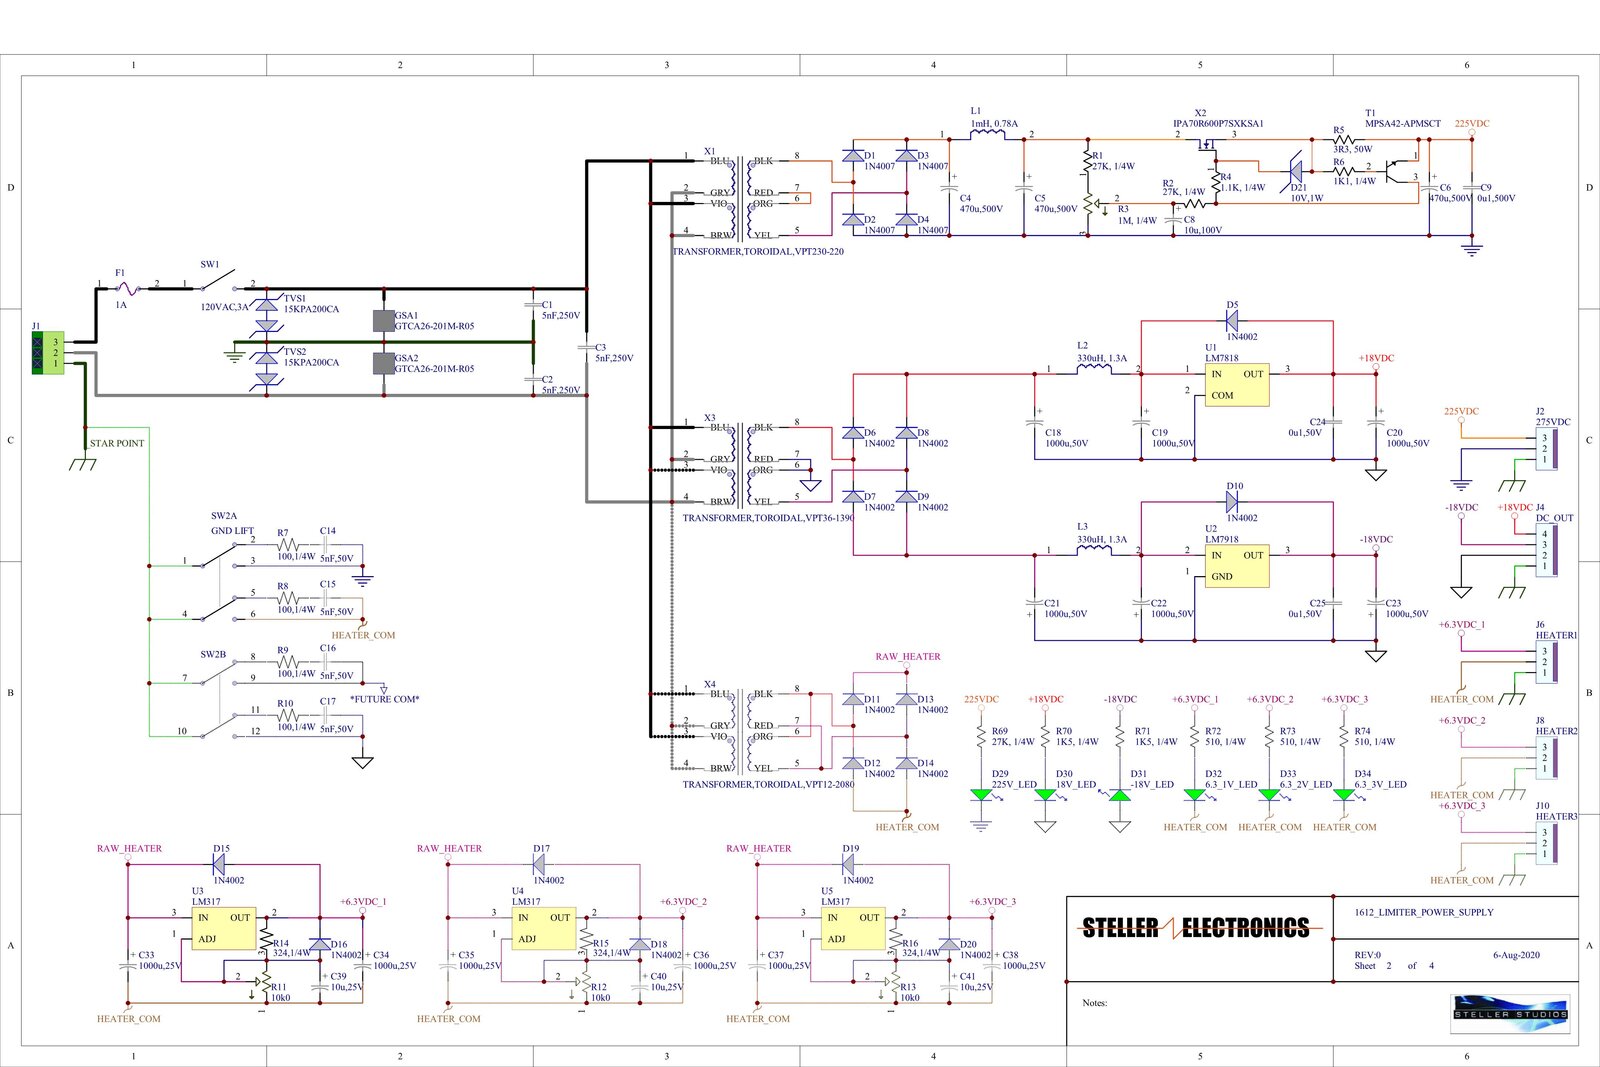
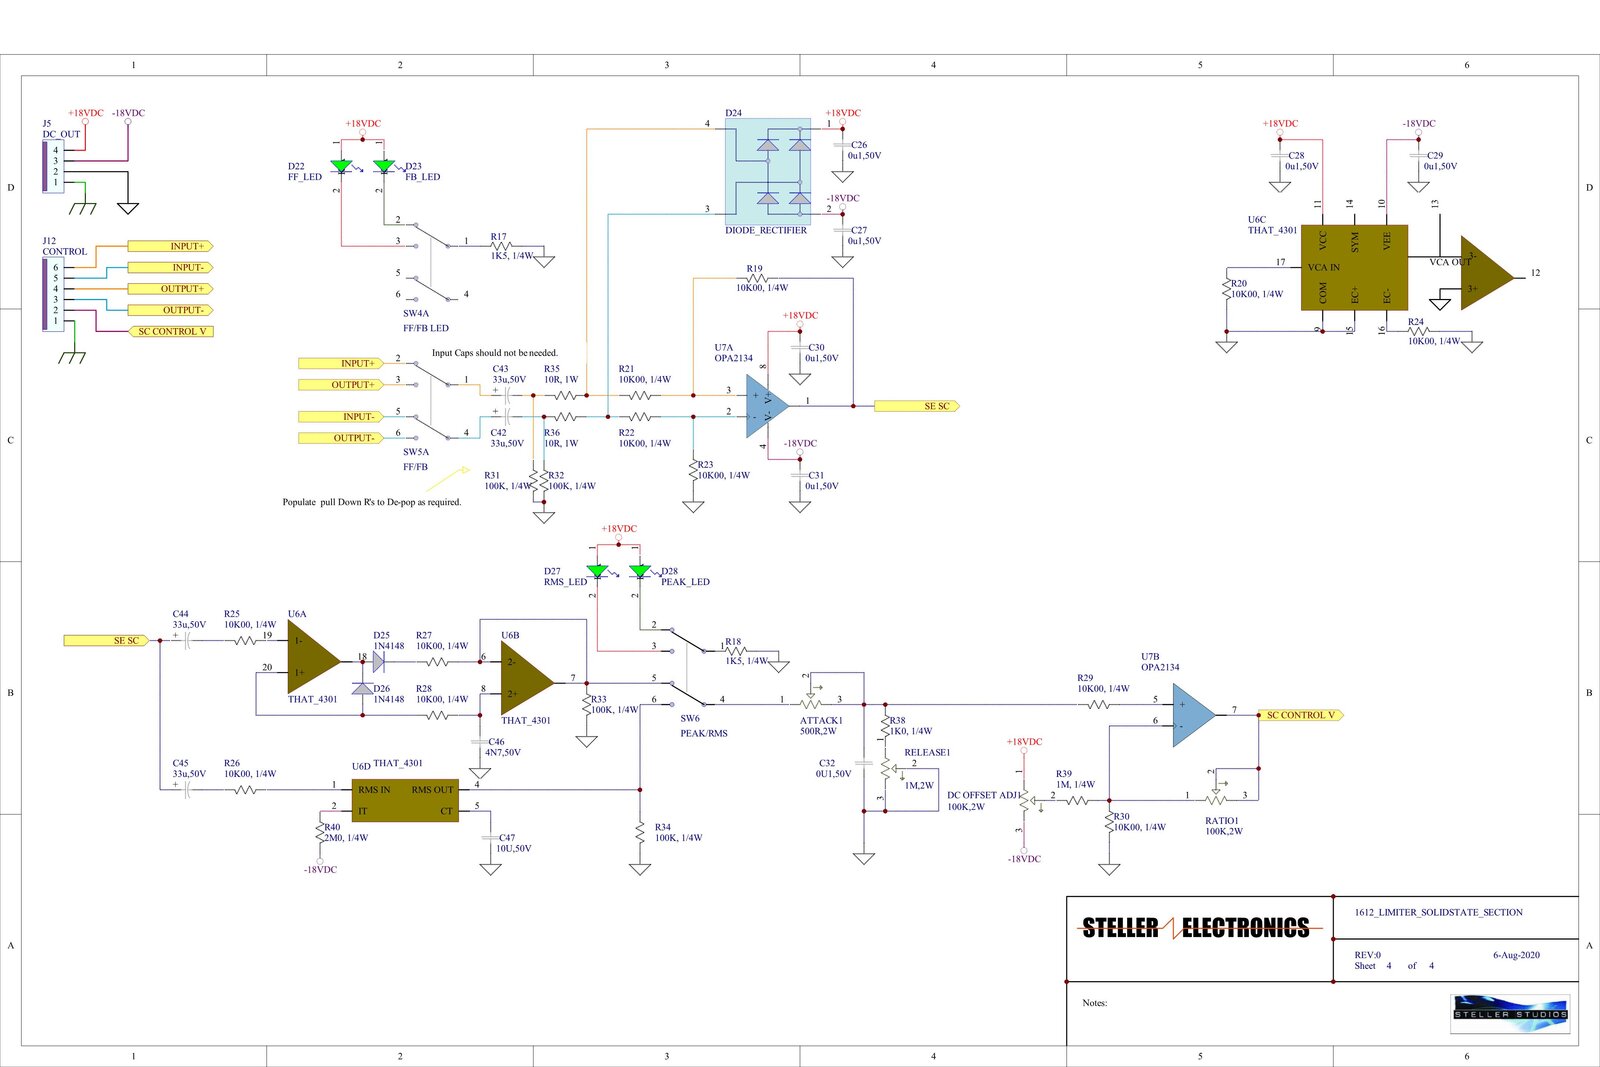
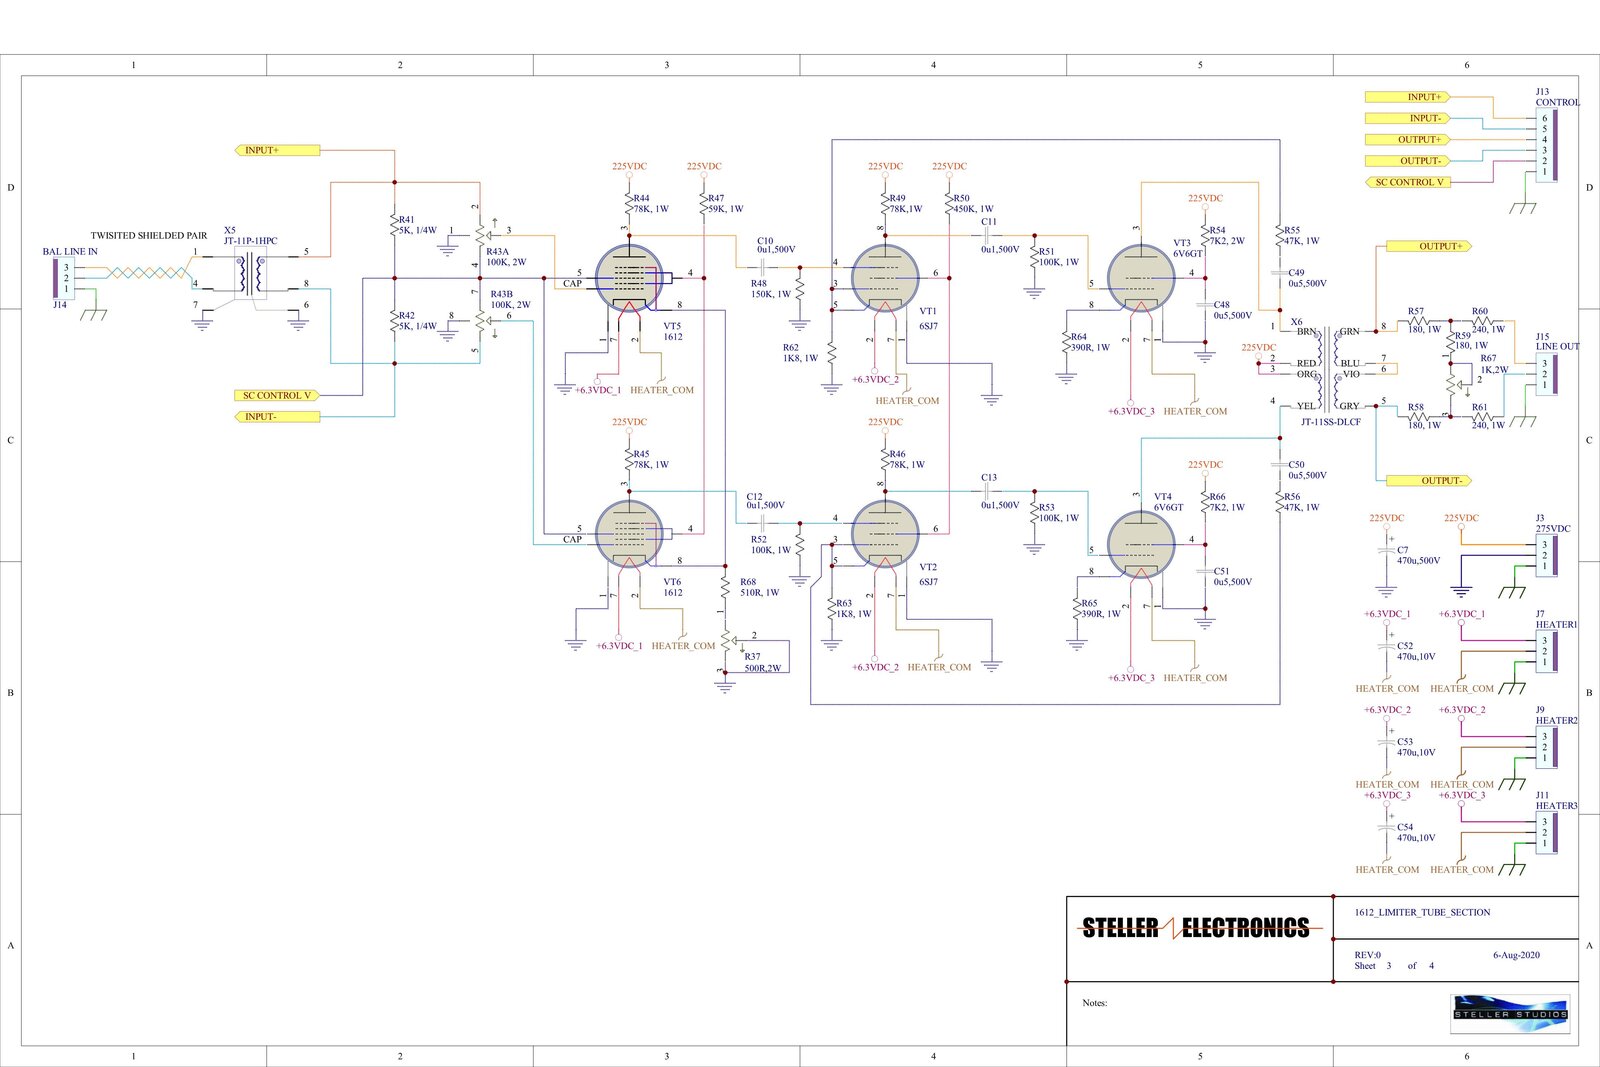
1612 Power Supply
1) I added indicator LEDS for troubleshooting.
2) I changed the current limit to trip around 200mA. R5 is now 3.3ohms. I will use an over sized wattage TO-220 type package to minimize heat sink requirements.
3) I fixed an error and connected R5 and R6 as per ESP's excellent article (https://sound-au.com/project151.htm)
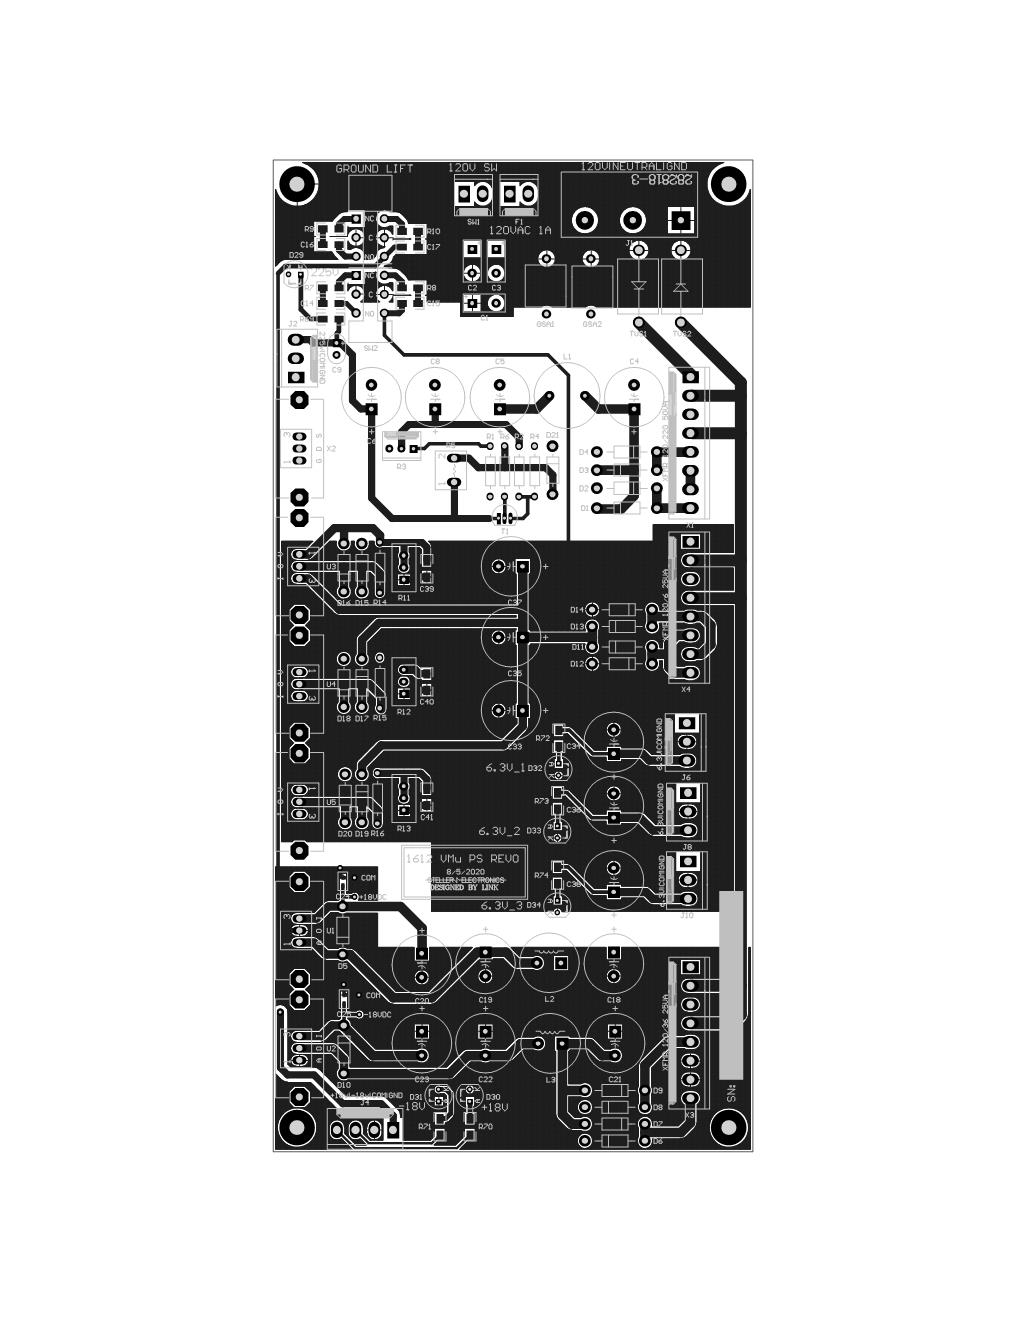
The PCB Layout for the power supply is essentially done....
I was careful to separate all common's and star them back the main chassis plane.
I made sure I have decent gap around the 225V and 120V traces.
I have over sized the traces, not so much for current handling but more for rework ;)
I have labeled the pin of the connectors, so I don't need the schematic...as much.. for testing ;)...
The board is only 2 layer with common planes on both sides with exception of the 225V supply.
Side Chain Control
I have saved one dual opamp and simplified circuit. This simplify the output, less parts= less noise :)
Tube Section
I added the connector to the side chain section....
At this point I am think 3 separate PCB's. One for the power supply, one for the Tube Section and one for the solid state side chain control voltage.
On a first glance, it looks very neat.
On a first glance, it looks very neat.
Thanks Boswell that means a lot coming from you!
Thanks Boswell that means a lot coming from you!
Progress update: 1) The side chain circuit has been refined a bi
Progress update:
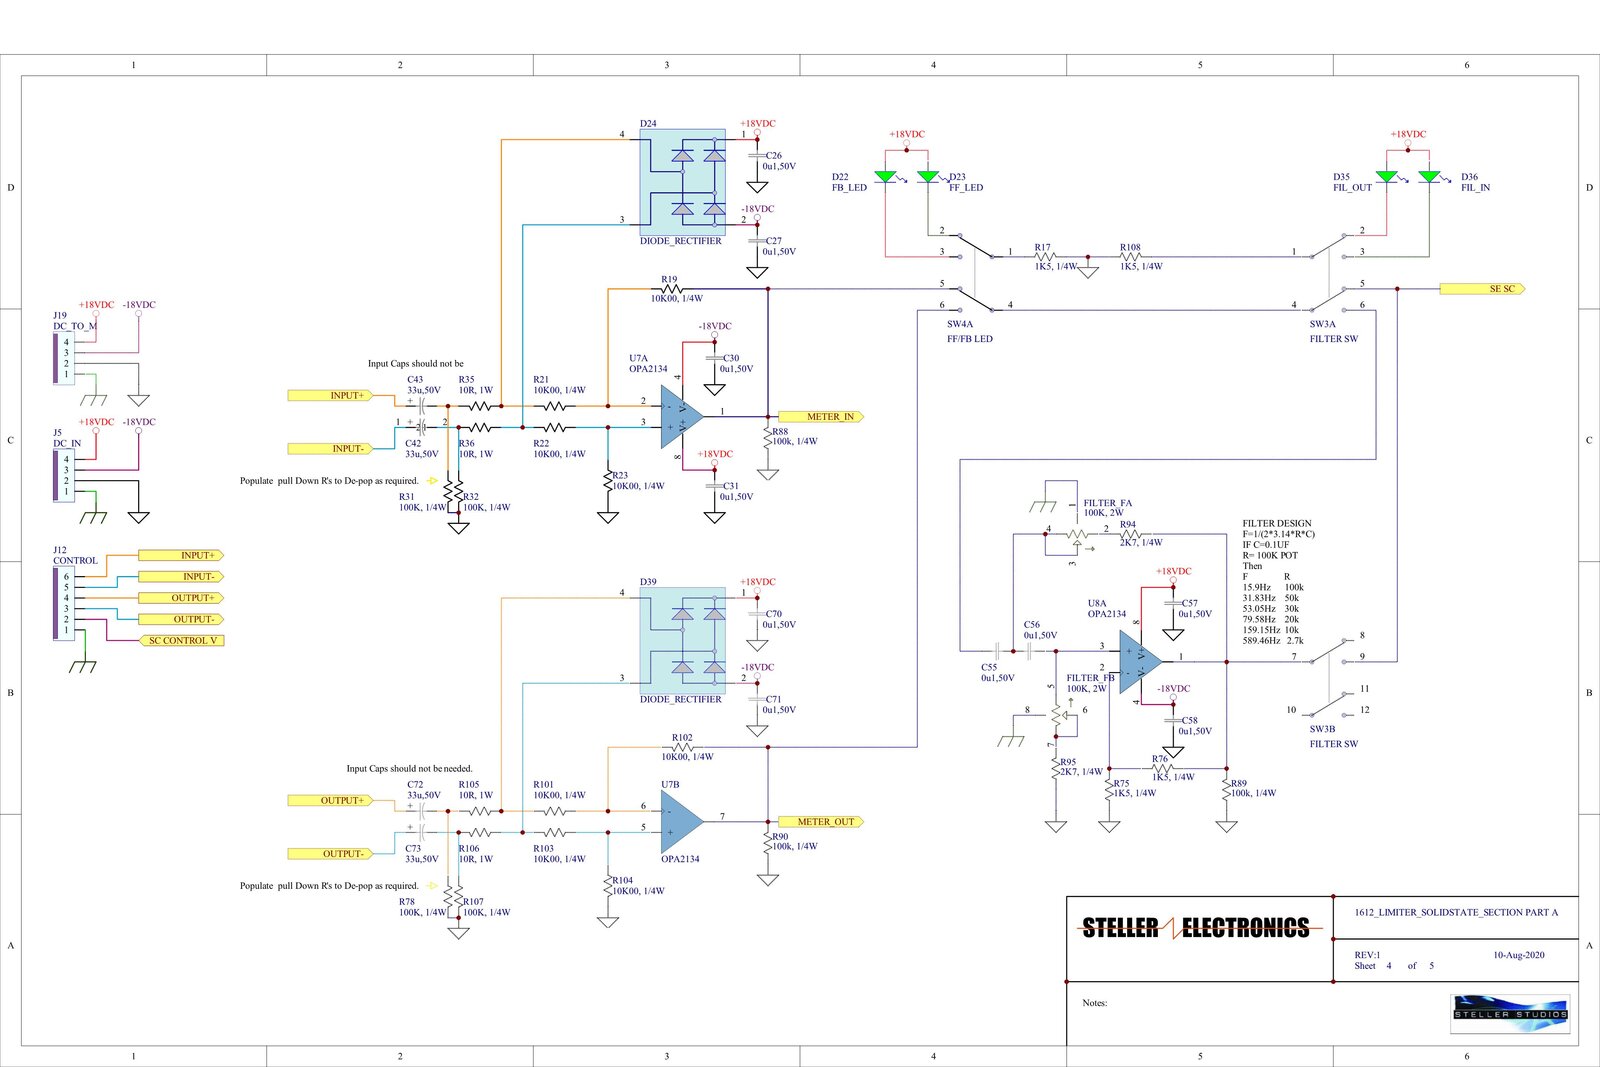
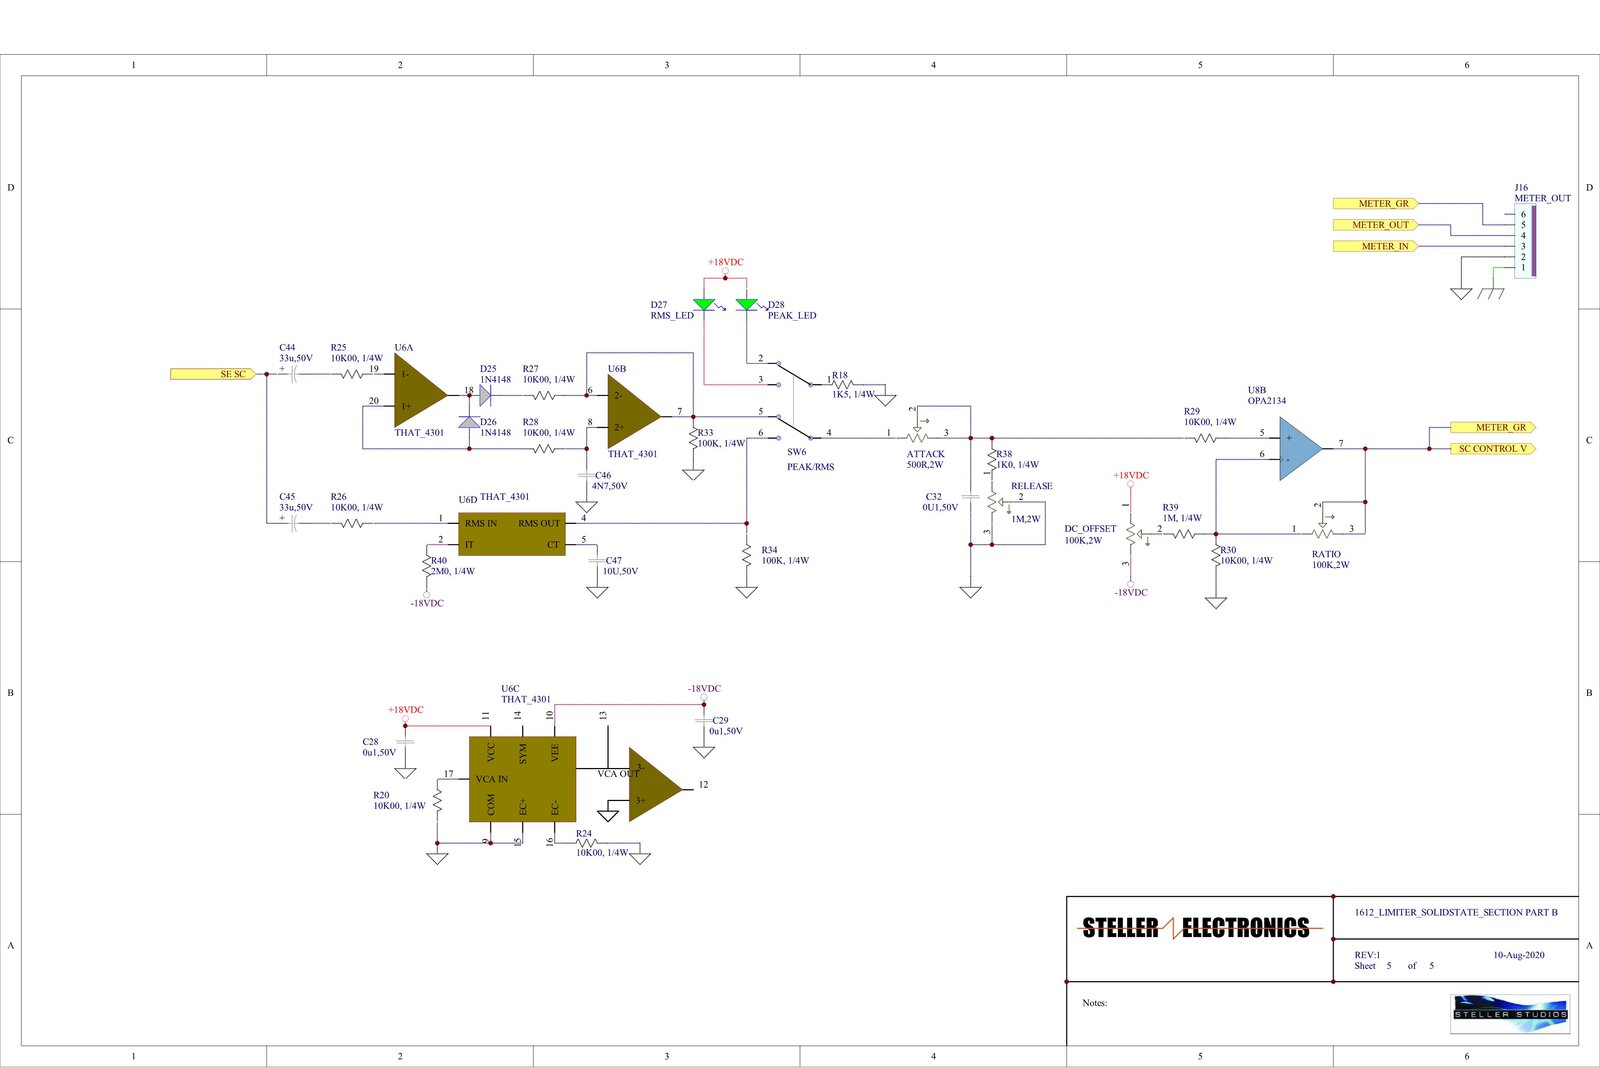
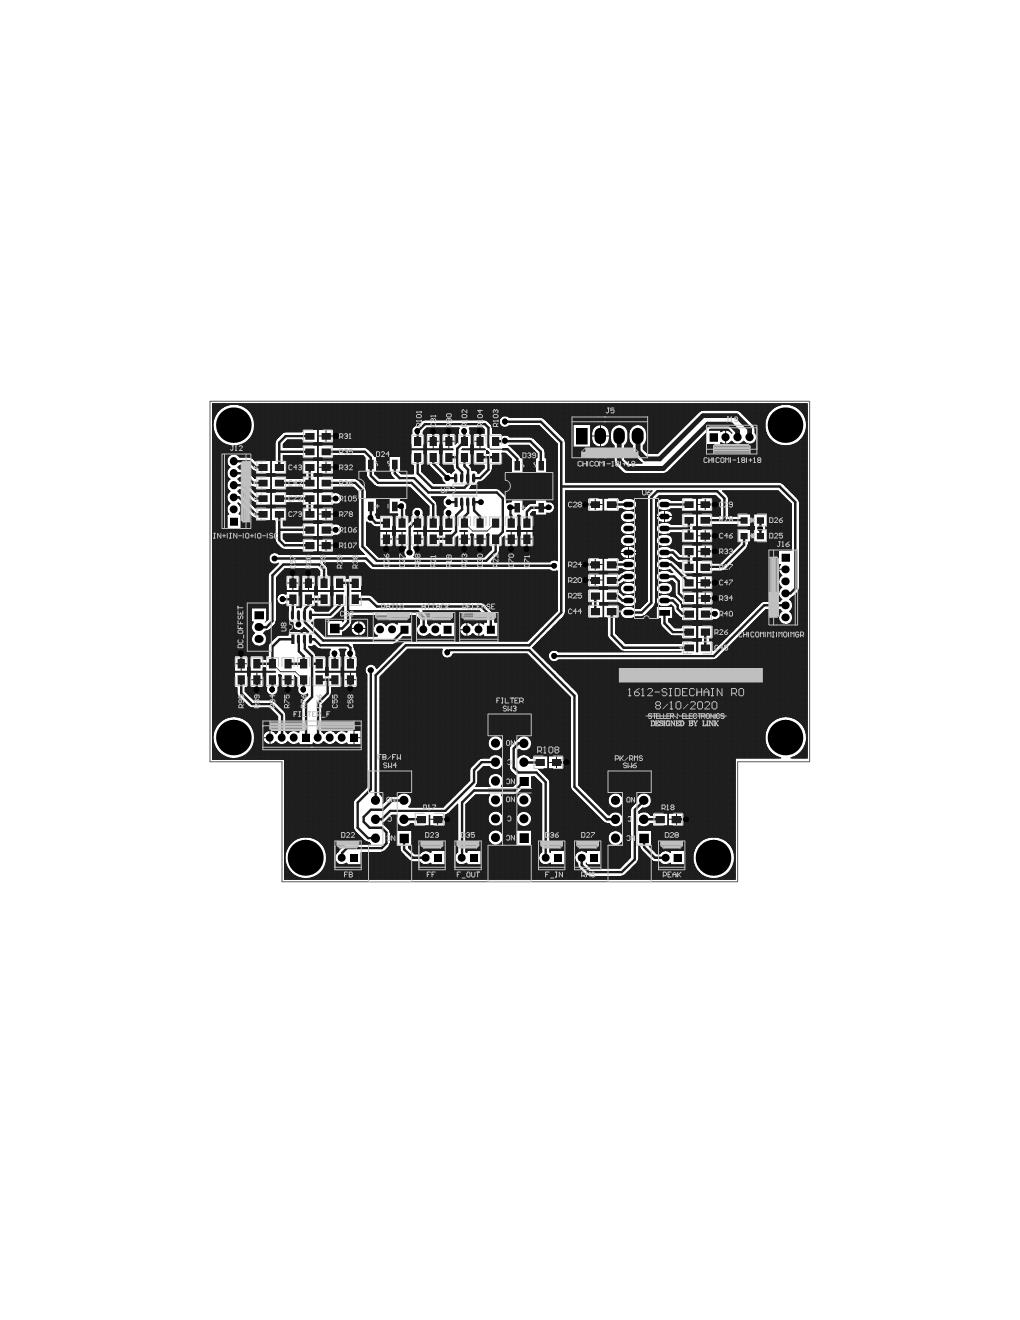

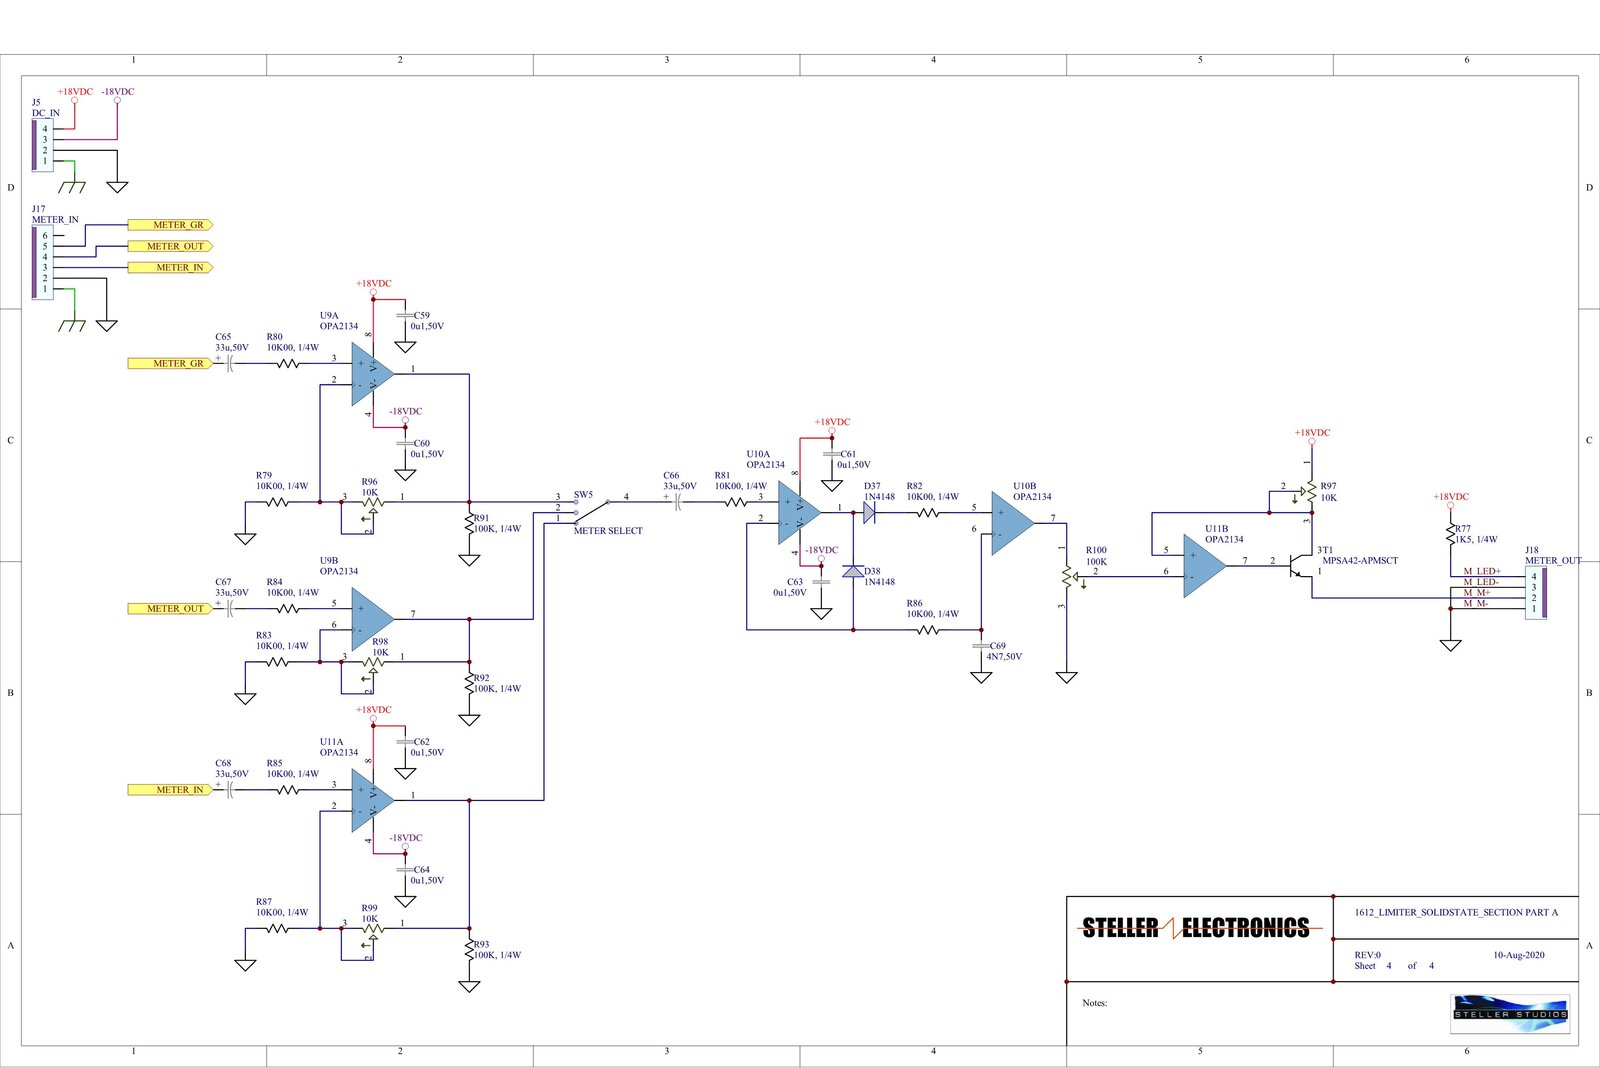
1) The side chain circuit has been refined a bit. ... I broke it up over two schematics to try to make it more readable. Having done many repairs over the years on amazing gear with terrible schematics, I really know the value of a decent schematic.
2) I changed the side chain filter into a variable (20Hz to 500Hz) 2nd order Sallen Key high pass filter.
3) I had to use an additional opamp to allow the meter switching network.
4) I added the 1:1 ratio.
5) I laid out the first version of the Side Chain PCB and updated the face plate to match the new layout.
6) I designed the VU Meter Movement driver circuit. I am using a voltage dependent current source to drive the meter movement.
As always love to hear your comments, concerns or abuse ;)
Without any ability to read schematics, i can say the front pane
Without any ability to read schematics, i can say the front panel layout looks well done, and i think the hpf frequency range is a useful range.
I haven't had a chance to look in detail at your latest schemati
I haven't had a chance to look in detail at your latest schematics, but I did see in the meter select and drive page that the resistors going to the non-inverting inputs of each of the 2134s should be to ground and not in series with the a.c. coupling caps. The amps need a bias current path!
The current drive to the meter looks a little strange, but it may be OK. You might need a small compensation cap from the meter output to the inv input of the op amp for stability.
A fixed resistor between the cal pot and the rail to avoid problems at the end of the pot range?
What's the function of the 100K resistors from the outputs of the three buffer/gain op amps to ground?
Thank you so much for the great feedback Boswell! Boswell, post:
Thank you so much for the great feedback Boswell!
Yes sir a mis on my part.
I have used this type of circuit for driving LEDs' before, I wanted to see if it would work for this app, good point though I will app some pads to the pcb.
Yes sir, this one was a typo, thank!
I was worried about erratic needle spikes when switching. but with R81 going to ground now...should be ok...thanks I will leave the pads for test points.
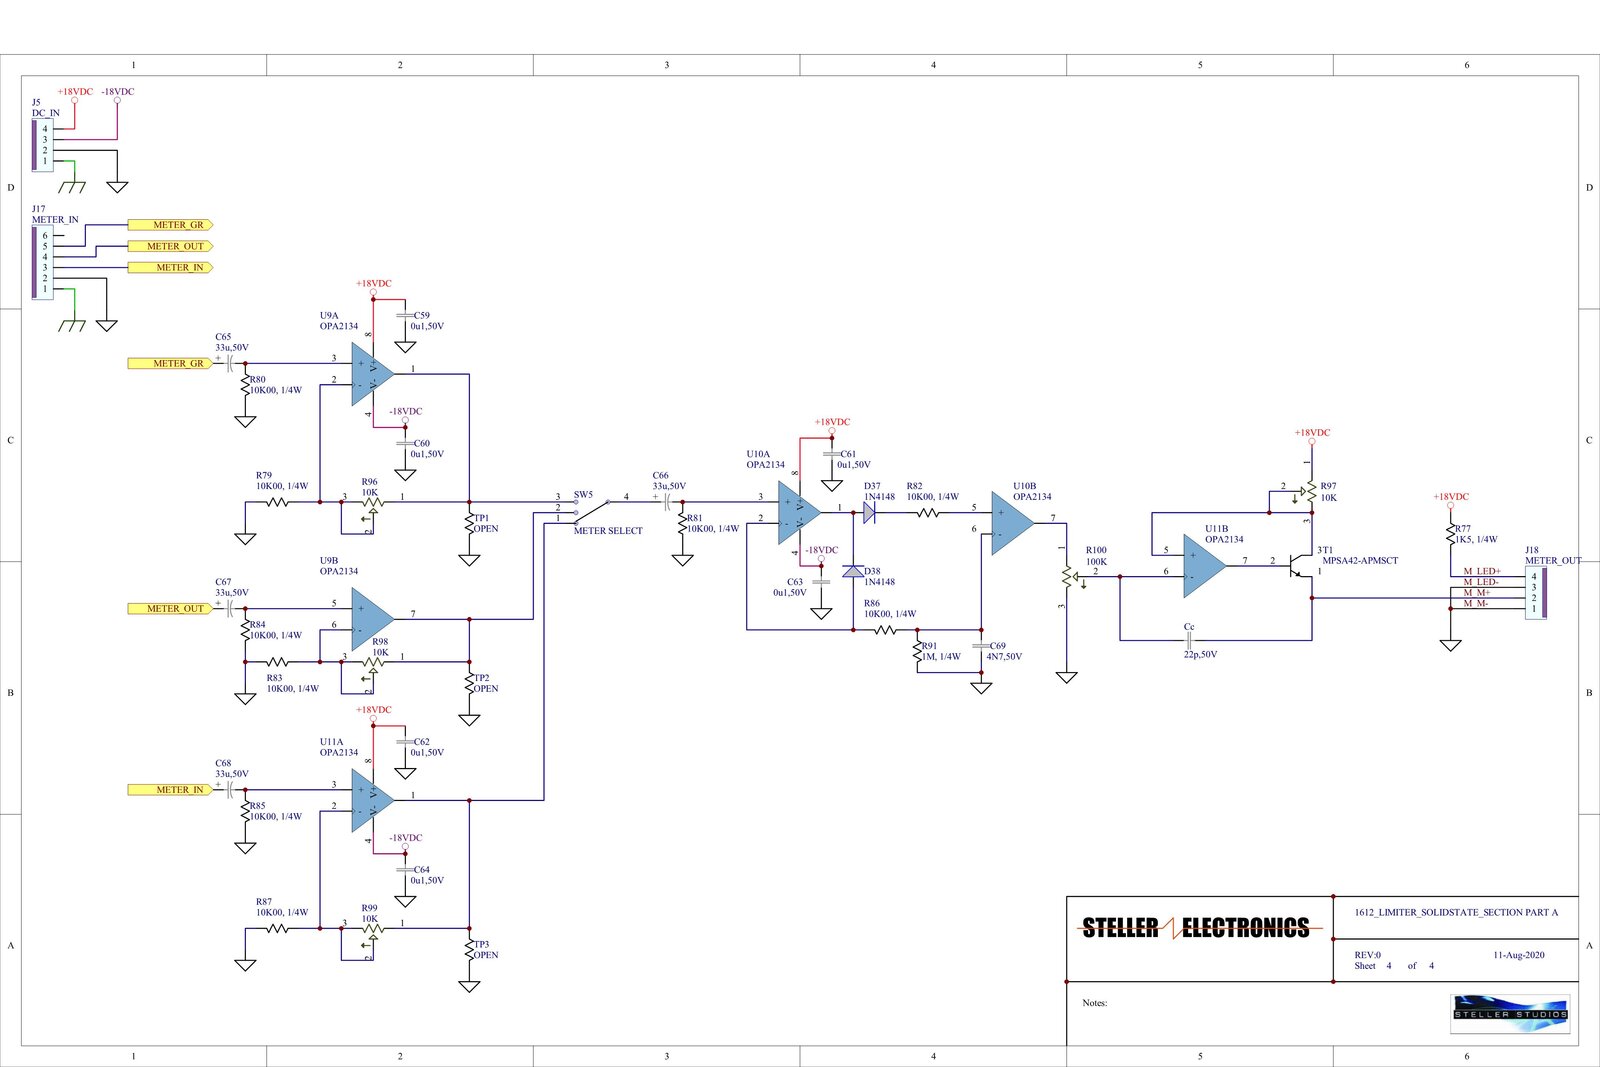
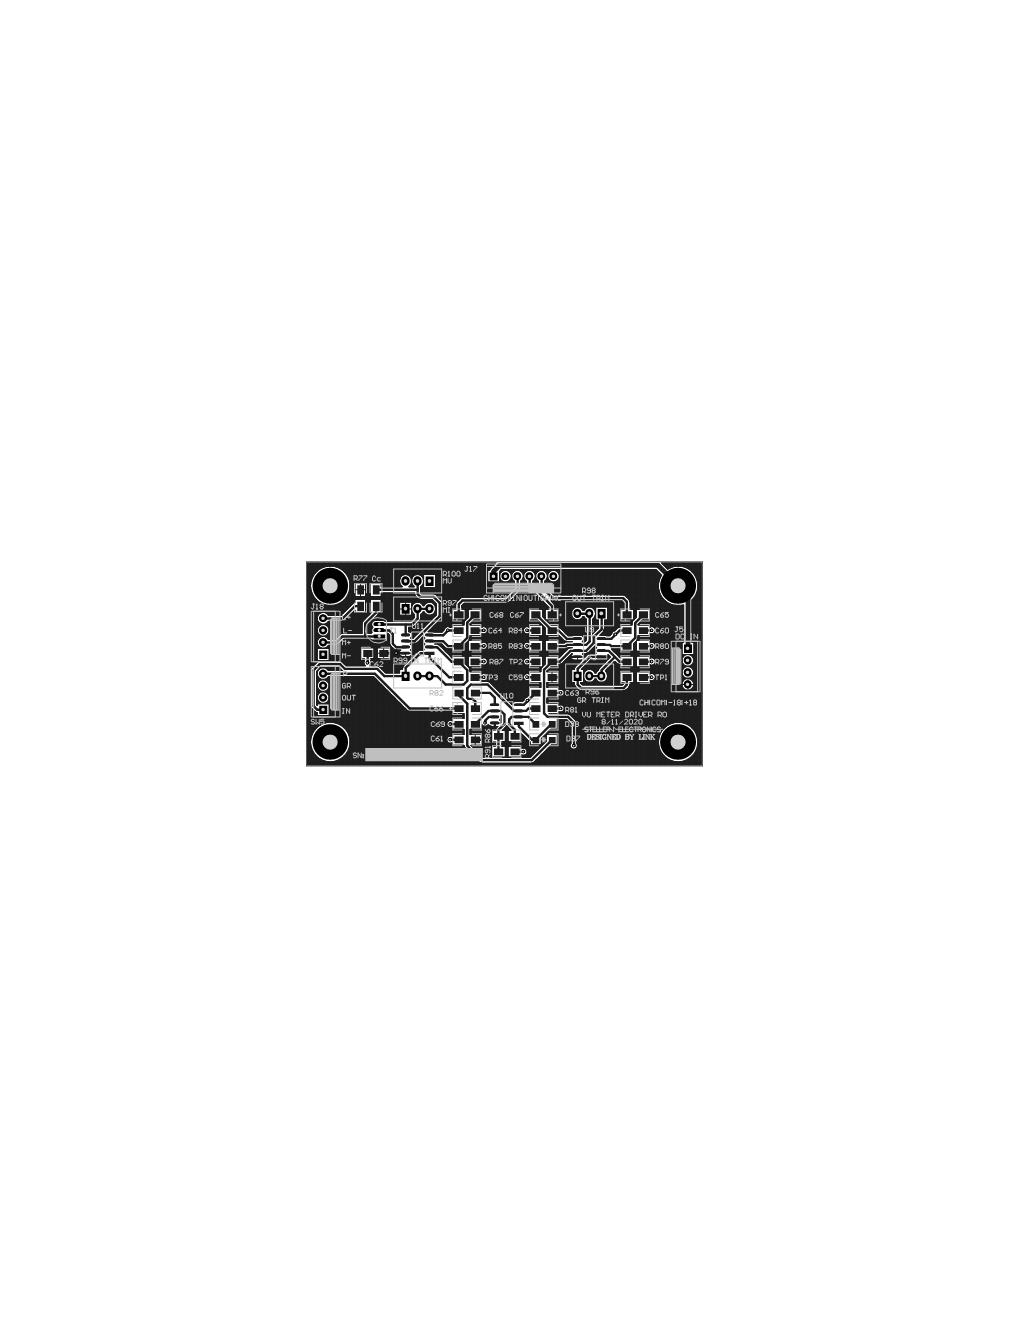

Thanks again!
11U, That's a lot of rack space for a compressor !! ;)
11U, That's a lot of rack space for a compressor !! ;)
lol... I wondered who would catch that! No it wont be 11 U... Al
lol... I wondered who would catch that! No it wont be 11 U... Although the gates 39B is 8u.... the 11u is an artifact of the software I used. I am trying for 2U at the moment, might need to be 3u though...
That's what I thought.. just teasing ;)
That's what I thought.. just teasing ;)
pcrecord, post: 465200, member: 46460 wrote: 11U, That's a lot o
Lol worked for Fairchilds
I've had a quick look at the other sheets, principally the those
I've had a quick look at the other sheets, principally the those showing the solid-state circuits. A few points:
1) There are needless 100K resistors to ground on the outputs of the 2134 op-amps on the Part_A sheet. They simply parallel the op-amps output impedance, which is a few ohms at low frequencies.
2) The Filter in/out switch seems over-complicated. You certainly need one pole for the LEDs, but can't the signal be switched by a second single pole, wiper to output and the two input poles taken from the input and output of the HP filter? The filter input would be permanently connected to the source (the FF/FB switch wiper p4).
3) Is the diff amp on the main solidstate_section sheet now replaced by the two separate ones on the Part A sheet? I assume you did not want the possibility that the switching would introduce clicks in the audio, so decided to have separate diff amps and switch between their outputs.
4) I didn't see where the GR metering signal is generated.
5) The unity-gain buffer immediately before the SC CONTROL V output gain stage serves no purpose and could be removed.
6) I'm not convinced by the attack/release configuration. As drawn, the release current has to compete with the much more powerful attack current for both charge and discharge. I would expect to find a series diode with a high value parallel resistor somewhere in the forward path.
7) You must be using low-output LEDs if you need to feed them with 18V through 1K5 resistors (~11mA)!
Thanks so much your help is greatly appreciated! Boswell, post:
Thanks so much your help is greatly appreciated!
Thanks these have been removed, these were artifacts from a de-popping thought, but the circuit has moved on...and so they should too ;)
Fantastic! I could not see the forest for the trees...I also have a bunch of 4PDT push buttons in a bin...but there is no need to use them here.
Yes that was my thinking, latest rev is below...
It was buried in the schematics... but the meter circuit has been significantly revised at lunch today...the revision is also below...the tag is METER_GR. Now that the concept is coming together I hope to breadboard it this week and mess around the idea.
Agreed removed in a earlier revision.
A question on this one: The attack and release come after the peak detector/RMS detector to you still recommend a series diode/high value drain resistor?
What can I say...I like the bright lights....
Attack/release times are somewhat personal. I've used compressor
Attack/release times are somewhat personal. I've used compressors where the metering (needle or LED) is clearly a representation of the compression control voltage, and you get used to that. However, a configuration where the needle or LED follows the attack but decays more slowly than the release when it is set to be fast can be easier to follow.
In the circuit as drawn, the 1M release control will have no effect other than suddenly to reduce the compression by up to a third as it's rotated to its fast end. The charge and discharge of C32 is governed by the selected driving circuit and the position of the 500R attack pot.
The action of a release circuit is to prolong the compression beyond the time that the signal amplitude drops away. That implies a disconnect between the drive and the output under certain conditions, and the usual way of achieving that involves a diode.
Could you say how T3 is meant to work? It's not common to have an NPN junction transistor with no d.c. path in its base connection!
Ok another lunch hour spent fixing and refining..... Boswell, p
Ok another lunch hour spent fixing and refining.....
lol ...doh...whats little bias between friends ;) or lack there of--point taken clearly a miss in my last lunch hour rush. Thanks for your help! Much appreciated
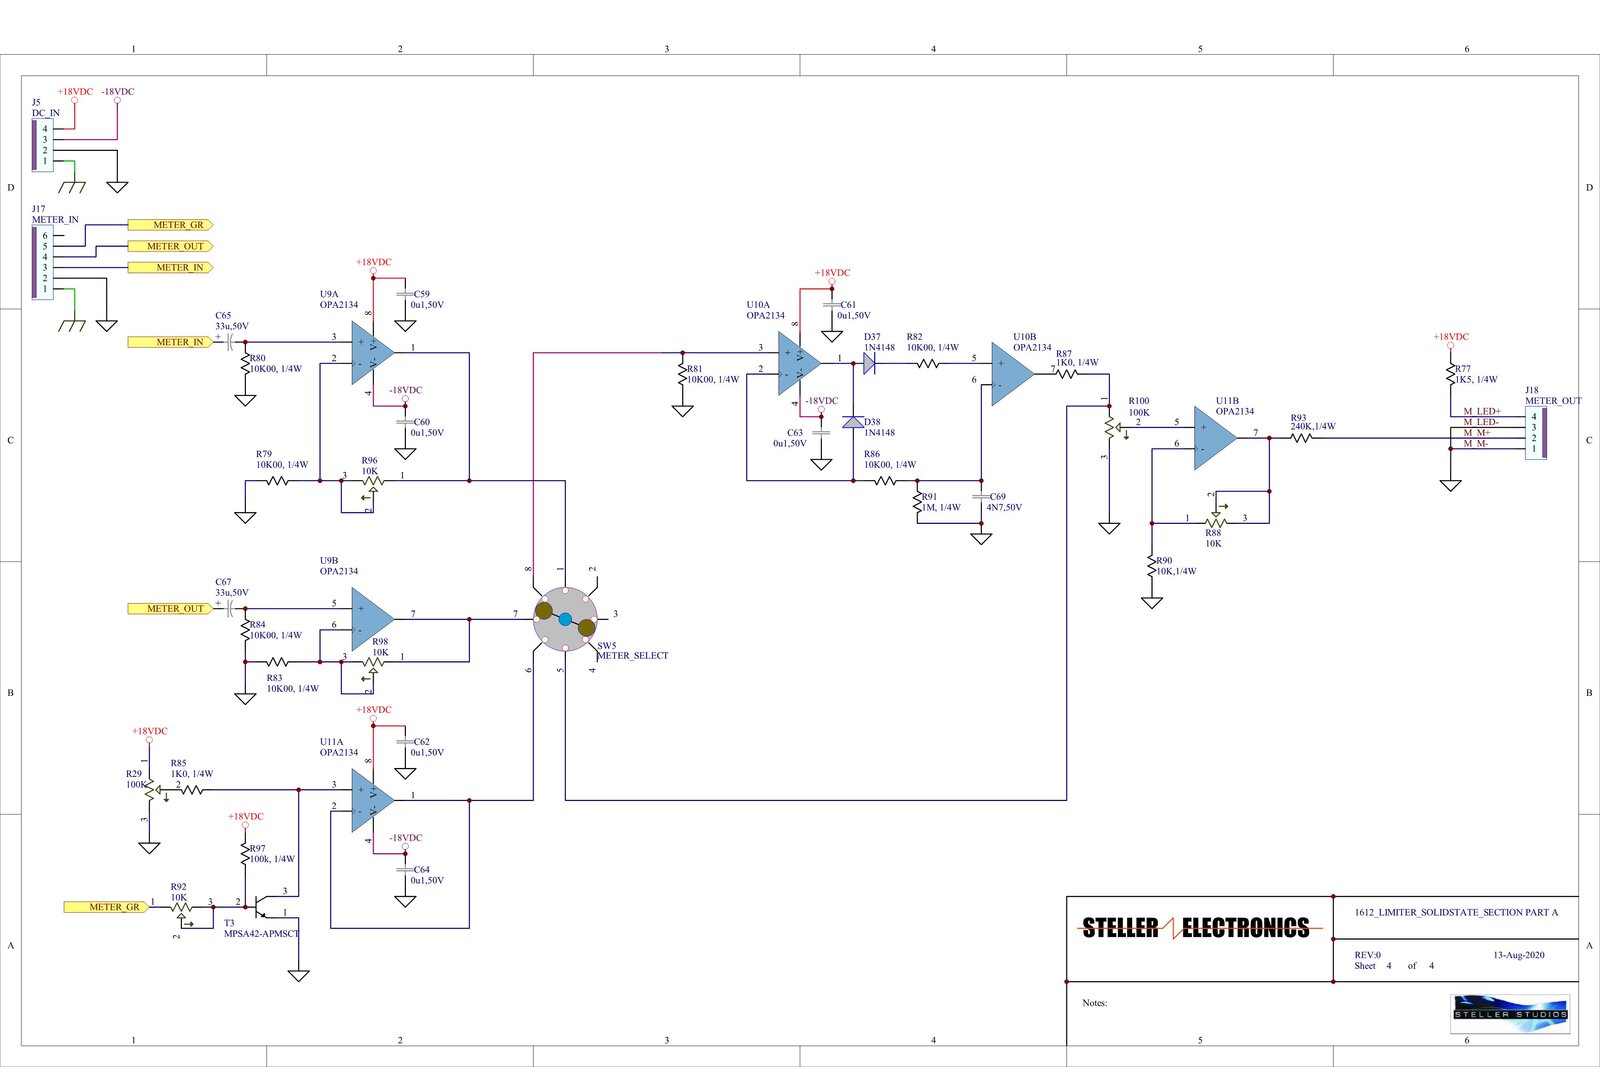
Last night I managed to escape to the garage after the kids went to bed. I breadboarded the gain reduction meter section last night and used a old meter movement I had on hand to test ...the following is where I got to... The concept is working and I only need one opamp...more refinements to come.
Thank you for elaborating and your very clear explanation. I thinking about using a comparator as the the gate to allow charge into the cap and concept you highlight as the means to keep the charge... Then foldback the cap voltage through some divider to the comparator reference input....Concept I am thinking is below...
Here is a shaking camera movie of the vu meter idea on the bread
Here is a shaking camera movie of the vu meter idea on the breadboard.
You did really well in that video to control the camera and perf
You did really well in that video to control the camera and perform all the necessary circuit actions with your other hand!
I still have two concerns about this method of metering the GR:
1) I'm not convinced that the GR meter drive will be amplitude sensitive without being frequency sensitive. You could try the breadboard circuit with a sinewave amplitude that shows some reduction on the meter and then wind the sinewave frequency up and down to see if there is a change in the needle position. The release pot will need to be set to a time constant that is an order of magnitude more than the rep rate of the signal. My worry is that the circuit may have the tendency to act as a PRM (pulse rate modulation) indicator as well as amplitude.
2) In the compression units that I have designed in the past, one problem has been getting the GR metering to represent in dB the actual compression achieved by the unit. This has meant measuring the transfer characteristics of lots of the devices used (it was hundreds in the case of Vactrols) to get an idea of spread, and then devising a non-linear circuit to replicate that in the meter. In one of the Vactrol designs (it had a series and a parallel Vactrol per channel) I used a PIC microprocessor to drive the meter, taking the data from a look-up table that had been generated and loaded into an EPROM in the PIC during the manufacturer's production test. It was surprisingly accurate, and very necessary for stereo bus compression/limiting.
I've never myself designed a 1612 as an audio gain control, but I know from the Gates leveller and others that multi-electrode valves (tubes) can be made to work in this way. What the control law is in terms of dB per volt I have no idea, nor how non-linear it would be. Matching a GR meter circuit to whatever law that turns out to be could be a tricky operation!
Very interesting... always looking to add a PIC! The meter in th
Very interesting... always looking to add a PIC! The meter in the gates was not at all accurate. And I completely agree the GR reduction circuit interface circuit to the 1612s is the crux of this design. I will try the frequency sweep and I also want to bread board the rms and peak detectors using a THAT 4301 to see what surprises I find there. Thanks so much, I would love to hear more about your PIC based meter. I have a few DSPIC33’s screaming to be used...
Snuck out to the garage before the kids got up.... here a quick
Snuck out to the garage before the kids got up.... here a quick sweep from 10hz to 30kHz.. there is about a .2vpp change over that span. On the meter itself there is a small amount of movement.
At 70khz the transistor no longer pulls down the input of the opamp.
That's going to be fine. You've managed to get the width of the
That's going to be fine. You've managed to get the width of the pulse to vary inversely with the number of pulses per second pretty accurately, so well done! I was worried about the frequency range over which that would be the case, and also that the pulse was not bottoming cleanly.
Thanks Boswell! I will now try to try to get time to breadboard
Thanks Boswell! I will now try to try to get time to breadboard the rms and peak detector ....
I breadboarded the RMS detector using the THAT 4301... this bit
I breadboarded the RMS detector using the THAT 4301... this bit..
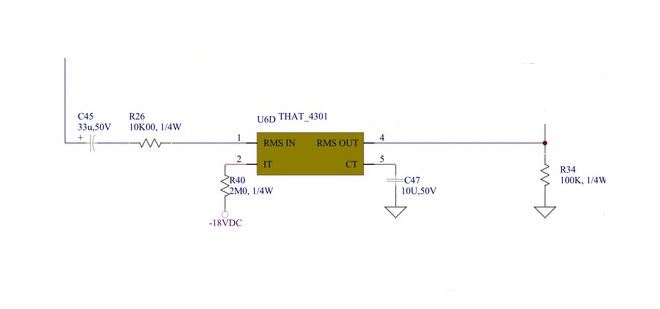
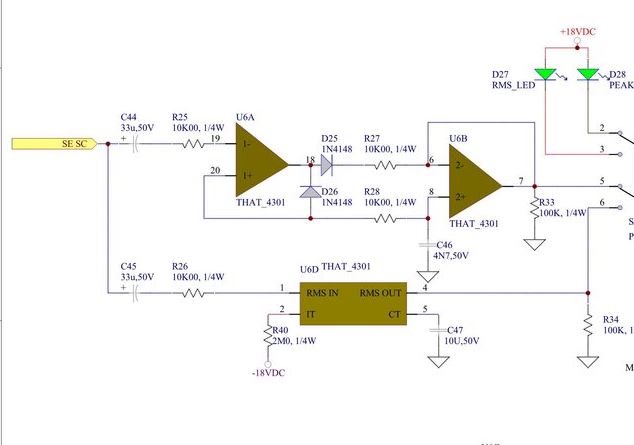
It worked first try all though I will need to add a gain stage to tune the output range. I tried using the remaining opamps in the 4301 to create the peak detector and could not get the expected rectified signal. Might be a wring error, or something inside the chip that I need to understand better....
Link555, post: 465256, member: 31690 wrote: I tried using the r
The op amps in the That4301 are pretty low-spec, with relatively large bias currents. It's possible they don't like working with the inputs to two amps supplied half the time from a capacitor. Also, I didn't check this, but it looks as though the + and - inputs of the first amp may be interchanged.
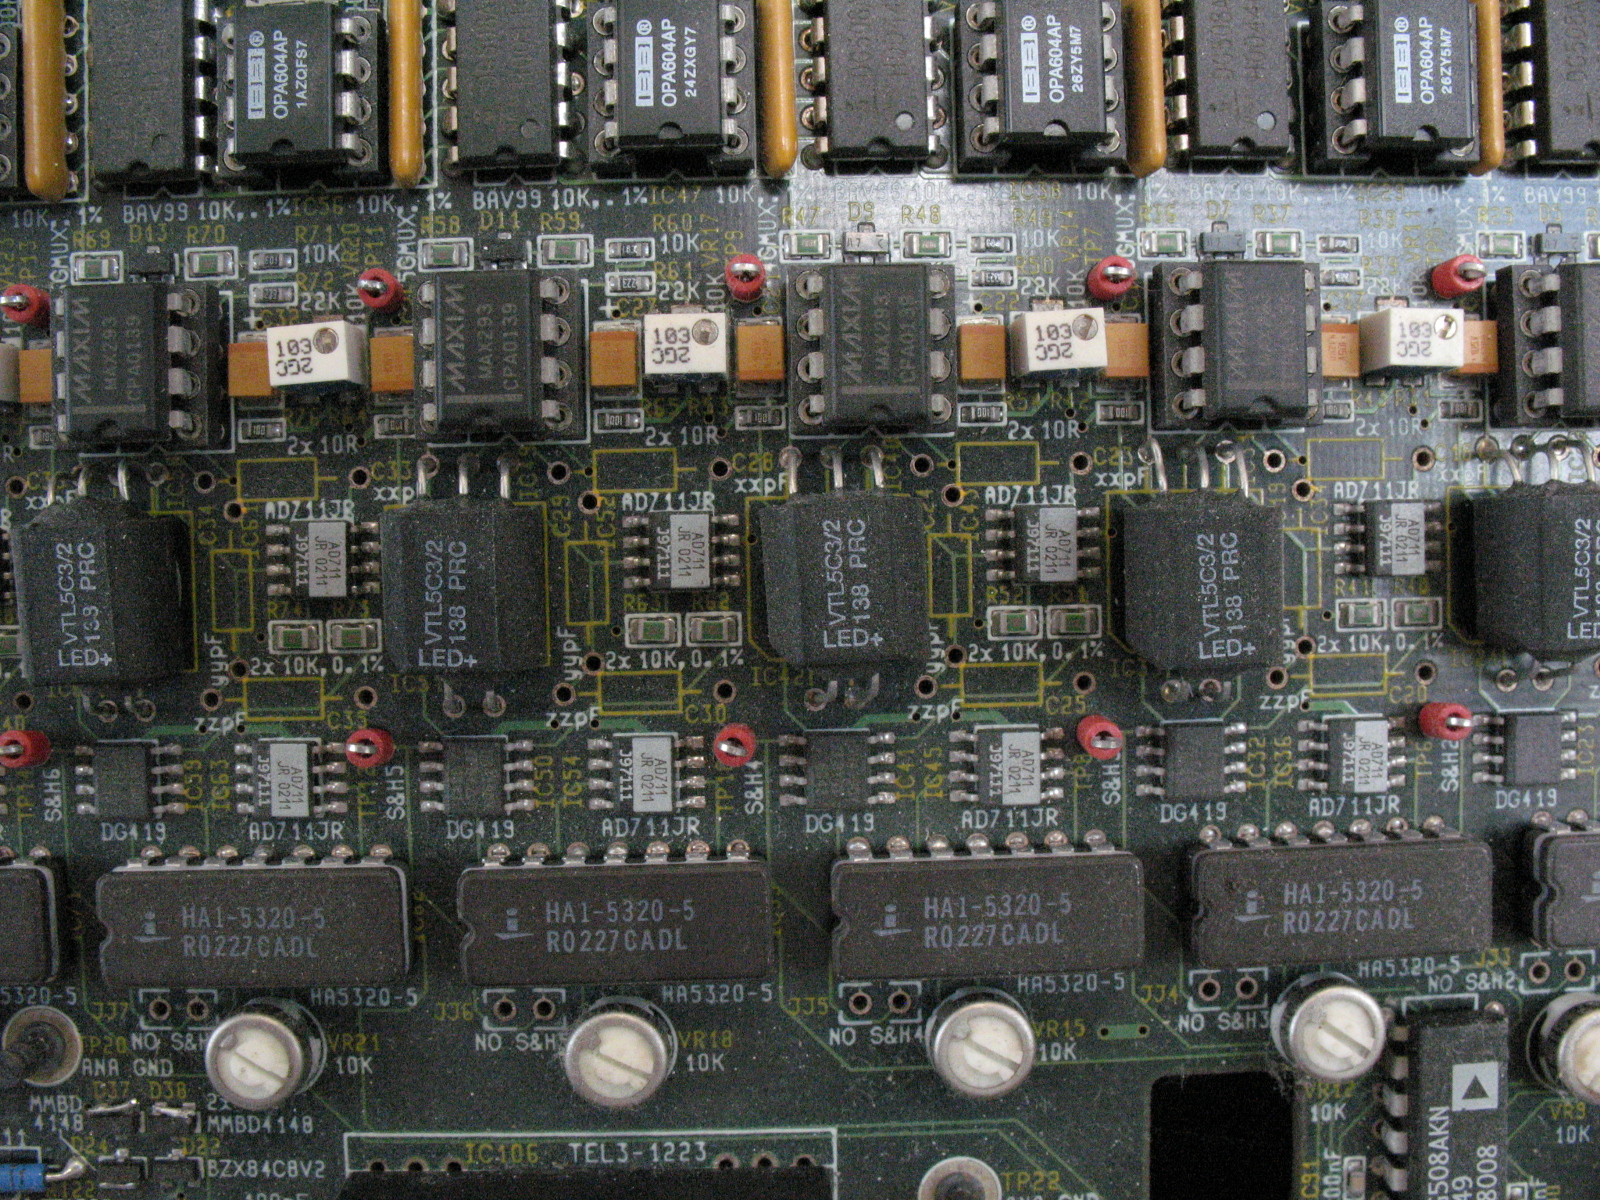
Here's a shot of a part of one of the boards I designed (20 years ago!) showing 2-pole LP filters using Vactrols. I got the filters to track (dynamically change their cut-off frequency in response to an external demand signal) accurately over a 4-decade frequency range. Depending on the capacitors fitted, that could be, for example, from 5Hz to 50KHz. I'm showing this because the Vactrols are the same series of device that I used in the compressor design I mentioned previously, but I can't show that one for contractual reasons. The Vactrols are the black packages going roughly across the middle of the photo.
Yes! that was exactly what was wrong, a schematic drawing error.
Yes! that was exactly what was wrong, a schematic drawing error....once a flipped the first opamp inputs I got more of what I was expecting...
Very cool design....I actually messed around with vactrols last year in a LA4 (NSL 7053) mod, they were much faster attack and release then the standard LDR....
https://m.facebook.com/Steller.ca/photos/pcb.2784468024907312/2784461394907975/?type=3&source=48
The board Layout looks fantastic BTW
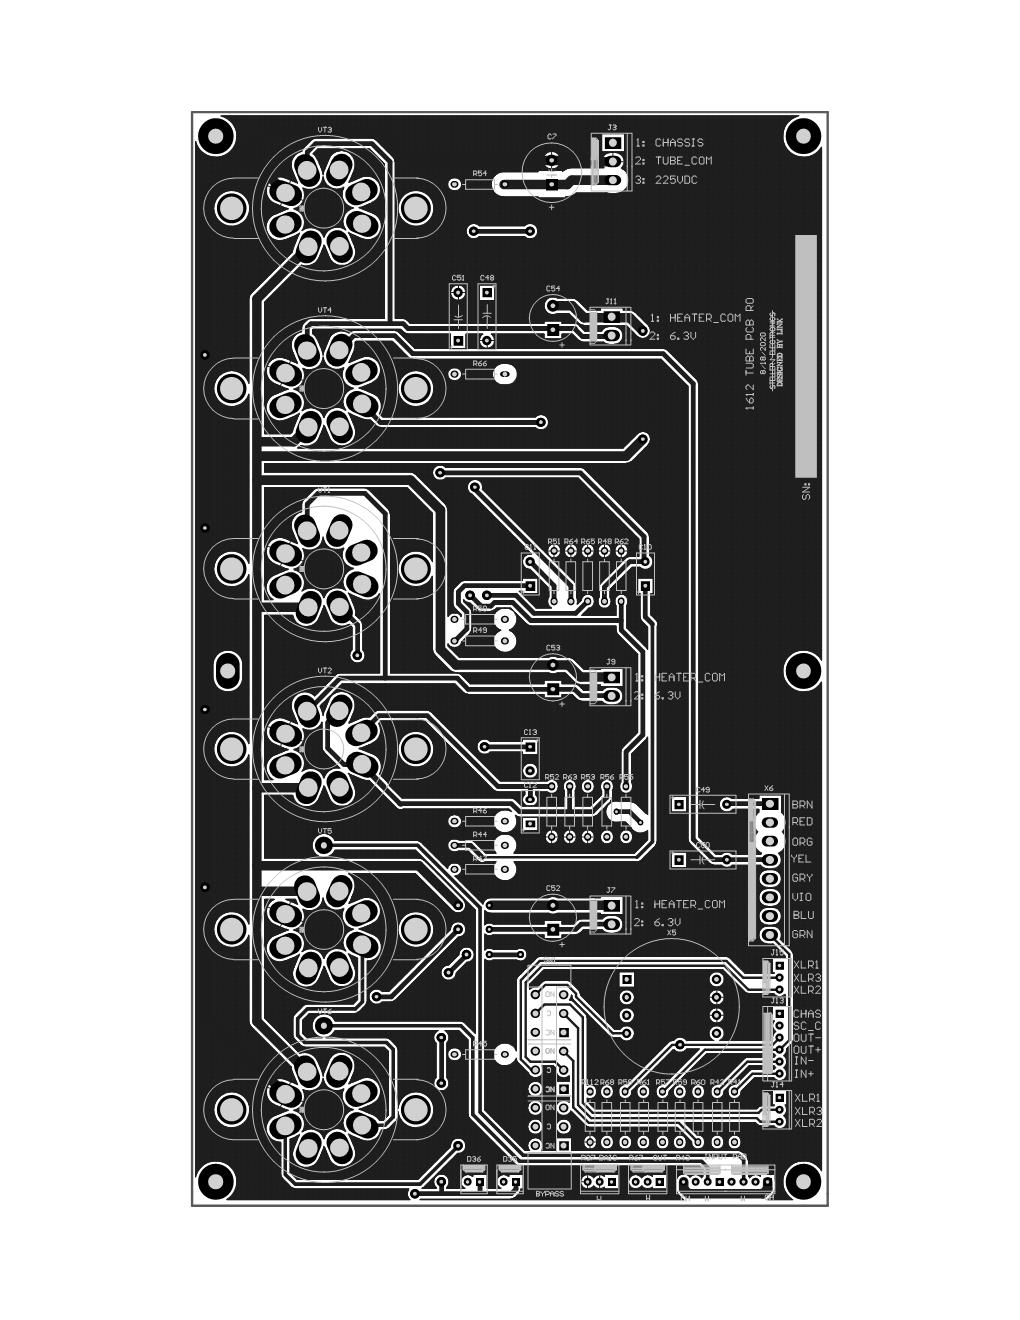
lunch hour rush today...finished the Rev 0 TUBE PCB layout....en
lunch hour rush today...finished the Rev 0 TUBE PCB layout....ensuring the proper spacing for the 225Vdc rail...using IPC2221B- worked out to be 50mil min...I went for 60mil clearance....
Link555, post: 465262, member: 31690 wrote: lunch hour rush toda
Look sexy !! ;)
Yes, it's looking pretty good. I would put the fatter heater tr
Yes, it's looking pretty good.
I would put the fatter heater tracks on all the 6.3V traces.
Have you got a large enough pad size for the transformer leads?
Was your reasoning behind not putting the heater regulators on this board and just bringing in the raw heater feed that you wanted to mount the LM317s on heat sinks on the PSU board?
Do the 1612 top caps feed directly from the input level pots?
Pagination