I thought I'd start a "companion" thread to the other Samplitude thread, where Sam users cn share tips and tricks for the platform. As with any DAW prog, there are various little things that are helpful to know.
I'm going to repeat a post I made in the other Sam thread, because I think it's a valuable thing to know, this is a Kraznet video which instructs a user on how to revert to previous menu layouts:
Topic Tags
Comments

There are some great Sam and Sequoia instructional videos on You
There are some great Sam and Sequoia instructional videos on YouTube. Tim Dolbear does a great job to be sure, but there is also another user - who isn't employed or connected to Magix in any way - who has also taken a great amount of time and care in producing wonderful Samplitude instructional videos on YouTube.
Kraznet has saved me in helping me solve problems, so many times, I've lost count. He is incredibly helpful on the Samplitude Users Forum, but he has also produced these great instructional videos, too.
I cannot stress enough how very well-done and incredibly helpful Kraznet's Samplitude youtube instructional videos are.
This guy is amazing; clear, concise, in-depth, and he explains things in an easy-to-understand way, step by step.
If you are a Sam user, you owe it to yourself to bookmark his videos. I've yet to come across an issue that he hasn't covered and explained how to correct.
https://www.youtube…
He also has several videos on the analog modeling section of Pro X, (3 episodes on am-munition alone) and along with Chris's sage advice, he has made a huge difference in how I now approach my 2-Bus structure.
I can say with complete honesty that I'd be lost in the tall grass without him.
FWIW ;)
De-Essing in Samplitude: I'm not crazy about de-essing plugs, b
De-Essing in Samplitude:
I'm not crazy about de-essing plugs, because they have a tendency to pull out the good stuff along with the bad.
There is a way to de-ess in Samplitude ( Chris is aware of this as well) that I thought I would post here, for those who might feel the same about de-esser plugs.
Your main focus for this will be in Object Based Editing.
The following is based upon the Samplitude 11 menu layout. If you want to know how to switch to that menu version to best follow these instructions, follow the Kraznet instructional vid at the top of this page.
(you can change it to 11 temporarily and then revert back to whatever menu layout you like after)
1. Go to the "Edit" menu at the top of the screen. Open it, scroll down, and select "auto crossfade active". (auto crossfade mode seems to work best for this process, with the least amount of "abrupt" editing artifacts. You can try it with the auto crossfade inactive if you want, just uncheck it at the bottom of the editing scroll down menu... but I personally prefer the auto crossfade mode)
2. Go to the vocal track you want to work on, and highlight it.
3. Find the sibilance section you want to modify. Zoom into the section so you can see where it begins and ends.
4. In the menu section, select the "Object" menu.
5. Select "split objects". Split the "sss" section just to the left of where it begins. Now, go to where the sibilant section ends, and split the object again.
(The "sss" will look different than the other sections, consonants and syllables. This will vary a bit from vocalist to vocalist, but essentially, it will appear very similar in its physical appearance from singer to singer..)
6. You have now created an object of only the sibilance. If this section isn't highlighted by default, do so now.
7. Now, at this point, you can either select the volume node of the object and bring the db of the "sss" down in amplitude, or,
8. You can open your object editor (right click on the section highlighted and select "object editor) and once that opens, select the 'FX" tab, which allows you to adjust EQ, add filters, compression, etc. This is where you can attenuate the hi frequency EQ in the range of the sibilance, either by using the stock 4 band parametric, or by adding the 116 EQ if you wish.
9. Make your changes in either the volume of the sibilant section, or, through EQ in the Object Editor. Audition the "sss" section, giving it a bit of pre-roll so you can hear the edited section relative to the rest of the track.
Adjust accordingly.
That's it! You'll notice that you have now attenuated the sibilance only without also attenuating the same frequency(ies) that sound good during the other sections of the vocal.
I know it may seem like a lot to do, and perhaps even convoluted to some, but it really isn't once you get used to the process. I can de-ess a vocal performance in a 4 minute song in around 10 minutes, and the results are much better and far more natural sounding than using a standard de-esser plug.
Object Editing is awesome. And this is but one out of many processes you can accomplish using this editing mode. :)
FWIW
d.

@Chris @TimDolbear And any other Samplitude users out there....
@Chris TimDolbear
And any other Samplitude users out there....
Here's the newest Samplitude trick/tip:
"Comparasonics".
I stumbled on it yesterday, and man, it makes editing so much easier...
For example, when de-essing, I tend to use Object Editing for this task, as opposed to inserting a de-essing plug on the vocal rack. The reason I prefer to do it this way, as I've mentioned in the past, is because anytime I've used a de-essing processor, it always seems to also remove frequencies that I don't want to remove.
It's a great way to zoom in and filter - or attenuate - sections of sibilance.
The only downside to this is that - while "sibilance" has a very distinct and definitive "shape" to its waveform - it can be tough for the eyes to single out, when working with a whole track where the entire waveform is the same color.
Enter "Comparasonics".
This feature in Sam, allows you to view frequencies by colors.
So now, when looking for areas of sibilance, you simply look for the same color to appear throughout the track. In my case, sibilance comes up as an "off-pink" color.
(I don't know if this color is chosen by Sam, or if it's also dependent upon your Windows color theme... I'm still trying to find out)...
So, because the sibilance shows up as the same color every time, not only can you find it immediately, but also, when you separate the sibilance out from the other parts around it, you can see exactly where the sibilance begins and ends, so you don't have to risk attenuating sections that you don't want or need to.
If you're already aware of this feature, just disregard this post, but, if you haven't checked it out yet:
1. In Samplitude, Go to your System Options Menu (or just hit "Y" on your keyboard to open the menu)
2. Scroll down to "Design" and then select "View Options".
3. a new menu will appear. To the right side, about 1/2 of the way down, under the heading "waveform colors", you will see a box next to the selection "comparasonics/color"
4. Check this box, then select OK to close the system menu
5. Give Samp about 30 seconds ( or so) to change your wave files graphics from standard view to the Comparasonics frequency specific colors view.
It makes editing so much easier, especially for guys like me, who's eyes aren't what they used to be. ;)
Below, in the following posts, are some graphics examples of how to set it up, and what it does.
See below.
-d.

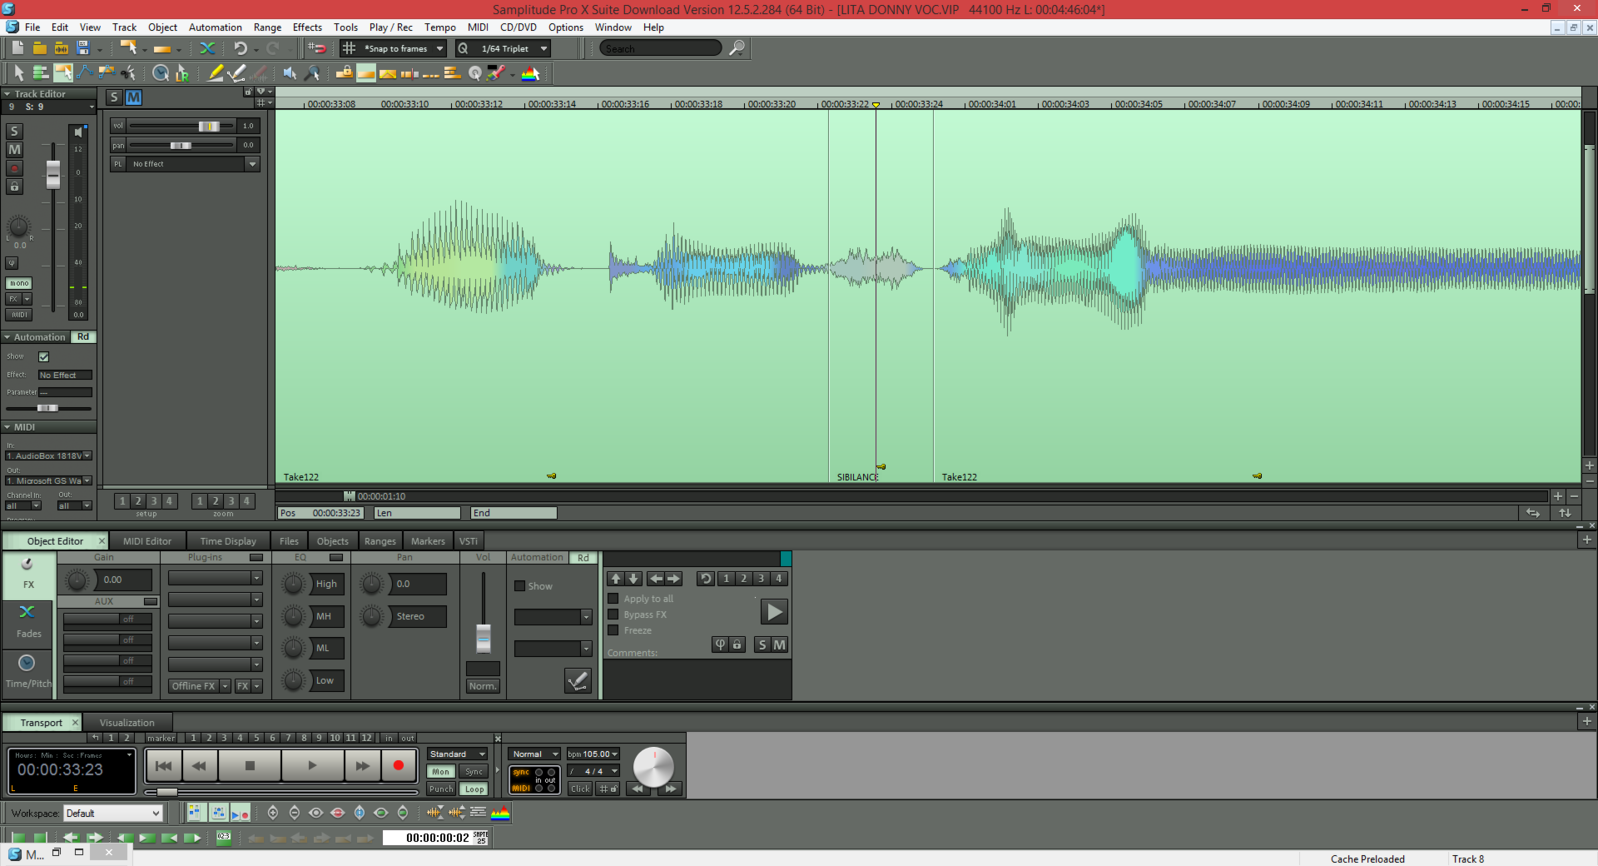
If you notice in the pic below, the area that is shaded light pi
If you notice in the pic below, the area that is shaded light pink, and has the cursor directly in the center (for identification purposes only) shows the area of sibilance. Now that comparasonics has been activated, you can see where sibilance occurs, simply by looking for that color.
And, anytime sibilance occurs on this track, you'll be able to identify it so much easier, because all you have to do is look for that color.


Spectral Correction Very complete explanation, [[url=http://[/U
Spectral Correction
Very complete explanation, http://www.soundons…

DonnyThompson, post: 425653, member: 46114 wrote: If you notice
DonnyThompson, post: 425653, member: 46114 wrote: If you notice in the pic below, the area that is shaded light pink, and has the cursor directly in the center (for identification purposes only) shows the area of sibilance. Now that comparasonics has been activated, you can see where sibilance occurs, simply by looking for that color.
And, anytime sibilance occurs on this track, you'll be able to identify it so much easier, because all you have to do is look for that color.
Many thanks for that info. Wonderful.
I thought I'd add something that I've been doing for quite awhil
I thought I'd add something that I've been doing for quite awhile in Samp, in that it may be of interest to other Samp users...
The subject is Object Editing.
I'm basing this on my own version of Pro X Suite, but I'm sure that you can also do this in Pro X 2 - because Object Editing is one of the most powerful features of Samplitude, regardless of the version (Sequoia too).
Object Editing
You can select ( or create) an object simply by selecting and highlighting the audio on a track in the timeline... at which point you can place your cursor anywhere in that range that you want; and "split" the file:
1. select audio on a track,
2. go to the Object pull down Menu at the top of the screen, select "split".
3. Then go to where you want that range to end, place your cursor over the point in the timeline that you want, and split it there as well.
You know have an "object".
4. click on the range you've created, which will highlight the object.
5. Now, right click on this object, and select "Object Editor". This will open the Object Editor Display, where you can insert FX, sculpt EQ, set panning, do pitch correction, lengthen or shorten the time/duration, and set volume for the object.
EQ:
There is a stock 4 band EQ in the Object Editor, but you can also insert other EQ's as well, if you have others that you like. In Pro X Suite, the 116 EQ is able to be added as a VSTi (in Pro X 2, Magix has made the 116 EQ the new stock EQ to replace the older 4 band).
You can now EQ just that object, without effecting the rest of the audio in the track. Anything you do to this object is for that object only, so if you add reverb, delay, EQ, GR, etc., it will only be for the object that you have created/selected.
Other uses of OE
OE really comes in handy for many tasks other than just EQ. Because the object you create can be as large or as small as you want, you can effect an object as small as a note - kick hit, snare strike, etc. It can even be as small as the sibilance before an actual note ( I use OE for de-essing all the time now... I haven't used a dedicated de-esser plug for quite some time. )
Here's an example:
Let's say that you have a bass track where everything sounds pretty good, but there are a few notes here and there that need some work; you can create an object as small as just one bass note. So, let's say you have a bass guitar note, one in particular, that sounds "woofy", or "muddy"... create an object that is only as big as that one note on the bass. Open your Object Editor, and you can fix the EQ on just that single note.
Once inside the Object Editor, you can also insert other filters and processors... things like restorative VSTi's to get rid of crackles, clicks, noise, etc.
Or, you can change the pitch of just that one note. Let's say there is a note you would like to change... perhaps it's not necessarily a wrong note, but you would like to change that note to another (perhaps an inversion)...
Create an object of just that one note, open the object editor, and you will see a "pitch/time" tab to the left. Click on this tab, and you can alter the note - either by typing in the number of steps you'd like to raise or lower the note, or by using the "rotary" pitch adjustment. You can audition as many different changes as you like, in real time. Find the interval that you think works best, hit "enter" on your keyboard, close the object editor, and the note has been changed.
These are just a few examples of what you can do with Samplitude's Object Based Editing feature. It's an incredibly powerful and flexible tool... so, if you own Samp but aren't using the OE, you're missing out on one of the coolest features of the program.
FWIW ;)
d.
@audiokid, @kmetal , @DigitaLWizarD , @Kurt Foster , @pcrecord
audiokid, kmetal , DigitaLWizarD , Kurt Foster , pcrecord
Samplitude Pan Laws
While Samp's pan law defaults to 0db globally, You can set the pan laws for each track, aux and bus independently.
Right-click over the pan pot on the track, bus, or aux you want to adjust.
A pan menu opens, which allows you to choose between 0db, -3.0 db, -4.5 db and -6db (mono source). This menu also allows you to swap channels, invert phase, adjust sides, M/S and other parameters.
You don't have to set your system globally, nor would you want to in certain mix scenarios. You can even do this with tracks assigned to buses or aux's... changing one doesn't change the other. For example, a situation might call for you to want a track to be set for -3db, but you don't want the stereo bus that it's assigned to to also be at -3db. Right-click on the pan control of the track, set your pan law for -3db, and that track is now set for that pan law without the bus that it is assigned to also being set at that -3db law.
Another useful feature in this same pan menu, is a rotary function which allows you to narrow / widen the field on stereo tracks. You can set this all the way to full-wide stereo spread, down in adjustable increments- all the way to mono, if you wish.
This comes in handy when working with stereo samples/VSTi's which are wide by nature, and which often sound good on their own, but which may not necessarily be what you want when fitting that sample into a mix.
FWIW ;)
d.
cool, Q: in regards to using different laws in the same session
cool,
Q: in regards to using different laws in the same session, aren't panning laws sort of the same as volume level of the pan?
In other words, in your process here Donny, would this be similar to adding more volume to the L/R of a stereo effect ? A widening process that can be achieved from a M/S or room simulation effect as well?
audiokid, post: 429273, member: 1 wrote: aren't panning laws sor
audiokid, post: 429273, member: 1 wrote: aren't panning laws sort of the same as volume level of the pan?
If you consider that panning is turning down one side (and turning up the other), you're aural perception will make it sound like the level attenuates as you move away from the middle position (detente), and come up in volume as you moved back towards the middle of the stereo field.. so, as you are moving, when it gets to the middle, the volume will sound like it is increasing, and that's not always something that we want to have happening.
Essentially, pan law is the level that the perceived volume level is attenuated as you move towards the middle, to keep a more "consistent" volume level as you are moving. There are consoles that use a -3db law (SSL was one), while other DAWs or desks might use -4.5 or even -6dB.
As far as DAW's go, back when I was working in Sonar, I could only choose a pan law globally - which effected everything... tracks, aux's, buses/groups... all at once. I didn't have the ability to set one track at one pan law without effecting all of the others. ( this may have changed, the last version of Sonar I was using was PE 8). The drag about doing it this way, was that if I wanted a certain track to have a -3db pan law, I was also forced into having it's corresponding aux returns and buses having that same setting as well.
As I mentioned in my previous post, in this same menu is also a stereo/mono "spread" adjustment, and having the ability to adjust the spread can be very useful. As you and I have discussed in the past, often times, stereo samples can be really tough to work with in a mix. Sometimes these stereo samples sound great on their own, and have a particular "wow factor" when we listen to just the samples by themselves... but ... when it comes time to fit them into a mix, they can often be troublesome. Having the ability to adjust the spread - to any degree that we want incrementally - unlike other platforms that only give you a choice between one or the other - "hard" stereo or "hard" mono - is a great tool to have. You can take a stereo VSTi, and narrow or widen it as much as you want, and this feature can really help in terms of getting it to sit in the mix with volume balance, depth, space - and phase.
For example. in this latest mix I've been working on, one track was a stereo Rhodes sample, and while I loved the sound, the built-in tremolo effect (which Fender Rhodes Pianos had) was sweeping back and forth far too wide, and it was becoming really distracting. So, as opposed to just converting it to straight mono, or dual mono, I was able to go into the Pan Menu and change the pan law to just that track ( to -3db), and, to also narrow the width of the stereo spread of the sample... which still gave me a nice sound and effect, but which allowed me to get rid of that very wide L - R oscillation from the tremolo effect that was originally so distracting. The result was that the Rhodes sat in the mix very nicely, and made it far less difficult to balance with the other pianos.
:)

It's important to keep the concepts of pan law and width adjustm
It's important to keep the concepts of pan law and width adjustment separate, but it's true that consoles and DAWs tend to push them together, along with "balance".
I find I rarely have to think about pan law because I almost always place a mono source in the L-R sound field first and then adjust its level as required in the mix. At no point in this process would I do anything different if the console (or DAW) had a different pan law.
Width comes into play when you have stereo sources or things like stereo outputs of effect units. It can also be applied to stereo stems, buses and sub-mixes, for example, a drum kit sub-mix. Width is adjusted by converting an L-R stereo source to an M-S pair, adjusting the level of the S term relative to the M term and then re-converting back to L-R. While in the M-S domain, you can also apply EQ to the M or S components separately, so that, for example, low-frequencies can be forced into the centre of a stereo image.
Boswell, post: 429278, member: 29034 wrote: I find I rarely have
Boswell, post: 429278, member: 29034 wrote: I find I rarely have to think about pan law because I almost always place a mono source in the L-R sound field first and then adjust its level as required in the mix. At no point in this process would I do anything different if the console (or DAW) had a different pan law.
as is the same for me.
Boswell, post: 429278, member: 29034 wrote: Width is adjusted by converting an L-R stereo source to an M-S pair, adjusting the level of the S term relative to the M term and then re-converting back to L-R. While in the M-S domain, you can also apply EQ to the M or S components separately, so that, for example, low-frequencies can be forced into the centre of a stereo image.
which is what I appreciate most with M/S. I tend to hpf sides. AM Munition is wonderful at this. Its the main reason why I stopped using the Dangerous Master now. Sequoia is a wonderful DAW.
I almost always HPF the sides of an M-S mix, commonly around 125
I almost always HPF the sides of an M-S mix, commonly around 125, but sometimes even as high as 250, depending on what the content is.
Am-munition is great for M-S and shaping the facets of it.
I love being able to set GR (and all of it's parameters - Gain, Attack, Release, Ratio, etc.) on the Middle and the Side(s) independently from one another.
FWIW, Chris ( audiokid )was the one who clued me in to all of this. After he told me about it and what it could do, it was like a brand new door had opened up on my mixes.
Here's another tip: If you've installed both 32 and 64 bit vers
Here's another tip:
If you've installed both 32 and 64 bit versions of Sam on your PC, generally, the shortcut that appears on your desktop after the install, is connected to the 32 bit version only.
Here's how to create a desktop shortcut for Sam64 :
Open your Magix directory - in most cases this will be found at C/Program Files (x86)/Magix/Samplitude.
Scroll down and locate the "Sam 64" icon. DO NOT drag this icon onto your desktop - the shortcut won't work.
Instead, RIGHT CLICK on the icon, and select "create shortcut". It will then ask you where you'd like the shortcut to reside, choose "desktop".
You'll now be able to click on the Sam 64 icon on your desktop and it will open the 64 bit version of Sam Pro X.
FWIW
d.