Hi!
I have been slowly working on building out a new room in my basement for practicing/recording drums.
It's been a slow process, that has thus far involved removing water heaters, and breaking up the concrete floor to re-route the water main so that I have a relatively unobstructed floor space to work with.
I have about 8' 4" from floor to the bottom of the ceiling joists, and about 11 1/2' x 14' of space to work with.
As a side note, the rest of the basement is finished, and the lovely wife isn't wild about me tearing that stuff apart as I do my build.
I have started beefing up the existing subfloor above my space using 'rods method' of adding two layers of 5/8 drywall between the joists, with green glue, and then battening them into place with 1x2.
My plan is to build the 'room in a room' and have a new "inner ceiling" supported by the new framing I build.
In the picture attached you can see what I have going on thus far.
My questions are:
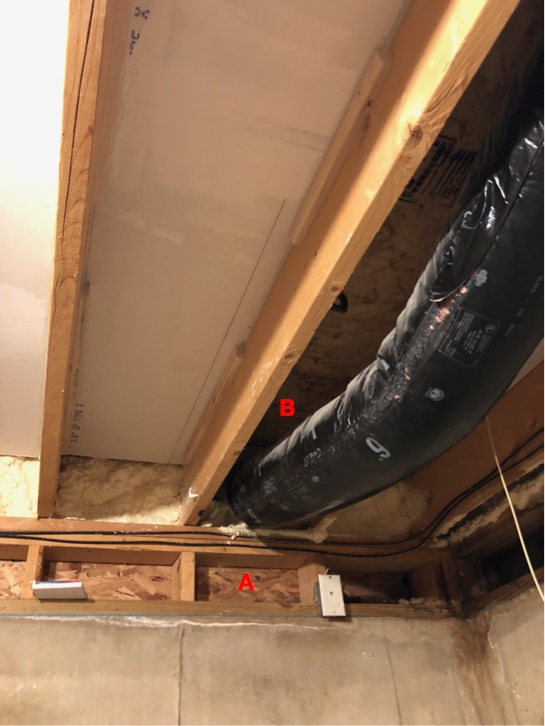
In the attached picture, you can see a space (labeled A). On the other side of that is the brick veneer of my home.
If I seal that area up with drywall and acoustic sealant, am I essentially creating a small 3-leaf system once I have my drum rooms walls built? Should I fill that cavity with layers of drywall? just insulation? Or is it such a small space that I shouldn't be fretting about three leaves?
Also, Above this ceiling is our 'formal' dining room (not used much).
In the space labeled "B" you can see the ductwork feeding the vents in that dining room.
Keeping in mind that I AM going to be building that decoupled "inner" ceiling, what should I do about that duct and vent feeding the dining room?
Comments
Jason Morris, post: 459638, member: 51197 wrote: A couple of rea
Jason Morris, post: 459638, member: 51197 wrote: A couple of reasons.
1) There was too much electrical running thru the existing joists for me to tear out and redo. I think darn near all the electric in the house converge and go thru the joists of that room. That would have been a nightmare.
2) Running the joists perpendicular kept my spans shorter so I could use smaller joists.Tucking into the bays as per Rod's book would have given me a bit more headroom, that is true, but acoustically the inside out ceiling will be just as "high" as if I had run the inner joists between the existing.
Cool man, sounds good to me, just wanted to double check.
So here is a simple question.. I have pretty easy access to th
So here is a simple question..
I have pretty easy access to the electrical panel from my drum room.
I am planning on only making a single penetration for my electrical, and a separate single penetration for ethernet... So, yeah two 'single' penetrations. ;)
Anyway.. Should I make them thru the plywood and drywall "leaf" or thru the 2x4 framing?
Once I make mypenetration, I can run the cable thru the space between the inner and outer leaf, then thru the existing ceiling joists over to the electrical closet. The electrical panel is only a couple feet away from the drum room.
and of course I will be filling the holes with acoustic caulk. I dunno. my gut says go thru the top plate (2 2x4's) but I figured I'd throw the question out here and see what you guys said before I started drilling holes I can't undrill.
If the hole is a vertical hole thru the top plates, thats fine.
If the hole is a vertical hole thru the top plates, thats fine. If the hole/ cable run is horizontal then thru the wall sheathing is fine. If running thru both leafs, stagger the hole so its on one bay on keaf 1, and another on leaf two.
You may want to run some pvc pipe to allow for easy cable running after the build is done. This helps in case of expansion or repair. If you run piping, incorporate a couple 90 degree bends and stagger the holes to maintain isolation. It maybe helpful to use the 90drgree bend thats rounded, to help keep wire runs easy. If i recall its called a "skate" bend, but its easy enough to find. Its perfectly acceptable to run audio cable in the same run as the Ethernet, they wont interfere with each other.
So, I finally have some of the "inner" ceiling joists up, and pl
So, I finally have some of the "inner" ceiling joists up, and placed the first ceiling module.
The joists are 2x6 over a span of just under 10'.
I have only installed one so far. Wanted to look into the best way to deal with the insulation before i went farther.
I think I had originally thought of using 2x8 joists, then decided on 2x6 and sort of forgot about the insulation on top of the module. :/
I only have 1/2" between the top of the ceiling module and the existing joists, so I'm not sure what I want to do.
I think the insulation from the existing joists will just barely touch the drywall of the modules. Maybe that is all I need to dampen them.
Or maybe I should pull batts of R11 in half and place those into the existing bays in addition to the R30.
That is what I am leaning to now, but thought maybe it would compress too much.
You should be able to use a thin, flat insulation retaining stra
You should be able to use a thin, flat insulation retaining strap to hold the existing insulation in place. Something like this should work, tho there may be insulation specific products that are similar. You may want to install a plastic vapor barrier, then install the strapping, or use either one alone.
https://www.homedepot.com/p/Master-Flow-1-1-2-in-x-100-ft-Metal-Hanger-Strap-HS1-5S28/202191779
https://www.homedepot.com/p/Perforated-Metal-Hanger-Straps-3-4HS/100396917
I may be misunderstanding the design, or your question but heres
I may be misunderstanding the design, or your question but heres how i see it.
If you leave the existing insulation, and secure it in place. Leave an airspace between the ceiling assemblies. Then you insulate the bays of inner ceiling with rigid fiberglass (with airspace behind it to save $ and increase absorbsion efficiency) then cover that with fabric to finish it off.
You always want an airspace (1" min usually) between the two ceiling assemblies (leafs) otherwise the design is short circuited and isolation drastically effected.
The space allows physical decoupling so the assemblies are free to vibrate on their own, independently, without passing that energy to the next assembly.
The insulation in the bays are there to dampen resonance (existing ceiling) and as acoustic treatment in the new ceiling. Dampening resonance isnt for isolation per se (its only a couple ectra db of iso) its there to act like moon gels on a drum head, or palm muting a guitar string. It traps the air borne energy, while the airspace handles the physical vibration transmissions.
Not sure if im mis-understanding your question.
Actually you dont want to include an airspace between the insula
Actually you dont want to include an airspace between the insulation and backing (drywall) on the inner leaf, since in this case the insulation has two jobs: acoustic treatment, and to dampen the resonance of the cavity.
Sorry, i mentioned the airspace in the previous post.
kmetal, post: 459911, member: 37533 wrote: insulate the bays of
kmetal, post: 459911, member: 37533 wrote: insulate the bays of inner ceiling with rigid fiberglass (with airspace behind it to save $ and increase absorbsion efficiency) then cover that with fabric to finish it off.
Thats what I am planning to do. My understanding is that doing this acts as the acoustic treatment, but not the damper.
I can't tell you WHY, as it doesn't seem to make a lot of sense to me. It seems like it would act as BOTH in the case of an inside-out ceiling.
But I know that was what I read. :/
kmetal, post: 459911, member: 37533 wrote: You always want an airspace (1" min usually) between the two ceiling assemblies (leafs) otherwise the design is short circuited and isolation drastically effected.
The space between the inner leaf and the outer leaf is much more than 1", with the exception of the outer joists.
where the outer joists cross it is more it's like 1/2"
I guess what I really need to figure out at this point is does the mineral wool I plan to put in the bays count as my damper as well as acting as acoustic treatment?
Jason Morris, post: 459913, member: 51197 wrote: I guess what I
Jason Morris, post: 459913, member: 51197 wrote: I guess what I really need to figure out at this point is does the mineral wool I plan to put in the bays count as my damper as well as acting as acoustic treatment?
If the insulation is in contact with tbe sheathing, it is dampening it. The wall design and physics apply simularly both inside out, and standard configs, in this regard. The idea is to prevent hollow cavities, ie resonant cavities/chambers.
The advantage (in this case) to standard double wall config is the insulation faces each other, vs inside out where the insulation faces the hard backing if the inner leaf. If you had tons of space you could lay insulation on top of the inner leaf.
That said, as long as the insulation is touching the sheathing, your achieving the same effect, and there is nothing to worry about.
You can always use standard fluffy r value insulation in your inner leaf. This will give you better bass absorbsion and be cheaper. Just make sure you retain it so the ceiling (fabric) doesnt look all bumpy. You can use a plastic vapour barrier if your worried about particulates. It will reflect a neglible abount of high frequencies back into the room which is fine.
"Believe none of what you hear, and half of what you see."
-Ben Franklin
:)
kmetal, post: 459914, member: 37533 wrote: You can always use st
kmetal, post: 459914, member: 37533 wrote: You can always use standard fluffy r value insulation in your inner leaf. This will give you better bass absorbsion and be cheaper.
Yeah, I was planning to use Mineral Wool (fire/sound batts) in the bays of my inner ceiling and walls, but I'm not sure what is going to be best acoustically yet.
I suppose there is no rule that says I have only uses one or the other?
I haven't got to the stage where I measure the acoustics and try any sort of correction. Im not even sure there is any advantage to "measuring" the acoustics of a live/drum room as there would be for a control room.
I figured I'd just have to use my ears and see what I felt the room needed once the isolation part was done.
Hey Jason, Once you hit record for the first time, you'll figur
Hey Jason,
Once you hit record for the first time, you'll figure out if there is problems with your room..
A good thing to have is bass trap panels. When I built mine, I placed a hard surface on the back of them so I can manipulate the acoustic of my room by moving them and orientate the absorbsion side.. Tools like that can allow you to have a thight sound for some songs and a more lively sound for others...
Jason Morris, post: 459930, member: 51197 wrote: Yeah, I was pla
Jason Morris, post: 459930, member: 51197 wrote: Yeah, I was planning to use Mineral Wool (fire/sound batts) in the bays of my inner ceiling and walls, but I'm not sure what is going to be best acoustically yet.
I suppose there is no rule that says I have only uses one or the other?I haven't got to the stage where I measure the acoustics and try any sort of correction. Im not even sure there is any advantage to "measuring" the acoustics of a live/drum room as there would be for a control room.
I figured I'd just have to use my ears and see what I felt the room needed once the isolation part was done.
You can use both types of insulation on your inner leaf. You could use say a 4" fluffy insulation tucked into the bays, and a 1" rigid insulation below it, even with tbe bottom edge of the studs. Leaving about 1/2" airspace between the insulations. This will give you a nice amount bass absorption and a clean looking finish.
Your on the right track. Any small room is going to have a need for taming the echoes and room boom, tracking rooms have the advantage of mic selection and placement, as well as moving the instrument around, and movable baffles as well, all to help get tbe intended sound. Measurements and analysis are much more critical in control rooms where the speakers and listening location are fixed positions. Particularly in smaller rooms with lower ceilings, a completely dead ceiling is desireable as the reflections from it are not generally useful.
Ive had good luck in a small fairly dead booth with drums using good tuning and about 5 mics. Using tbe door open different amounts and a couple room mics. Matt wallace stated in a recent tape op article he did maroon 5's drums (for the album with the song harder to breathe) in a dead small room with tbe door partially open and a couple ambeimt mics as well. Lol his drums came out better than mine however, despite similar techniques.
Hi Jason, great information here. I’ve been reasearching for a f

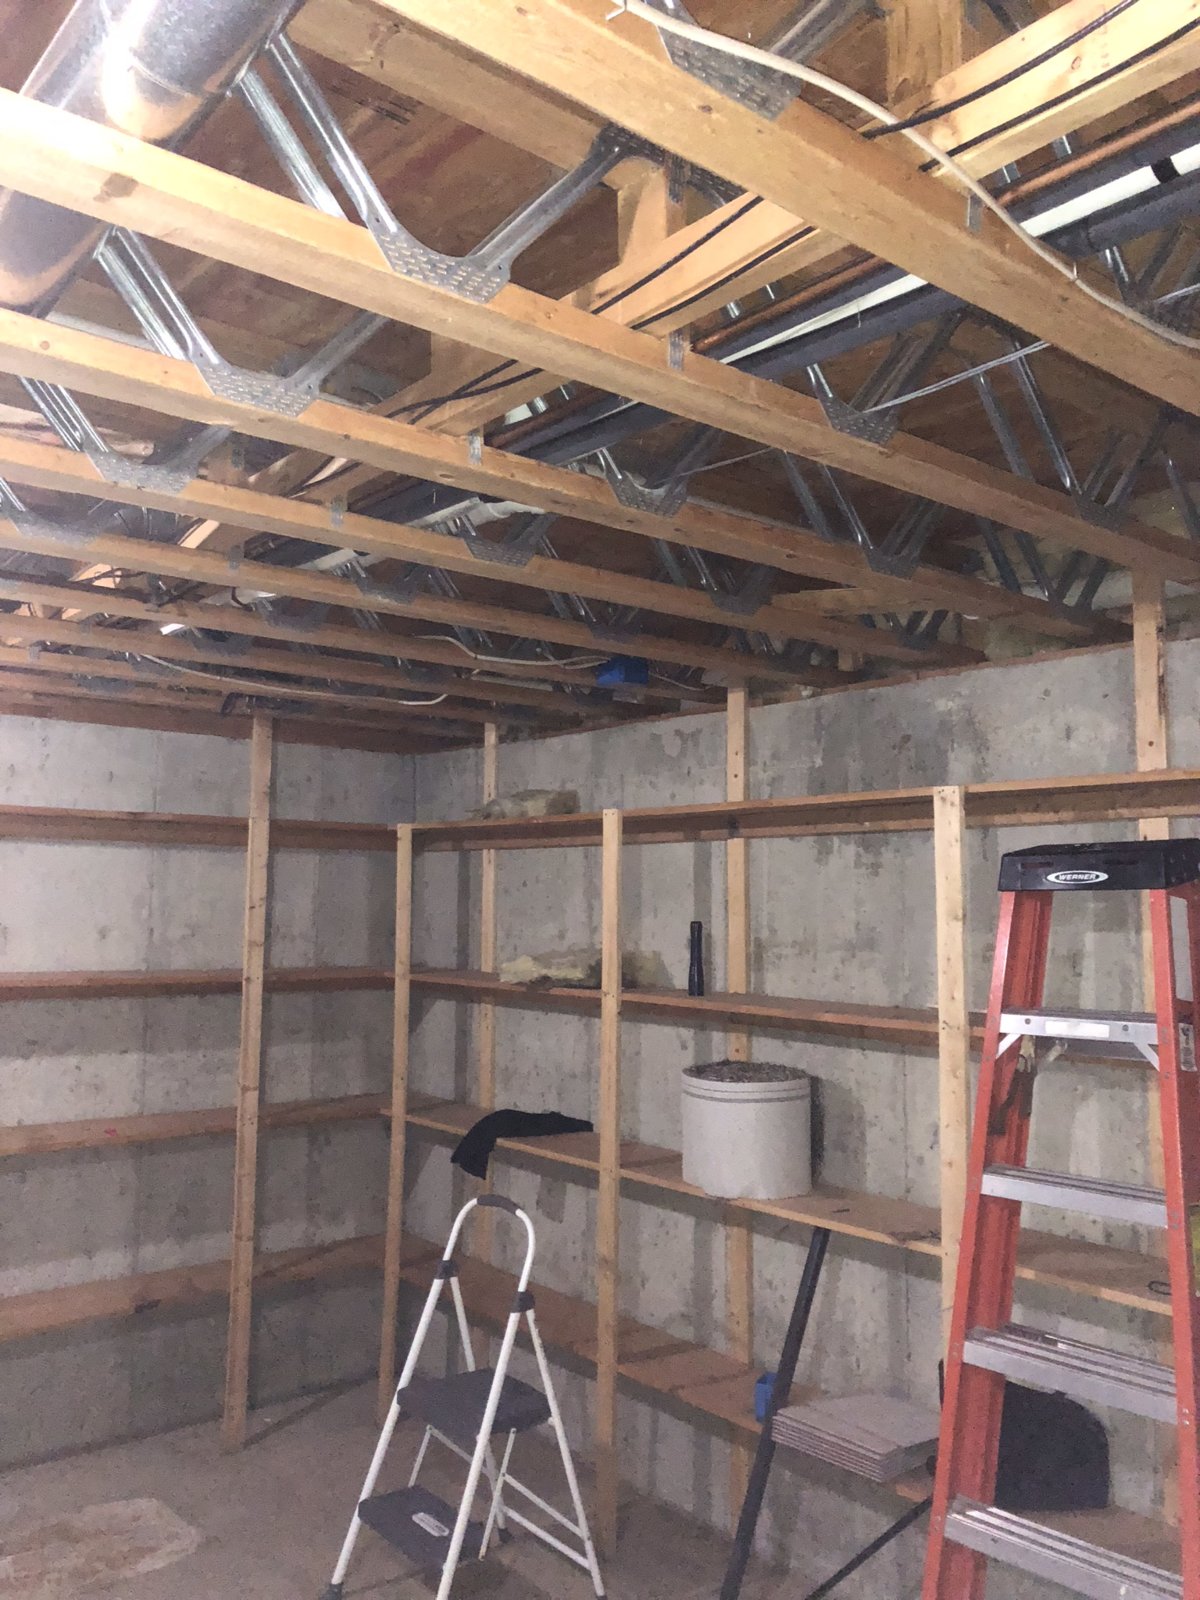
 Hi Jason, great information here. I’ve been reasearching for a few years and I have just started my studio build in our house that we moved into last year. I will be building an inside out ceiling and walls. I’m in a basement with three concrete walls. I’ve been beefing up the rim joist and won’t be long before I start adding two layers of drywall with green glue to the underside of the subfloor. I will be building a room inside a room. (Live drum room) 15’8 x 16’4. 7’7” to bottom of existing joist. Not a lot of ceiling room. The Joist are open web.
I have a couple of questions for you. Did you have a lot of nails sticking through your subfloor ? Did you cut them off if you did? As you can see in my pic. I only have 1 1/2 to get two sheets of 5/8 drywall because of my joist design. No room for 1/2” or 1” styrofoam to suck up the nails poking through like John Sayers site suggest.
I’m going to use 2x6 ceiling joist. Did you stick with 16” centers and make smaller modules to fit inside? How long were your modules? My span is a little more than yours but can’t sacrifice any headroom. I might have to sister the joist.
You have a lot of information I can use lol. I will be checking back often.
Oh yea, on my future ceiling modules I only have space for two 5/8 drywall. No room to add the plywood. Is that a problem?
Hi! I am envious of your square footage, but I can't say I'd be
Hi!
I am envious of your square footage, but I can't say I'd be eager to tackle that ceiling!
Do you know what the measurement is between your floor and the bottom of those ceiling supports?
JLDrumStudio, post: 460122, member: 51506 wrote: Did you have a lot of nails sticking through your subfloor ?
I did have nails poking thru, yeah.
I didn't clip off any of the nails though. I used the styrofoam trick for most of my bays. The first few, I bent the nails over and pounded them down flat. Wish I had not done that. It's not going to be fun if the wood floor above ever needs to come up. I know I read a comment by Rod on another forum where he strongly advised against cutting the nails, as it could lead to problems with your floor above.
JLDrumStudio, post: 460122, member: 51506 wrote: I’m going to use 2x6 ceiling joist. Did you stick with 16” centers and make smaller modules to fit inside?
I went with like 19.2" centers. I built the modules so that when they were completed I could easily fit a standard batt of mineral wool in the bay.
I sistered two 2x6 joists together as well. I probably didn't need to do that, but the cost for a few extra 2x6's seemed worth the extra structural strength, and I didn't really see a downside, so I did it.
My modules are about 4'8" long. Easily manageable with two people. Would be tough to install with just one person.
JLDrumStudio, post: 460122, member: 51506 wrote: Oh yea, on my future ceiling modules I only have space for two 5/8 drywall. No room to add the plywood. Is that a problem?
My buddy who has been helping me out with this is a great carpenter, and he asked me the same thing. "Hey do we need to use plywood on these modules? Maybe we can save you some money and just use 3 layers of drywall?"
My answer to him was "I Don't know. All I know is this is how I have seen it done by someone I consider an expert, so I would rather spend the extra money and do it that way than have to tear it all out and do it again if it doesn't work right."
So I guess thats is my answer to you, and I hope you don't view it as a cop out. What you are talking about doing makes perfect sense to me, but I'm not an expert, and the way you want to do it is a deviation from how I saw it done.
I wonder if the plywood helps keep the modules from twisting or flexing over the years?
Thanks Jason for the quick response. I’m 7 ft 7” right now to th
 Thanks Jason for the quick response.
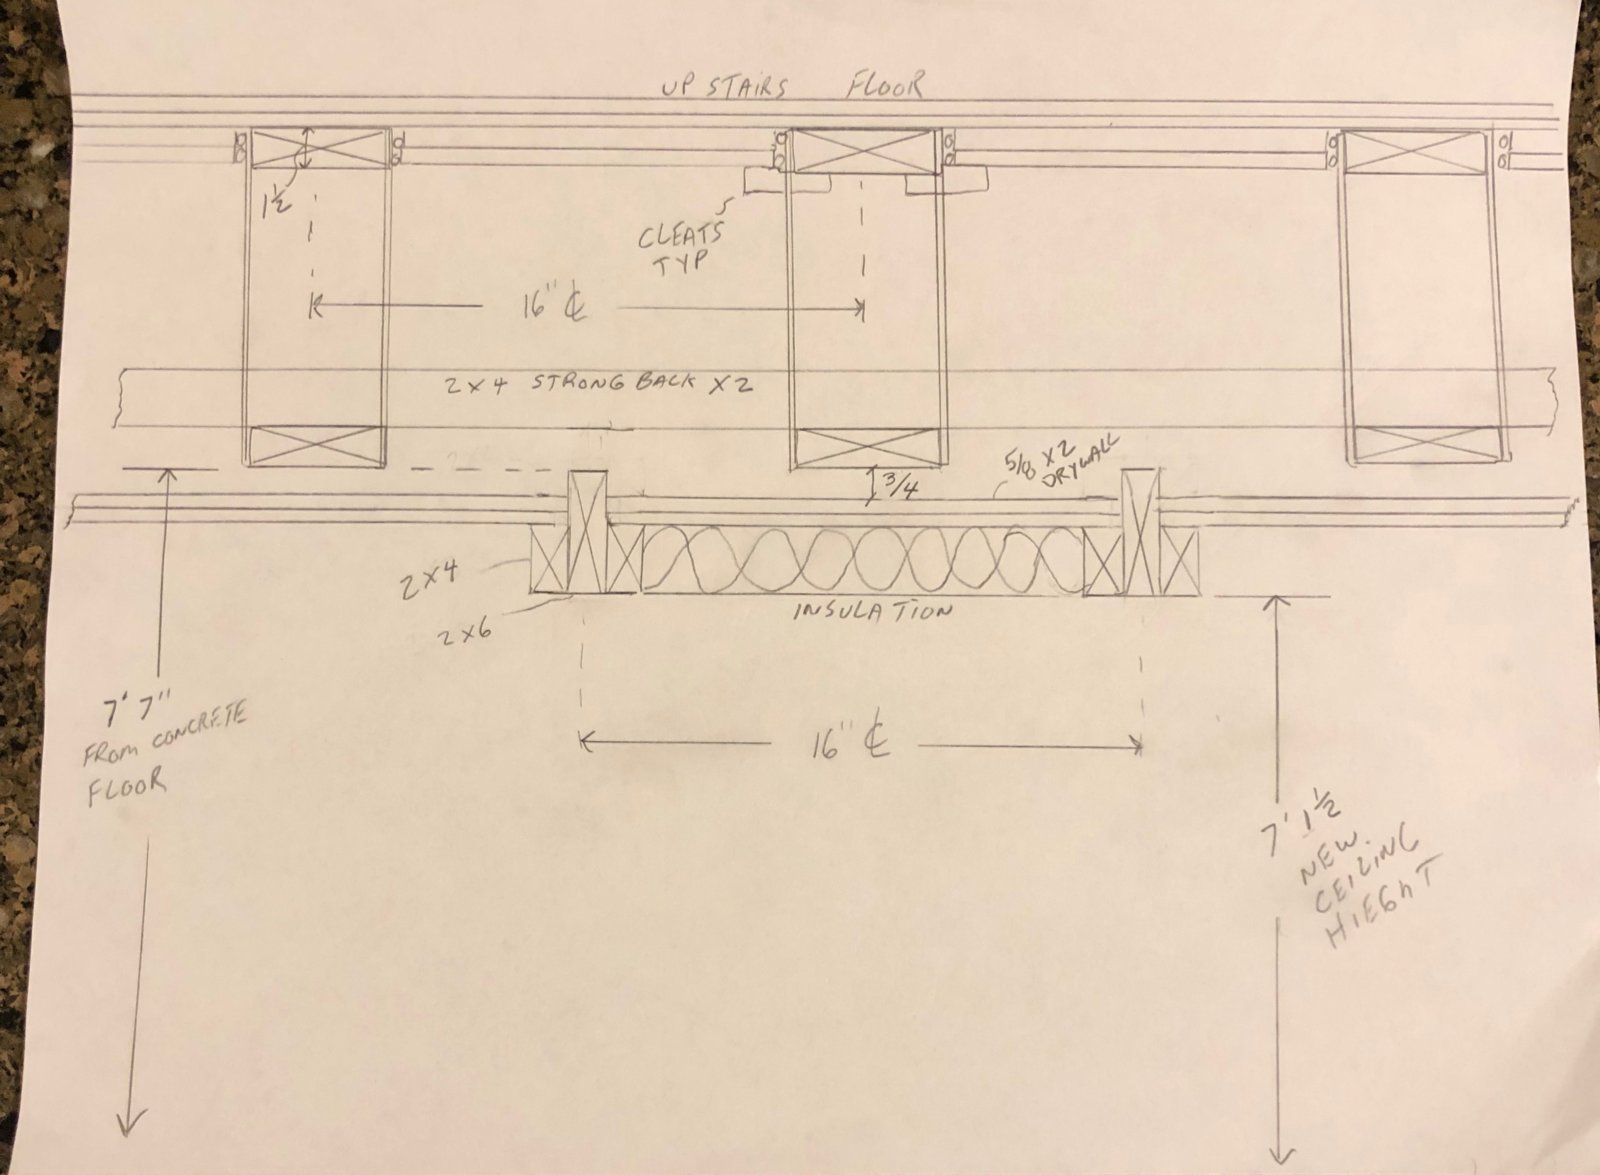
I’m 7 ft 7” right now to the bottom of my floor joist. I will have a ton of work up in my floor joist. I will just take it one step at a time. My next step is to beef up the subfloor. I’ve heard different things on the nails coming through the subfloor. Seems like they use to think it was ok to bend or cut but now they say the styrofoam is the salution. I understand that on a typical floor joist, that’s the best and easiest salution. Mine unfortunately is not typical I only have 1 -1/2 inch to beef up the subfloor. So, that’s a problem with the nails. I think I’m going to trim them leaving 1/8 sticking down. I will use some 1/4” polystyrene closed cell foam to cover the nails. Then two 5/8 drywall with green glue. That gives me 1-1/2 total so my cleats don’t have to be notched. I did look into the nail problem and it seems the hvac guys are running into the same problem when they put up thier heat transfer plates for floor heaters. They have just been cutting them by the hundreds. I dunno lol. Looks like I’m stuck cutting them.
Here is a scetch,by doing the inside out ceiling without the plywood I am 7 ft 1-1/2 to the bottom of my modules/ 2x6
I have plenty of time to think before I cross that bridge. Subfloor and existing hvac are making my head hurt. Oh what we go through for sound isolation.
For the nails, i prefer banging them flat to the subfloor whenev
For the nails, i prefer banging them flat to the subfloor whenever applicable. Eaiser than cutting them, and doesnt mess with the fastening of the upper floor covering. Styrofoam is easier applied when you need to prevent tbe screws your using to fasten the drywall to tbe subfloor, from poking up thru the floor covering upstairs. It can work both ways, but it seems more difficult to install the stryofoam into a bunch of partially bent nails.
Id also verify with tbe Green Glue Company that its effective in your proposed application. I only recall seeimg test data for full sheets. Given the 1.5x price of gg relative to drywall id want to make sure it was working equally well, and as perscribed.
Inside out isnt my area of expertise, i know that in general isolation construction, plywood is integral being structural, allowing for a more rigid wall panel/partition (lowering resonant frequency of the assembly) and gives you something to screw subsequent layers of sheathing into.
There is an extreme weak link on the drawing, with the new modul
There is an extreme weak link on the drawing, with the new modules fitting in between the new studs, without a continuous sheet(s) above them, you end up with huge stud size runs where the isolation is only as good as an uncovered framing member. This is going to greatly, greatly, very significantly, reduce the amount of isolation you can acheive. Isolation sheating should be one (psuedo) continuous, air sealed, massive layer. I would cosider 'wrapping' the joists with drywall on the side exposed to the drum room (studio ceiling), and using the standard backer rod/caulking method to create a continuous, air sealed, massive membrane for your iso layer.
Is consuder a standard non-inside out independently framed ceiling applying drywall directly to the bottom of the new framing, Or id consider a risc-1 clip based ceiling assembly. To me the minimal amount of headroom gain on an inside out assembly, are not worth the sacrifice in isolation or the extra labour. Acoustic tiles, foam, and moving blankets are all very thin materials capable of reducing ceiling reflections effectively.
kmetal, post: 460130, member: 37533 wrote: There is an extreme w
kmetal, post: 460130, member: 37533 wrote: There is an extreme weak link on the drawing, with the new modules fitting in between the new studs
Well, according to the John Sayers folks, those sections where there is no continuous sheathing are not really a weak point, because you have 5 1/2" of timber. I'm not sure what the density of 5 1/2" of pine is vs 5/8 OSB and 1 1/4" of drywall.
In any case, my inside-out ceiling should be done soon and I can provide some insight into whether it was a success or not.
Jason Morris, post: 460302, member: 51197 wrote: Well, according
Jason Morris, post: 460302, member: 51197 wrote: Well, according to the John Sayers folks, those sections where there is no continuous sheathing are not really a weak point, because you have 5 1/2" of timber. I'm not sure what the density of 5 1/2" of pine is vs 5/8 OSB and 1 1/4" of drywall.
The reason i ask is because in Rods book, in the section about massing up the existing ceiling, where drywall is placed in between the bays, he cites the weak point of the assembly's isolation as the studs themselves.
I presume it has to do with density, a continuous seal, as well as the properties of wood which make it a good conductor of sound, drums, guitars, ect are all made of wood.
Ive never seem test data for an inside out assembly, where i have seen plenty for standard iso walls, many of which are freely available in the USG handbook.
Im not claiming the inside out method isnt effective, i am curious as to how effective it is relative to a standard assembly. I also submit that wrapping the framing with drywall wouldn't make the assembly worse based on what i understand. How much improvement or if its necessary or not, i dont have a conjecture on until i can see some test data on the performance of the inside out ceiling. Maybe someone over at JS has some? Totally not being an A$$, im just not super well versed in this method, and i know Stuart and John, are bright minded individuals.
I AM still plugging away at this. I am almost done with the "iso
I AM still plugging away at this.
I am almost done with the "isolation" portion of the build.
I am not at a point where I need to make final decisions about how I want to build the doors.
I am planning on a solid core door, with two layers of MDF green glued and screwed to it.
What I am NOT sure about are seals.
What are good seals to use around the jambs and what is a good seal to use at the floor?
I have looked at these door sweeps:
https://www.amazon.com/dp/B00TXGLLX2/?tag=r06fa-20
and these seal kits:
https://www.amazon.com/dp/B07H4PY1XN/?tag=r06fa-20
Im wondering if those (expensive) seal kits for the bottom of the door are really the best way to go? or maybe i need to just build a threshold at the floor with good seals on it?
I know there would be a "trip hazard" there, but I wont be bringing a lot of equipment in and out, as it's just for my own use.
And I dont mind stepping over a threshold.
I really just want it to work well.
Any thoughts?
Or maybe I should just go with a "seal kit" like this? https://
Or maybe I should just go with a "seal kit" like this?
https://acousticalsolutions.com/product/acoustic-door-seal-kit/
Jason Morris, post: 461064, member: 51197 wrote: Or maybe I shou
Jason Morris, post: 461064, member: 51197 wrote: Or maybe I should just go with a "seal kit" like this?
https://acousticalsolutions.com/product/acoustic-door-seal-kit/
I've installed some of those on my doors and they work nicely.
https://www.amazon.com/dp/B00TXGLLX2/?tag=r06fa-20
Althought I regret buying doors that the mecanism is already embedded in the door. For the look and the effectiveness, if I had to redo it, I'd buy them all premade with the door cases.
Theres no doubt the pre-fab seal kits will work as perscribed.
Theres no doubt the pre-fab seal kits will work as perscribed. They are pretty pricey, so it really depends on your budget, and needs. Ive used them (door sweeps) at Normandy sound, but i can say with age (35+ years) they dont exactly work smoothly. The drop seal isnt perfect. Im sure lubrication would have help even more, but just working them loose got them moving "ok" when i was working on the doors during the re-build.
For the door seals, on the triad wave cave, i built them as described in rods book. I did however use a single seal, rather than wonderful triple seal in rods book. This was because we didnt add mass to the solid core doors.
For the weatherstrip we used GM type K, trunk rubber. It was available from "facca fasteners" supply company, and possibly elsewhere now. At one point it was tough to aquire. Its extremely durable, and looked brand new 5 years later, standing up well in the commercial studio.
For the threshold i just continued the door jamb style using 1x4 (ripped to width) jamb and stops.
I was concerned about tripping, and knicks and dents, but it proved not to be a problem on any of the 5 doors in the studio.
Had i used a double or triple seal, then i would have used a gasketed threshold, a drop seal routed into the door bottom, and door sweep, since a triple seal on a threshold would be quite tall.
Ive seen rod reccomend regular ribbed weatherstrip as an alternative to the magnetic weatherstrip in the book, for the third seal.
If you end up going rods method, i can write out how to install the jambs and weatherstrip, as rod told me on RO many years back. He doesn't describe the process in the book.
At the end of the day you just need something that creates and airtight seal, and is durable. The durability is im guessing one of the main reasons behind using trunk rubber, vs standard dept store exterior weatherstrip for the primary seal(s).
kmetal, post: 461069, member: 37533 wrote: Theres no doubt the p
kmetal, post: 461069, member: 37533 wrote: Theres no doubt the pre-fab seal kits will work as perscribed. They are pretty pricey, so it really depends on your budget, and needs
In Canada they can be found around 300$CAD .. pricey but one less thing to doubt when looking for the max isolation ;)
Depends on budget for sure !
So, things are progressing. The room is "enclosed" now. Just nee
So, things are progressing.
The room is "enclosed" now. Just need to finish up the seals on the doors and then start the acoustic treatment and flooring.
As one might expect from a room that small the sound is .. chaotic. Everything is just bouncing all over.
I think in a room this small Im going to be looking at just absorbing as much as possible.
Planning to line the walls and ceiling with Rockwool, corner superchunk traps, then add 1x slats to make liven the room up a little.
Not sure how much as room that small can really be "livened up" though.
You guys think Im on the right track with this thinking?
Jason Morris, post: 461251, member: 51197 wrote: So, things are
Jason Morris, post: 461251, member: 51197 wrote: So, things are progressing.
The room is "enclosed" now. Just need to finish up the seals on the doors and then start the acoustic treatment and flooring.
As one might expect from a room that small the sound is .. chaotic. Everything is just bouncing all over.I think in a room this small Im going to be looking at just absorbing as much as possible.
Planning to line the walls and ceiling with Rockwool, corner superchunk traps, then add 1x slats to make liven the room up a little.
Not sure how much as room that small can really be "livened up" though.You guys think Im on the right track with this thinking?
Yeah thats pretty much what id start with. I think of the slats more as EQ than reverb. It will help balance back in some of the highs.
Even in small rooms a little life is just fine.
What are the internal dimensions.?
Great work btw.
Jason Morris, post: 461251, member: 51197 wrote: I think in a ro
Jason Morris, post: 461251, member: 51197 wrote: I think in a room this small Im going to be looking at just absorbing as much as possible.
Planning to line the walls and ceiling with Rockwool, corner superchunk traps, then add 1x slats to make liven the room up a little.
That's what I did in my 10x11 small room.. I made triangle shape bass traps in 2 corners (rockwool covered in draps and holded with pine wood in the corners.. it makes them decorative and very fonctionnal. Sorry I don't have a better picture..
kmetal, post: 461252, member: 37533 wrote: Yeah thats pretty muc
kmetal, post: 461252, member: 37533 wrote: Yeah thats pretty much what id start with. I think of the slats more as EQ than reverb. It will help balance back in some of the highs.
Even in small rooms a little life is just fine.
What are the internal dimensions.?
Great work btw.
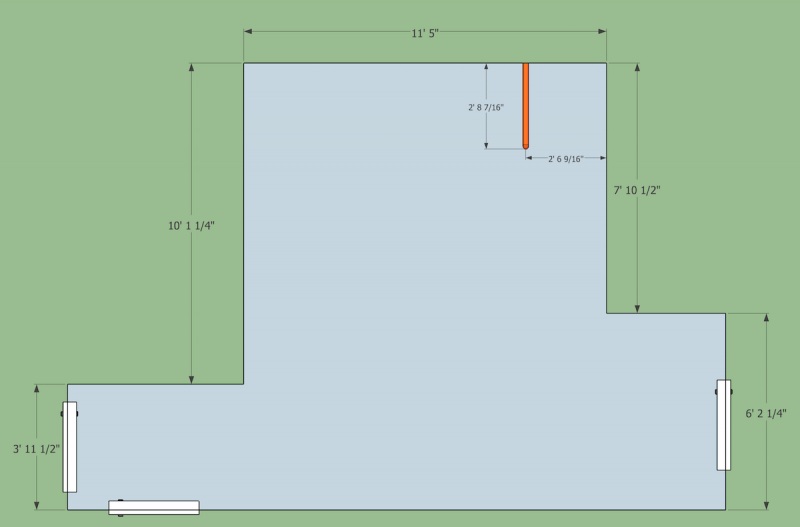
The walls and ceiling are all inside out, so from stud to stud is 12'7" x 9' 10 1/2" and 7'10 to the bottom of the ceiling frame.
The sheathing is obviously 3 1/2" farther on each side so, I guess the room is "acoustically" a little over 13 x 10, with ceilings that are like 8' 1"
Thats the "main" section of the room. There room is a little "L" shaped, so there are a few more feet by the doors.
Thats a pretty decent size booth, ive gotten good drums sounds i
Thats a pretty decent size booth, ive gotten good drums sounds in smaller booths than that. The booth im thinking of was more like 8x11, with splayed walls and ceiling, and just some 2" rigid fiberglass panels, spaced along the wall, with a 1.5" space behind the panel. The ceiling was untreated, and 7.5' on one side 8.5' on the other.
You could conserve some floor space by putting bass traps at the wall/ceiling corner junctions. These can be rectangular or strandled.
I would also consider putting slats on the front wall, instead of behind the kit. This will keep the (out of phase) reflections in the null spot of the mics. This opposed to the direction the mics are facing. Other locations id consider is on the wall/ceiling bass traps if you have them there, and especially if their rectangular so they dont spit back at the kit. Also the ceiling, beyond the kit could be an unobtrusive place to add them.
Another place to build a bass trap could be the L shape alcove itself.
You can use a Helmholtz calculator to get the board spacing right. You'll likely have fundemental room modes between 75-100hz if my memory is correct.
You can experiment with their location before you nail them in, to see what you like.
I would also without a doubt, test the isolation of the room before adding treatments. Just to verify its isolation level is satisfactory.
kmetal, post: 461256, member: 37533 wrote: You could conserve so
kmetal, post: 461256, member: 37533 wrote: You could conserve some floor space by putting bass traps at the wall/ceiling corner junctions. These can be rectangular or strandled.
Yep, that was my plan. Pretty much every corner was going to have corner traps. I was thinking superchunk style traps made of Owens Corning Fire and Sound mineral wool batts.
kmetal, post: 461256, member: 37533 wrote: I would also consider putting slats on the front wall, instead of behind the kit
Also was the plan. Although I am thinking of making the wall across from the kit (which is, incidentally . the . longest wall in the room) a wiggly wall, with mineral wool of different depths (3" - 8") behind it.
kmetal, post: 461256, member: 37533 wrote: You'll likely have fundemental room modes between 75-100hz if my memory is correct.
I havent measured the room, but I did play my kit a little bit in there, an d based in what I was hearing, you are correct.
kmetal, post: 461256, member: 37533 wrote: I would also without
kmetal, post: 461256, member: 37533 wrote: I would also without a doubt, test the isolation of the room before adding treatments. Just to verify its isolation level is satisfactory.
Oh yes. I will. I still have a couple things I need to nail down before I can call the . isolation "done".
Pretty much just seals and . the hatch/door . to that water main. Right now the isolation is kinda blown due to . a 3'x3' hole in the inner leaf. Once it . is framed and a door installed I expect things will be better
Heres some useful acoustic calculators. https://amcoustics.com/
Heres some useful acoustic calculators.
Theres plenty of free stuff here too.
kmetal, post: 461256, member: 37533 wrote: You can use a Helmhol
kmetal, post: 461256, member: 37533 wrote: You can use a Helmholtz calculator to get the board spacing right. You'll likely have fundemental room modes between 75-100hz if my memory is correct.
Been playing around with a hemholtz calculator... Doesnt look like it's particularly useful for frequencies between 75 and 100.
Any ideas what I can use for those frequencies?
edit: Ahh. from what I am reading, the corner super-chunk traps should deal with those frequencies.
Jason Morris, post: 461260, member: 51197 wrote: Been playing ar
Jason Morris, post: 461260, member: 51197 wrote: Been playing around with a hemholtz calculator... Doesnt look like it's particularly useful for frequencies between 75 and 100.
Any ideas what I can use for those frequencies?
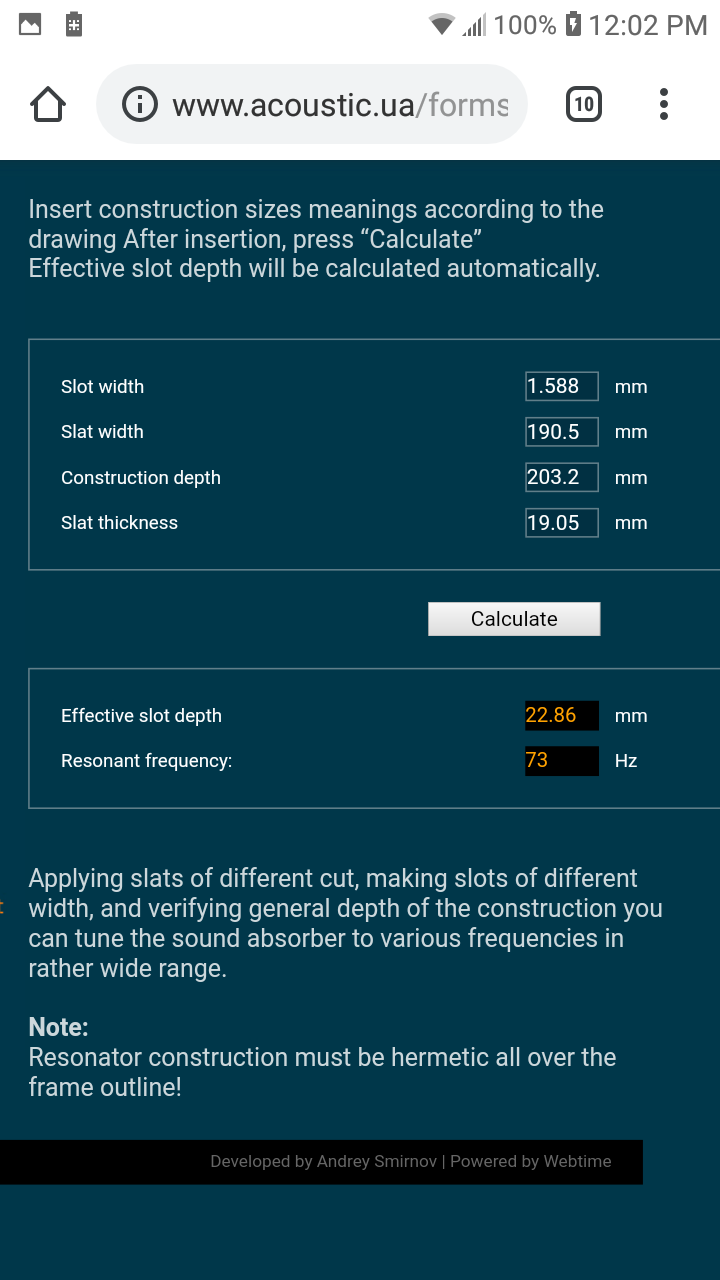
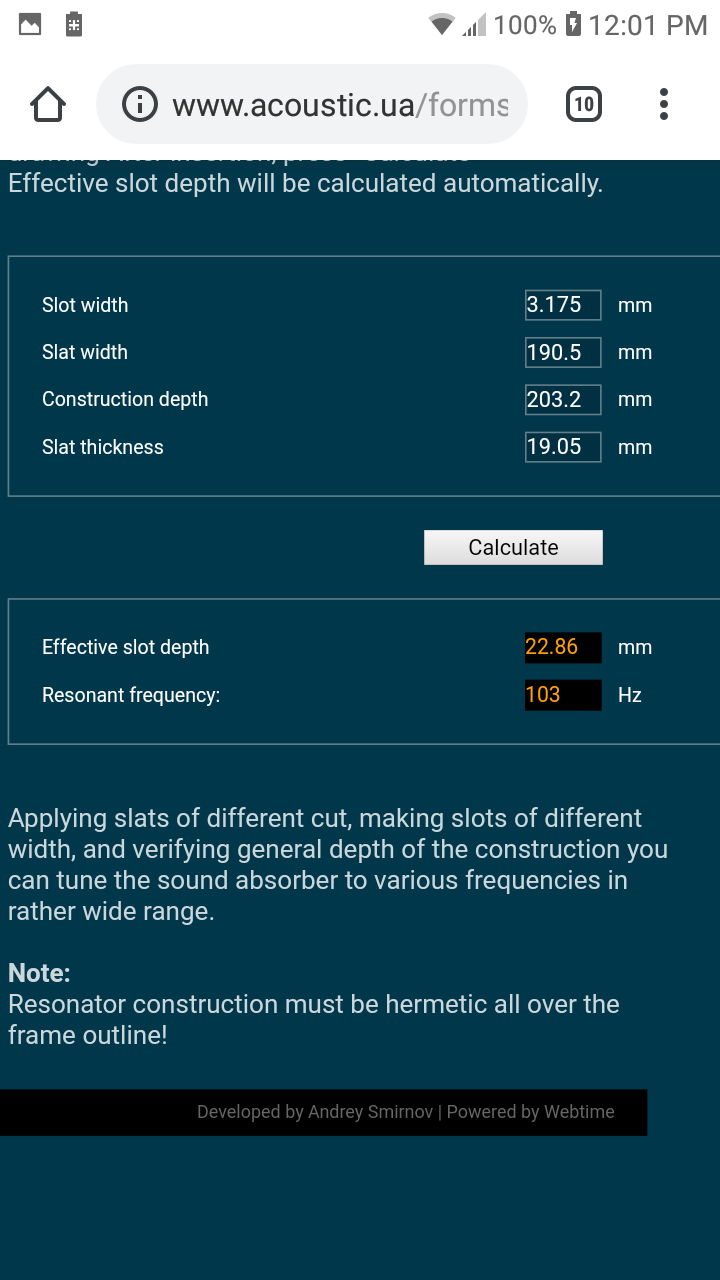
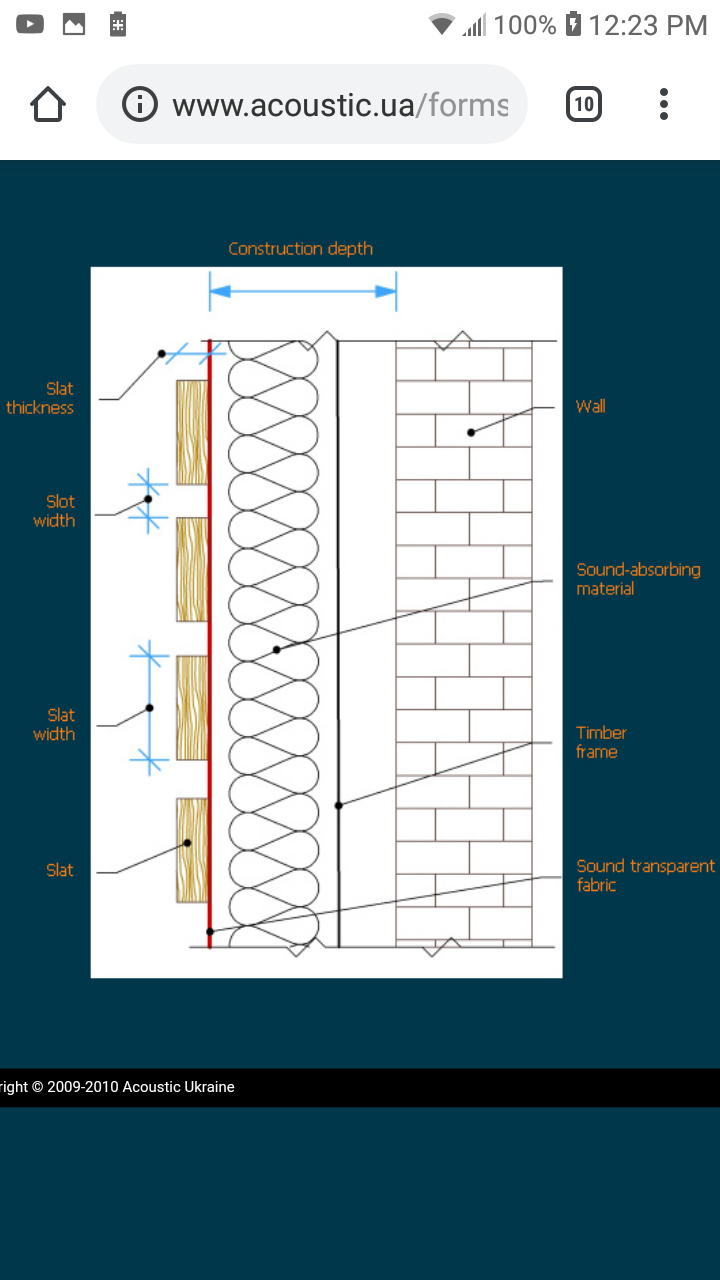
A slat resonator with an 8" depth, 2
1x8 slats, and 1/8" spacing, gives you 103hz, and 1/16" spacing gives you 73hz.
You can also consider usung 5/4" thick slats to lower the resonant frequency. This is available anywhere that sells lumber and is a true 1" thick 1x board instead of the usual true 3/4" thick "1x" trim board we are used to.
Its a pita that the calcs i found are metric.
http://www.acoustic.ua/forms/calculator5.en.html
You may want to space/size your slats to a much higher harmonic or otherwise useless frequency like 700-800hz like we did in the normandy booths to liven up the otherwise completely dead rooms.
Also with regaurd to the super chunks, you may want to consider the straddled panel variation, wich is a rigid fiberglass panel on the surface, with standard unfaced fluffy R- value insulation behind that.
This design is cheaper, and more efficient in the lows, because r value insulation is better at lows than rigid, due to a more optimized GFR, gas flow resistivity.
If it were my place, id consider rectangular soffit traps around the ceiling perimeter about 1.5 feet deep, x 1x1.5 feet tall. Faced on the front and bottom with rigid fiberglass, filled with fluffy, covered with fabric.
This gives you quite a bit of cubic footage, stays out of the way. It gives you double the cubic footage than a straddled type design would if spaced the same 1.5ft off the wall. Its also easier to build.
Well, last night didn't go great. Tried doing seals on the doors
Well, last night didn't go great. Tried doing seals on the doors, and it turned out to be more challenging than we expected. We finally figured out a method that worked well, but not before ripping the seals off two or three times. In the end we got one set of seals out of the 50ft roll of trunk rubber. Well, thats not entirely fair, we do have 10 feet or so left over for the next set of seals.
I will have to order another box of this type-K trunk rubber. probably two more boxes. :/
Jason Morris, post: 461274, member: 51197 wrote: Well, last nigh
Jason Morris, post: 461274, member: 51197 wrote: Well, last night didn't go great. Tried doing seals on the doors, and it turned out to be more challenging than we expected. We finally figured out a method that worked well, but not before ripping the seals off two or three times. In the end we got one set of seals out of the 50ft roll of trunk rubber. Well, thats not entirely fair, we do have 10 feet or so left over for the next set of seals.
I will have to order another box of this type-K trunk rubber. probably two more boxes. :/
Sad you got a hard time there..
I had a bit of trouble with that too when I did mines.. This is why, if I need to build a new studio one day, I'll plan a budget for already made doors with frames included.. Far more easy to put them there, levels and some Uretan around them and call the day ! ;)
My actual doors were safe and sound (door only) and costs 69$ CAD each
With frame already made with acoustic seals would cost around 350$ CAD each. But you can thrust they fit perfectly and will last forever..
It's very nice that we can follow your progress !
Have a good one !


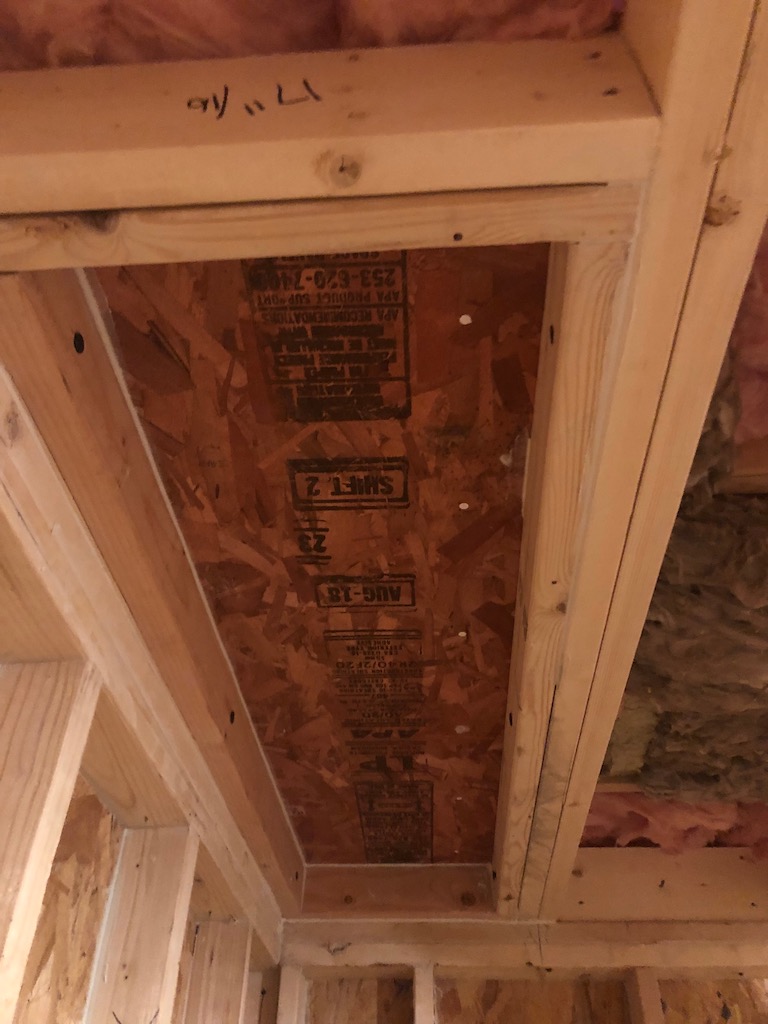


kmetal, post: 459637, member: 37533 wrote: I'm curious why your
A couple of reasons.
1) There was too much electrical running thru the existing joists for me to tear out and redo. I think darn near all the electric in the house converge and go thru the joists of that room. That would have been a nightmare.
2) Running the joists perpendicular kept my spans shorter so I could use smaller joists.
Tucking into the bays as per Rod's book would have given me a bit more headroom, that is true, but acoustically the inside out ceiling will be just as "high" as if I had run the inner joists between the existing.