Hi!
I have been slowly working on building out a new room in my basement for practicing/recording drums.
It's been a slow process, that has thus far involved removing water heaters, and breaking up the concrete floor to re-route the water main so that I have a relatively unobstructed floor space to work with.
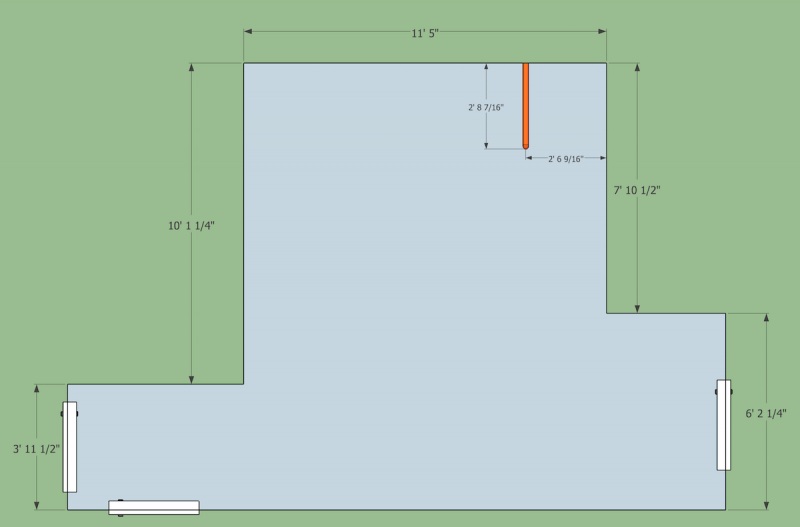
I have about 8' 4" from floor to the bottom of the ceiling joists, and about 11 1/2' x 14' of space to work with.
As a side note, the rest of the basement is finished, and the lovely wife isn't wild about me tearing that stuff apart as I do my build.
I have started beefing up the existing subfloor above my space using 'rods method' of adding two layers of 5/8 drywall between the joists, with green glue, and then battening them into place with 1x2.
My plan is to build the 'room in a room' and have a new "inner ceiling" supported by the new framing I build.
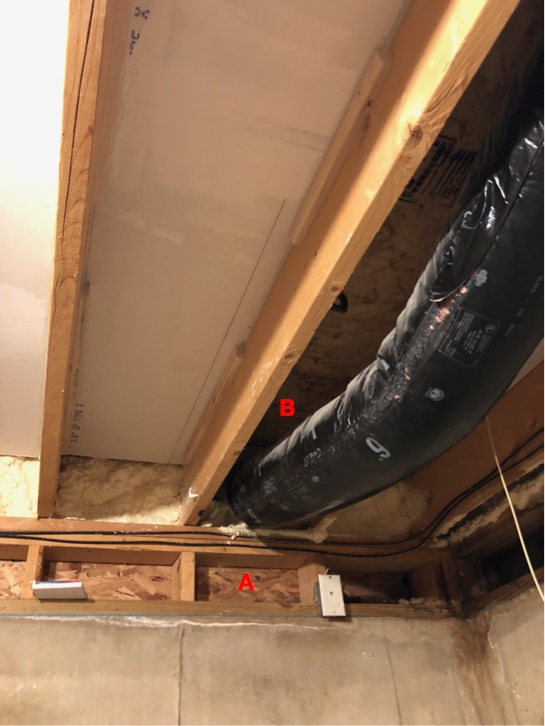
In the picture attached you can see what I have going on thus far.
My questions are:
In the attached picture, you can see a space (labeled A). On the other side of that is the brick veneer of my home.
If I seal that area up with drywall and acoustic sealant, am I essentially creating a small 3-leaf system once I have my drum rooms walls built? Should I fill that cavity with layers of drywall? just insulation? Or is it such a small space that I shouldn't be fretting about three leaves?
Also, Above this ceiling is our 'formal' dining room (not used much).
In the space labeled "B" you can see the ductwork feeding the vents in that dining room.
Keeping in mind that I AM going to be building that decoupled "inner" ceiling, what should I do about that duct and vent feeding the dining room?
Comments
Jason Morris, post: 461592, member: 51197 wrote: I think the big
Jason Morris, post: 461592, member: 51197 wrote: I think the bigger problem is the AC line coming into the wall is vibrating the whole darn house.
Yeah i would not be surprised. Thats a physical coupling. The ac unit is on its own slab on dirt, which is generally a very good sound insulator.
The good news is they make flex joints specifically for the issue of the lines.
The process of elimination can be maddening. The positive side is at least the bulk of the stuff you've done has shown noticeable improvements.
kmetal, post: 461594, member: 37533 wrote: The positive side is
kmetal, post: 461594, member: 37533 wrote: The positive side is at least the bulk of the stuff you've done has shown noticeable improvements.
It has. It is still frustrating seeing the numbers on the SPL Meter higher than I would like. I can just barely hear the AC and air hander when they are running, but I really have to be straining to hear it. Like hold my breath and not move.
And when they aren't running, the SPL Meter is still saying its in the low 40's (c-weighted).
At that point, the ringing in my head is louder than anything getting into the drum room.
Speaking of the ringing in my head, always wear earplugs when you play drums, kids..
Jason Morris, post: 461627, member: 51197 wrote: So I turned on
Jason Morris, post: 461627, member: 51197 wrote: So I turned on the ERV, just for kicks...Dont know why I didnt do this before..
When it is on, the inner door makes a low pitched howling noise, while the outer door makes a high pitched whistle.
Have I mentioned how much I hate doors?
This is puzzling. Does it seem to be sound leakage or physical vibration? Youve got double seals on the door correct?
kmetal, post: 461631, member: 37533 wrote: Does it seem to be so
kmetal, post: 461631, member: 37533 wrote: Does it seem to be sound leakage or physical vibration? Youve got double seals on the door correct?
I suspect leakage. If I push on the inside door hard enough it goes away.
If I stick my finger in the corner of the outside door the whistle goes away. That one I think I can fix with a bit of caulk or a slice of seal stapled into place.
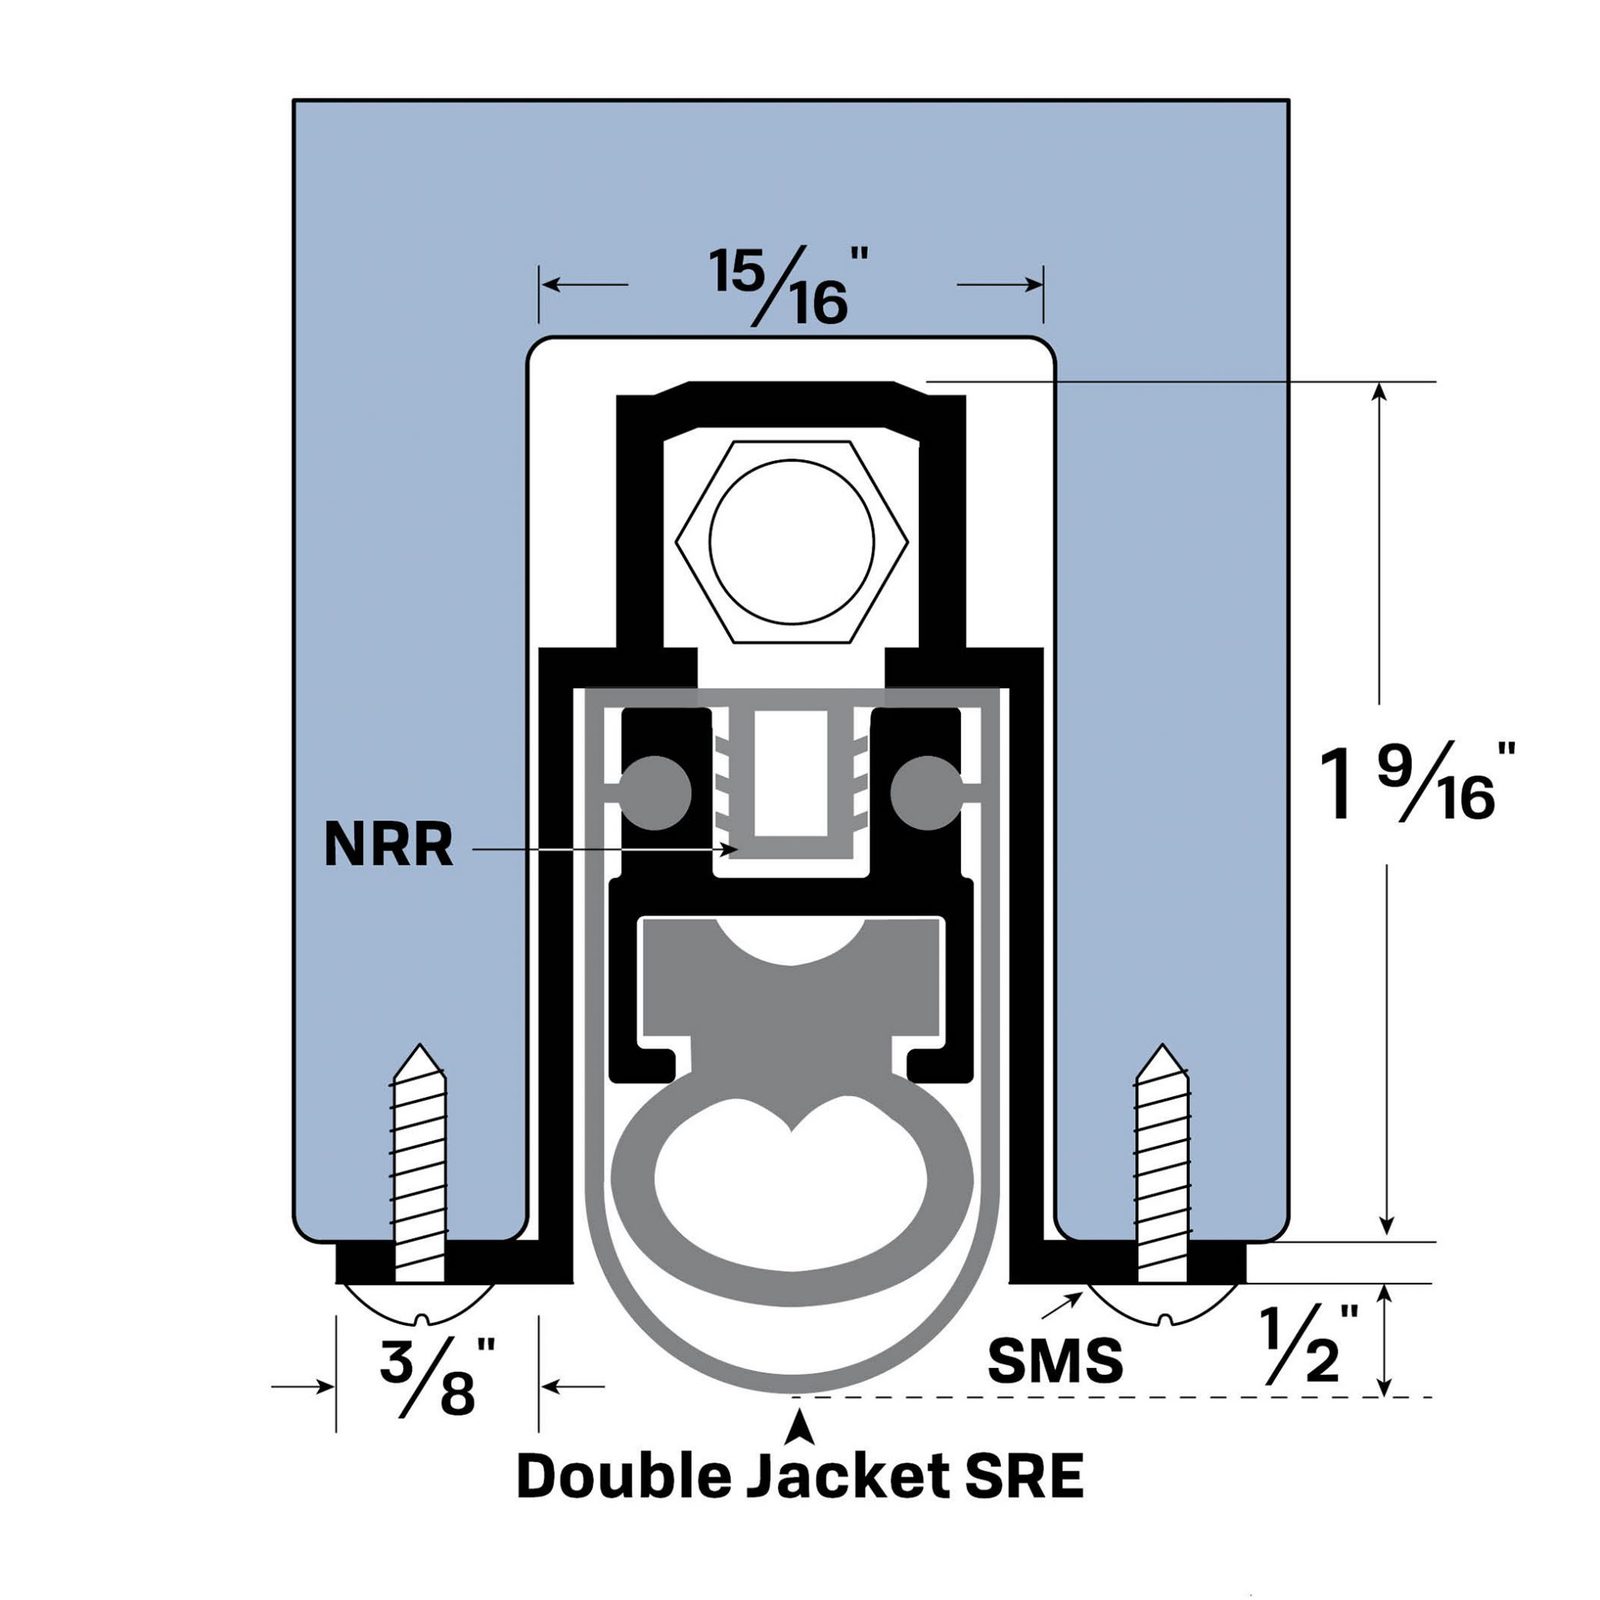
Yes, double seals. Its tough to tell though if my second set of seals push the first set out of place, as the second seals and stops obscures the view of the first set.
IM probably going to have to rip and replace the seals again.
Maybe I should break down and buy a seal kit with a drop seal for the door bottoms.
Or maybe I should just buy a pair of pre-hung fire rated entry doors as I did for my office/control room.
Honestly, I'm pretty sure it is working about as effectively as my doors to the drum room.
Jason Morris, post: 461633, member: 51197 wrote: IM probably goi
Jason Morris, post: 461633, member: 51197 wrote: IM probably going to have to rip and replace the seals again.
Maybe I should break down and buy a seal kit with a drop seal for the door bottoms.
Or maybe I should just buy a pair of pre-hung fire rated entry doors as I did for my office/control room.
Honestly, I'm pretty sure it is working about as effectively as my doors to the drum room.
My issue with the standard doors is they lack the mass of your custom doors.
What is the current threshold/bottom seal?
Have you considered using magnetic weatherstrip for one of the seals?
You may be on to something about the second seal pushing out the first. I would consider removing just the second stops, assuming the first set of seals are working corrrectly. Let the door shut, seal, and re-mount the second so they make contact but dont push the door open.
The other thing you can do is add a latch. Every door ive installed has had a latch of some sort, even the sliding doors. Deadbolts, knobs, and the ball catch, are all things ive used with sucess.
kmetal, post: 461636, member: 37533 wrote: The other thing you c
kmetal, post: 461636, member: 37533 wrote: The other thing you can do is add a latch. Every door ive installed has had a latch of some sort, even the sliding doors. Deadbolts, knobs, and the ball catch, are all things ive used with sucess.
I may try a ball/roller catch. Most of them seem to be for closet doors. Need to find one suitable for such a heavy door.
Oh and the current threshold is just like the side stops/seals.. which makes for a huge threshold to walk over.
It didn't bug me cause its just me using that room.
Jason Morris, post: 461638, member: 51197 wrote: I may try a bal
Jason Morris, post: 461638, member: 51197 wrote: I may try a ball/roller catch. Most of them seem to be for closet doors. Need to find one suitable for such a heavy door.
I have no idea where they got the one for Normandy, or when. It didnt seem special, im guessing its from the 80s.
Im thinking based on the fact that you pulling the doors shut, alieviated the noise, the simple fix may be the solution.
You may want to check this : https://acousticalsolutions.com/pro
You may want to check this : https://acousticalsolutions.com/product-category/doors-windows/
There are other companies that do similar equipment too. This one was the first on my google search.
This kind of mecanism is great and clean looking :
Jason Morris, post: 461673, member: 51197 wrote: Yeah, when I re
Jason Morris, post: 461673, member: 51197 wrote: Yeah, when I re-do my seals I may end up breaking down and just buying those seal kits.
You can also use regular weatherstrip too. The important part is making contact completely around. Just figured id mention it since the kits are not a cheap endeavour, relatively speaking.
Well, I got most of the bass trapping done. I haven't put slats
Well, I got most of the bass trapping done. I haven't put slats on the wall yet, but other than that my "planned" trapping is complete.
I think the difference is pretty remarkable, but as one might imagine the room is totally dead.
I did find a. pretty interesting thread over on sayers forum regarding using 6mil plastic to reflect back. everything about 1K to bring some of the highs back in.
https://www.johnlsayers.com/phpBB2/viewtopic.php?f=3&t=20000
It was also mentioned in a roundabout way in the Master Handbook of Acoustics.. But there they talked. about leaving the Kraft paper on insulation in order to reflect highs.
I may experiment a bit with that and take more measurements. I'm just not sure where I absolutely SHOULD NOT try reflecting highs. I guess I will just need to experiment.
Plastic is cheap.
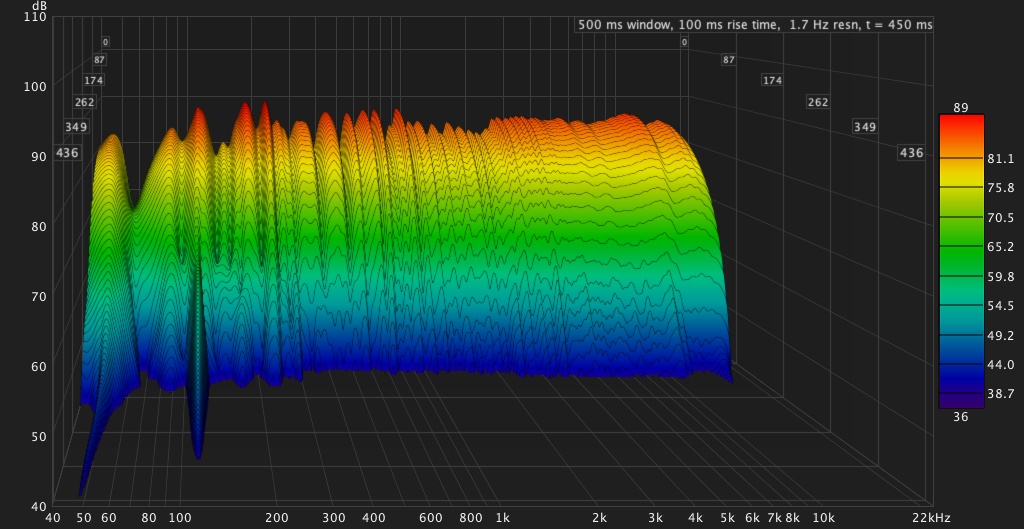
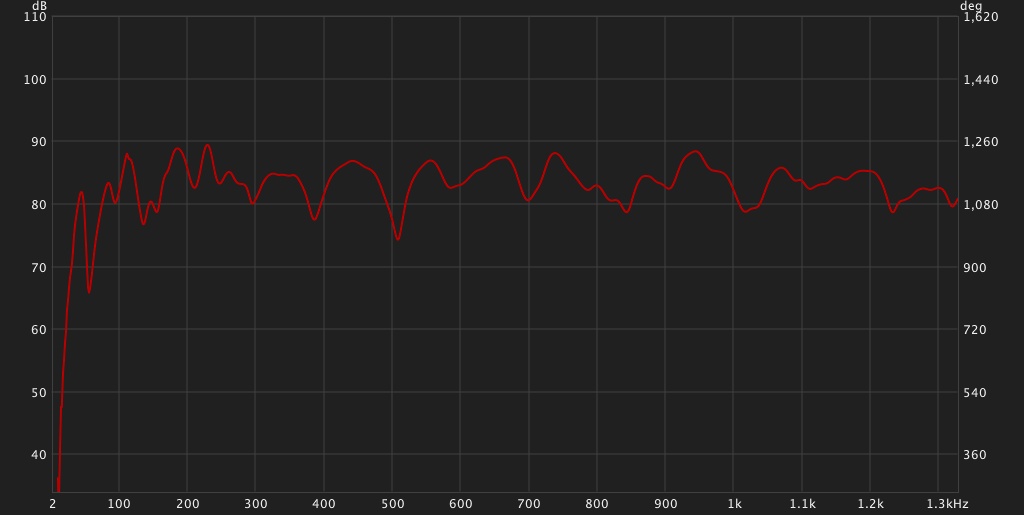
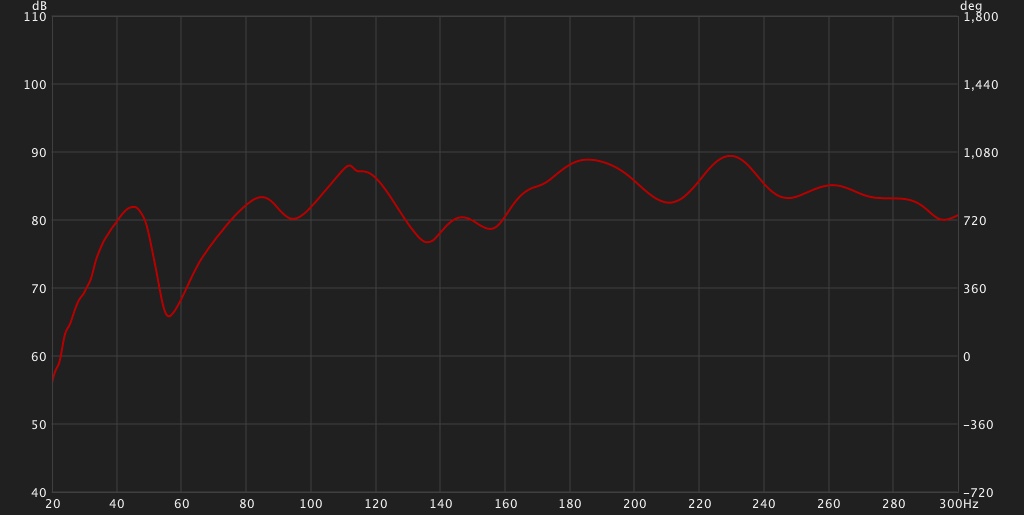
anyway, attached are measurements from my room as of today. One look at the waterfalls will tell you just how dead that room is :)
There is a graph with two lines.. Thats the before and after.. with the green being the earliest measurement, with minimal mineral wool on the walls.. and the red being the "after", taken today
Jason Morris, post: 461713, member: 51197 wrote: may experiment
Jason Morris, post: 461713, member: 51197 wrote: may experiment a bit with that and take more measurements. I'm just not sure where I absolutely SHOULD NOT try reflecting highs. I guess I will just need to experiment.
Plastic is cheap.
By all means now is the time to experiment. The last place i would want HF reflections would be directly on the side, and behind the drums. I wouldn't want them messing with the phase, bleeding into the overheads, and accentuating the cymbals.
Are the slats on the wiggly wall yet? Are you planning on slats at all? Just curious.
The graphs look nice to me fwiw. With such a smooth mid and high response it seems like the only concern is to make sure the kick and mics aren't being affected by the 50hz peak/decay or the 60hz null. 100hz could interfere a bit with intelligibility of the kick or could add a bit too much beef to the snare. Overall things seem good to me.
At this point its about how it sounds subjectively to you and some trial and error.
Slats are not on the wiggly wall yet. I think I'm gonna pull dow
Slats are not on the wiggly wall yet. I think I'm gonna pull down the plastic and wait until after I get slats on before i experiment. Maybe after the slats are on things will feel a little more open. I mean it's a small room, I'm not expecting physics to make an exception for me. I just want to do what I can within the bounds of those physics :)
Jason Morris, post: 461731, member: 51197 wrote: Slats are not o
Jason Morris, post: 461731, member: 51197 wrote: Slats are not on the wiggly wall yet. I think I'm gonna pull down the plastic and wait until after I get slats on before i experiment. Maybe after the slats are on things will feel a little more open. I mean it's a small room, I'm not expecting physics to make an exception for me. I just want to do what I can within the bounds of those physics :)
Small rooms can sound good on drums man. Plenty of classic and modern drum tracks are done in booths.
As far as the slats go, the classic approach to them is to add laquer one coat at a time until your happy with the amount of HF they are spitting back.
Normandy has just stain and no laquer in the booths, and i believe 3 coats of laquer in the main and control rooms. I think powerstation was either 3 or 7 coats of laquer ugh, maybe 5, cant believe id forget that. Either way they were tested by ear in all cases.
awesome. I went back to one of your other posts on slats and the
awesome. I went back to one of your other posts on slats and the hemholtz calc and spent some time doing that today (instead of working like I should have been)
My wiggly wall goes from like 3.5" (standard 2x4 depth) to about 8" deep. Based on that I came up with these numbers using 1x8 and 1x10 slats.. Do these numbers look right?
1x8 - 1/8" gaps
- 8" depth = 103hz
- 6" depth = 152hz
- 3" depth = 173 hz
1x8 - 1/16" gaps
- 8" depth = 75hz
- 6" depth = 87hz
- 3" depth = 123 hz
1x10 - 1/8" gaps
- 8" depth = 94hz
- 6" depth - 108hz
- 3" depth = 153hz
1x10 = 1/16" gaps
- 8" = 67hz
- 6" = 77hz
- 3" = 109hz
Assuming those numbers are correct, I think that is in the ballpark of what I want to deal with.
So now my question is how do I know how many to add? Just experiment? Add some and test.. add more and test?
Or is there a magic formula?
kmetal, post: 461737, member: 37533 wrote: As far as the slats go, the classic approach to them is to add laquer one coat at a time until your happy with the amount of HF they are spitting back.
Do you add the lacquer while they are on the wall? Did you have problems with it dripping on the cloth covering the insualtion?
Jason Morris, post: 461744, member: 51197 wrote: 1x10 = 1/16" ga
Jason Morris, post: 461744, member: 51197 wrote: 1x10 = 1/16" gaps
- 8" = 67hz
- 6" = 77hz
- 3" = 109hz
This spacing looks best to me. In the book rod mentions you can use varying size boards as long as the average board ratio is the same. Im foggy on that aspect so id have to refer to the book, as far as using boards other than 1x10 only.
Jason Morris, post: 461744, member: 51197 wrote: So now my question is how do I know how many to add? Just experiment? Add some and test.. add more and test?
Or is there a magic formula?
Id cover the entire wall to maximize bass trapping. But you can do what you want. No magic formula just the board surface to space ratio. The board size and spacing is the key.
Jason Morris, post: 461744, member: 51197 wrote: Do you add the lacquer while they are on the wall? Did you have problems with it dripping on the cloth covering the insualtion?
They way i understood it is they added it after installation of the slats. This way they could observe the sound without worrying about the boards moving. Its possible they did one initial coat of laquer before they nailed them in. The Normandy control room slat units were made off site, so they had the laquer already, and we just nailed in the sectional units.
Im not sure how they dealt with drips when fabric was involved.
kmetal, post: 461747, member: 37533 wrote: This spacing looks be
kmetal, post: 461747, member: 37533 wrote: This spacing looks best to me. In the book rod mentions you can use varying size boards as long as the average board ratio is the same. Im foggy on that aspect so id have to refer to the book, as far as using boards other than 1x10 only.
Oh! I was expecting to alternate boards of different sizes and slot widths to get more frequencies. Is that not the way to do it?
I need to look at the book again.
Jason Morris, post: 461749, member: 51197 wrote: Oh! I was expec
Jason Morris, post: 461749, member: 51197 wrote: Oh! I was expecting to alternate boards of different sizes and slot widths to get more frequencies. Is that not the way to do it?
I need to look at the book again.
You can use different spacing. At the powerstation the board spacing gets smaller as you move higher in the room. This keeps it less reflective at the lower level where the instruments and most mics are, then gets more ambeint as you move higher in the room. It also absorbs deeper bass as you move further away and the bass sound wavelengths increase.
The reason i would go with 2x10 and 16th inch spacing in your room is to maximize the absorbsion at the problem frequencies around 50-60hz and 100hz. These are the main issues in your room. Also the large boards and small space will increase the amount of highs you reflect back. With reasonators as you absorb lower bass frequencies you reflect more highs. Smaller boards and bigger spaces absorb higher bass frequencies and absorb more highs.
It could be worth taking some readings at the location of the wiggly wall, and at the various depths to make sure the frequencies coincide.
As a non-master in acoustics i tend to think about it in a simple way- just absorb as close the fundemental room mode (lowest peak frequency) ie, 50hz, as much as possible. This gets the best bass response and reflects the most highs.
Your wiggly wall has a continuously varying depth, so your going to have broadband absorption of many frequencies, despite consistent board size and spacing.
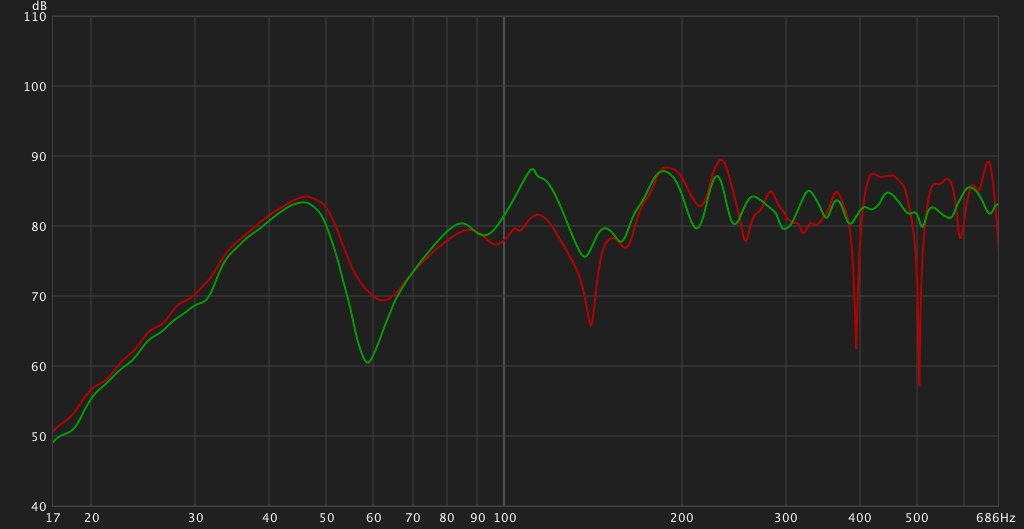
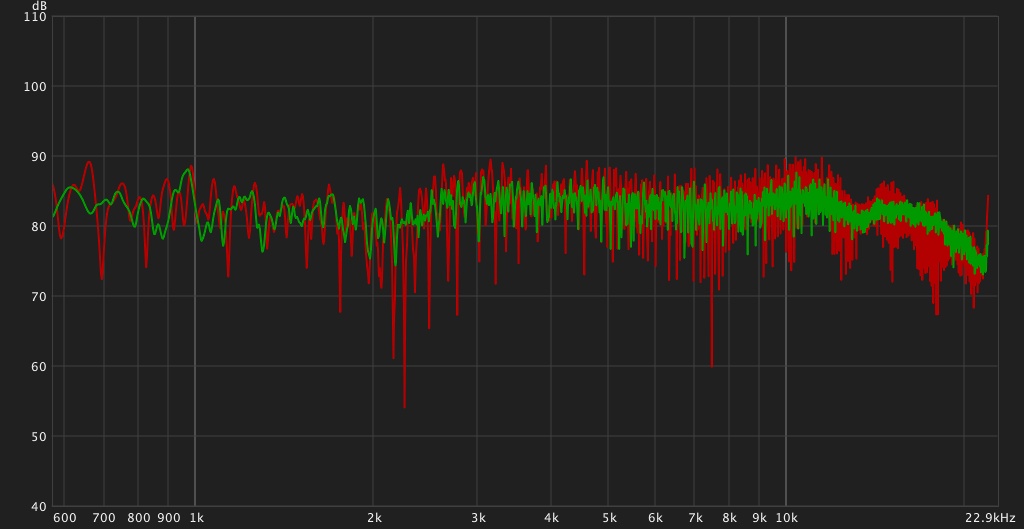
well, this is frustrating. I spent several days working on the w
well, this is frustrating. I spent several days working on the wiggly wall, putting 1x10's up with 1/16" gaps.
It looks like it worked at the target frequency of 60hz, but everything else looks significantly worse.
The green is the measurement taken before I did any wiggly wall nonsense.
I wouldn't panic just yet. Have you changed anything else in the
I wouldn't panic just yet. Have you changed anything else in the room besides adding slats to the wiggly wall? Are all the other walls uncovered, filled with insulation?
Have you checked how the drums sound in there yet?
Remember in a tracking room the drums and the measurement mic, and regular mics arent in fixed locations.
So it could sound subjectively better as is. Also the room shows improved low end which is better for the entire room as a whole. The mid/highs are directional and more easily influenced by mic location. The bass too will vary with position, but the improvement will be reflected everywhere in the room.
If you arent happy with the room sound yet, you can always add a theater curtain hanging in front of the resonator. The will absorb the mids and highs while maintaining the smoother low end response, but will cover up your the cool looking wood work.
You could also wait on the blanket / curtain, until more finish treatment is added. More slats plywood peices ect would scatter more sound around, and could create a more diffuse smoother sound decay. It could make the comb filtering worse too. Sound scattering and diffusion is a difficult area in acoustics and not "figured out" completely yet by anyone. Its not my strongest area of knowledge.
I would test the drums as is to get an earmark. Then experiment with a blanket(s) in spaced in front of the wiggly wall covering up various portions of the wall. Ie completely covered, half, some sections but not others. Its important to get a feel for the wiggly walls range of sounds it effects.
Once the wiggly wall was sorta mapped out sonically most important by ear/recording, and measurements perhaps for reference or not, id then mess around with some reflective surfaces around the room. Hopefully you have a sheet or two of plywood and/or some 1xs, to experiment with. You will start to get a feel for where reflecrions sound nasty or good. Id start with reflection materials on the side walls. If looking at the wiggly wall id leave a section of absorption then put the reflective stuff, then some absorbsion section where the drums are. I would try both the reflective surfaces directly across from each other, and staggerred, so they reflect into absorption. You can also experiment with some angles too.
I wouldnt sweat the graphs too much. The Normandy control room took some time to hone in on the best spots for the plywood reflectors that are hidden behind fabric. Their locations and angles were experimented with.
yeah, things seem to sound better than they look. here's a quic
yeah, things seem to sound better than they look.
here's a quick test I did. Forgive the sloppy playing. I have spent too much time building and not enough time practicing. :D
No processing of any kind. No mixing really either except panning the overeads and room mics.
[MEDIA=audio]https://recording.o…
Attached files Mixdown.mp3 (4.4 MB)
Sounding nice in there. Id experiment with a room mic facing th
Sounding nice in there. Id experiment with a room mic facing the wiggly wall a couple inches away and probably up near a corner. This will show what kind of ambeince is currently available. Not sure if the hall is available for re-amping/ambeince.
Beyond that is mess with some reflective panels to see if i can get some more top end from the snare without washing out the cymbals.
Honestly as-is would produce good sounding drum tracks in a mix imho, they sound clear and punchy raw, just a tad dull, and maybe slightly boxy, (which isnt unusual) but still nice and solid. When you factor in processing and sample layering, i dont think the drum sound will have any compromise.
Nice work man. Looking forward to hearing and seeing more as this evolves and gets wrapped up!
Jason Morris, post: 462104, member: 51197 wrote: Getting ready t
Jason Morris, post: 462104, member: 51197 wrote: Getting ready to staple cloth to the rest of the walls..
Any tips for how to keep my bass traps stuffed with fluffy insulation from being lumpy?
Chicken wire over them before I put the cloth on?
You could use chicken wire. They also make a thin metal strapping for retaining insulation which you could use. If theres room you could face the traps which rigid fiberglass too. Small Eye bolts and string or metal string can work too.
You have the option of retaining the insulation so it is behind
You have the option of retaining the insulation so it is behind the framings front face a little bit, with an airspace between the fabric. This way is looks good, but you don't have to worry about using a pretty looking or flat or onobtrusive retention method. You can just use watever is easiest and its guarenteed to look good. Since its up high you dont have to be concerned about bumping into it. Although the occasional flying drumstick might hit it lol.


.jpg)
.jpg)
.jpg)
Jason Morris, post: 461589, member: 51197 wrote: I'm glad you sa
So two non-experts walk into a bar one day...
;)
Nice. Have you used the iso mount pads yet for the unit?