I am having a back garden practice/recording cabin built. Structure will be (from outside to inside)
Concrete base with DPM
timber frame (total area 4x5m)
OSB with 18 mm shiplap cladding
4x2in wooden studs
100mm RW3
2 layers of 15mm acoustic plasterboard.
Roof
OSB covered with EPDM
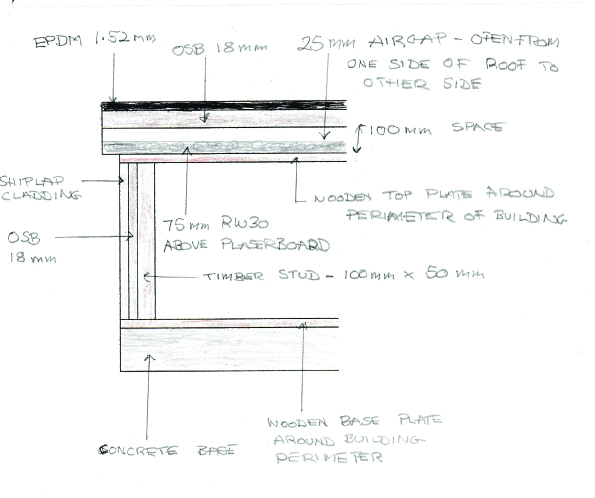
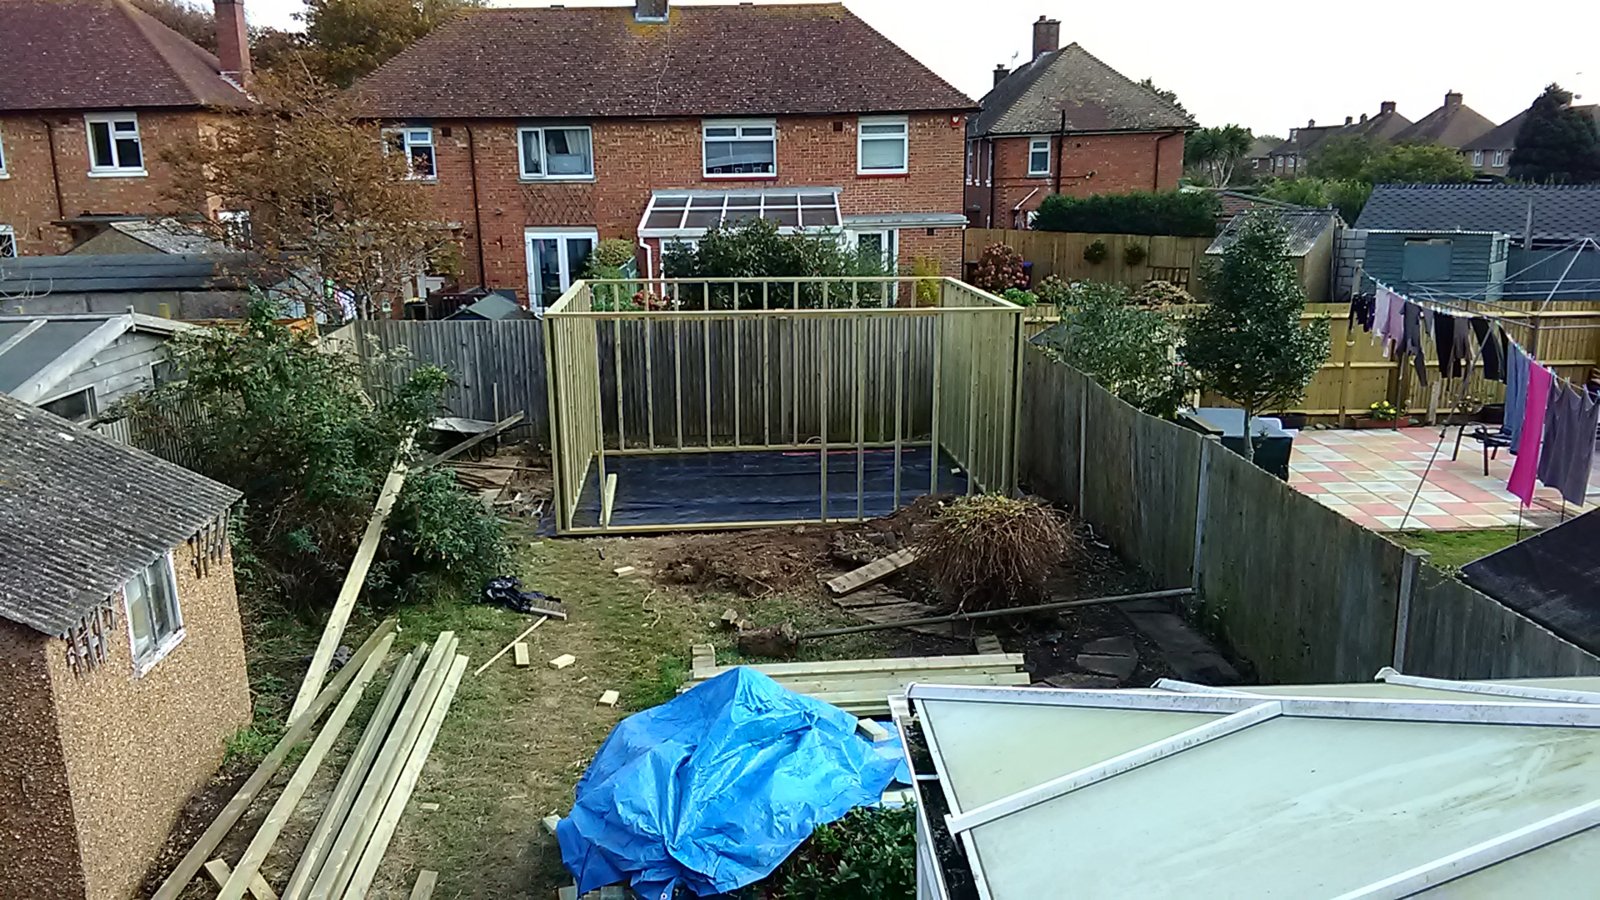
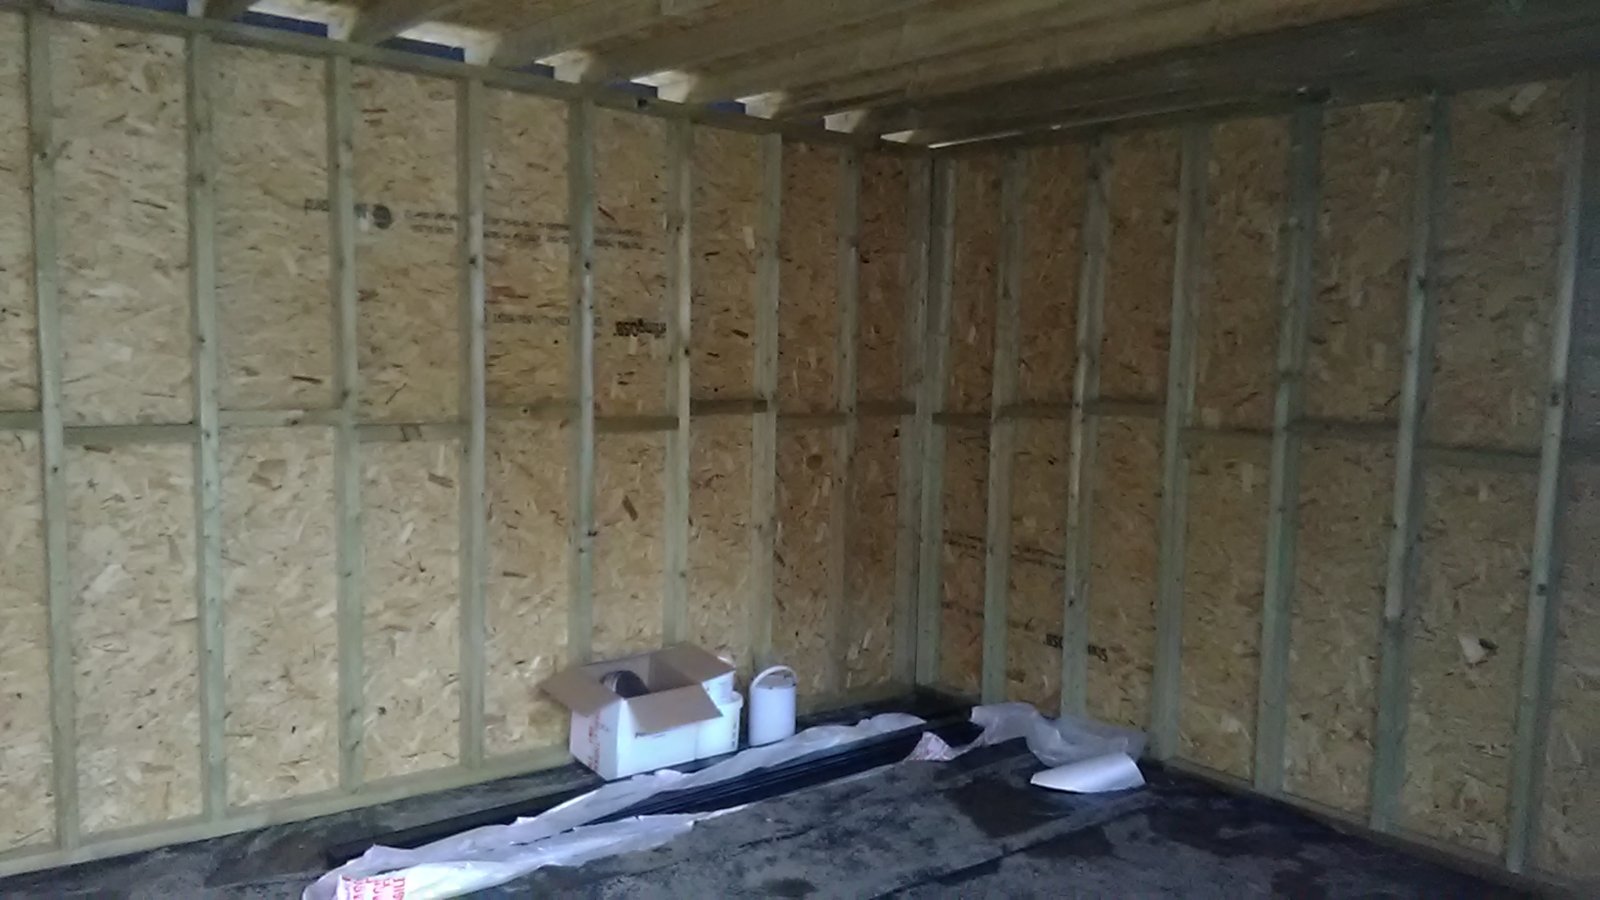
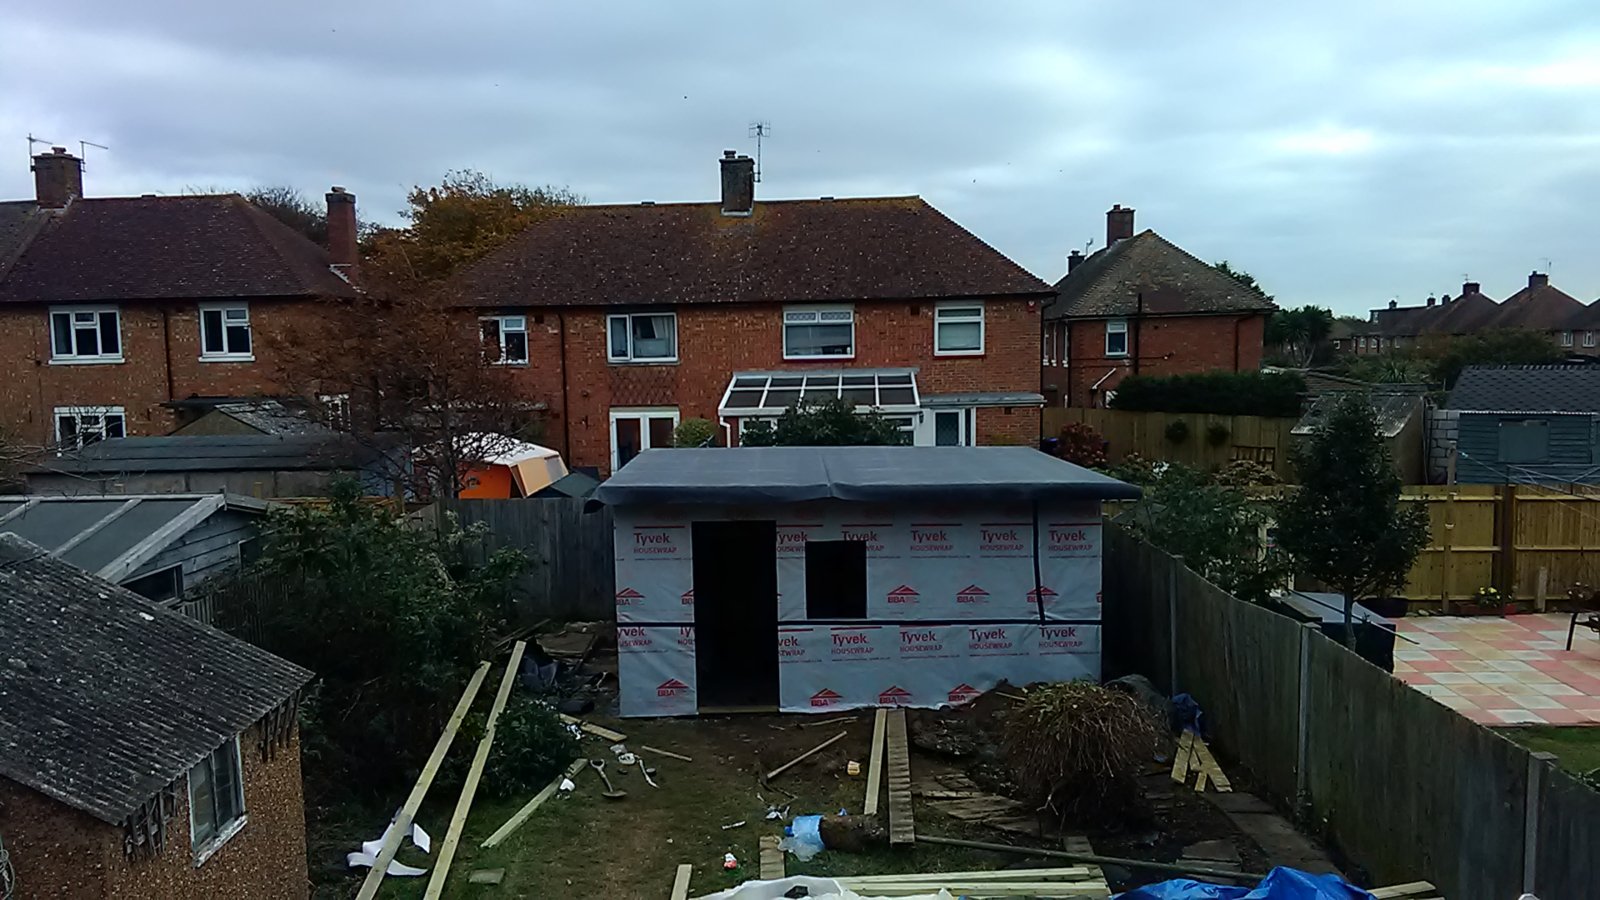
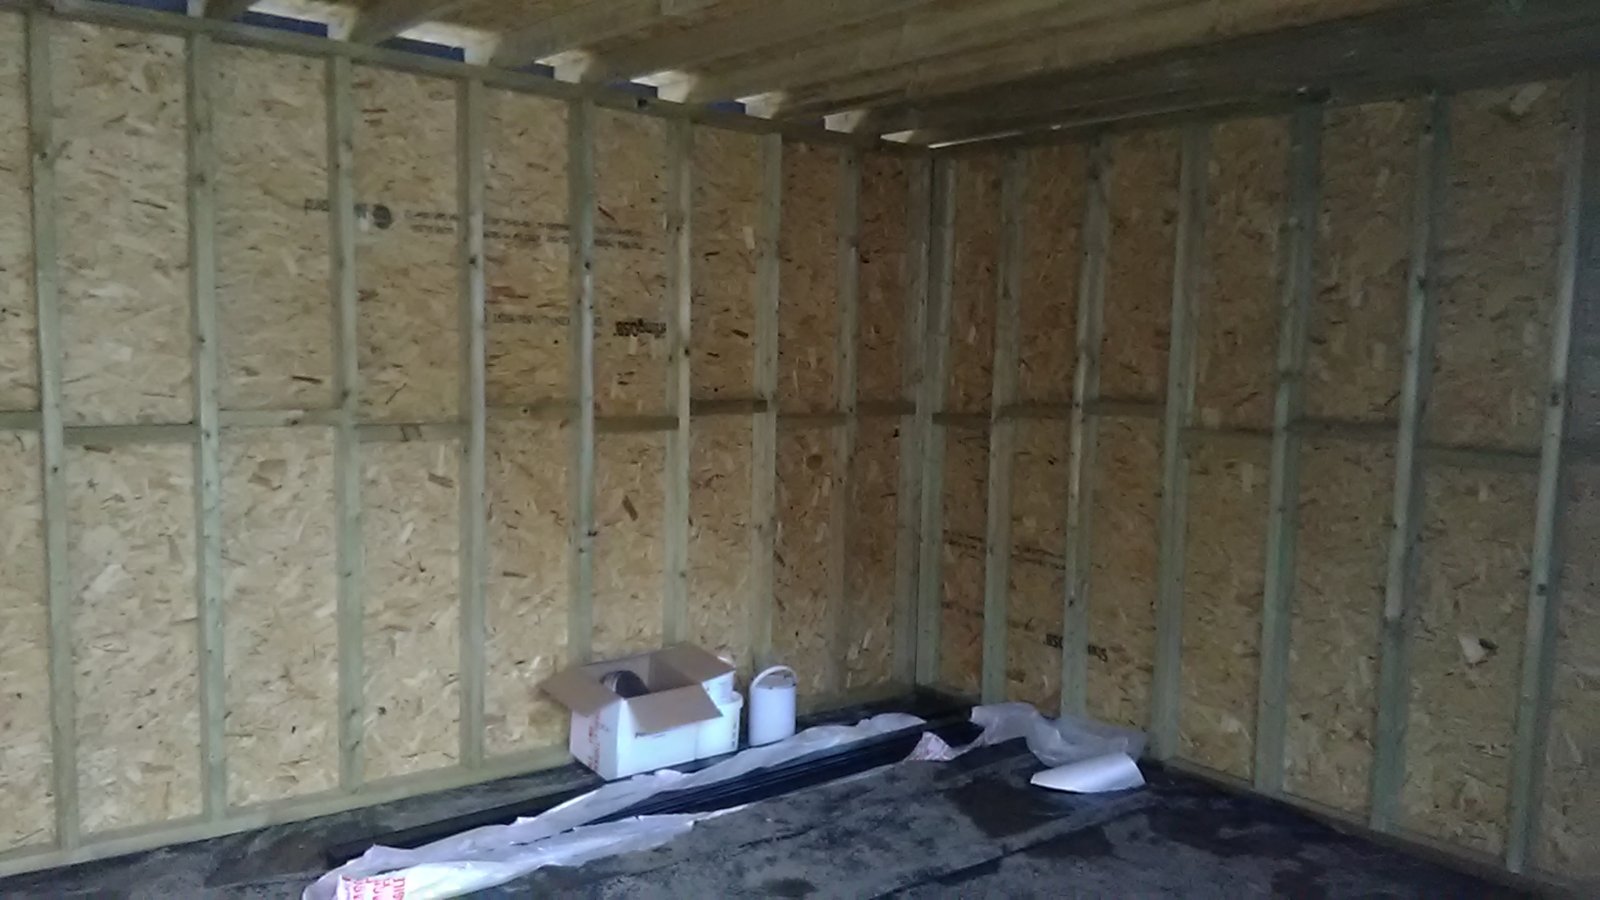
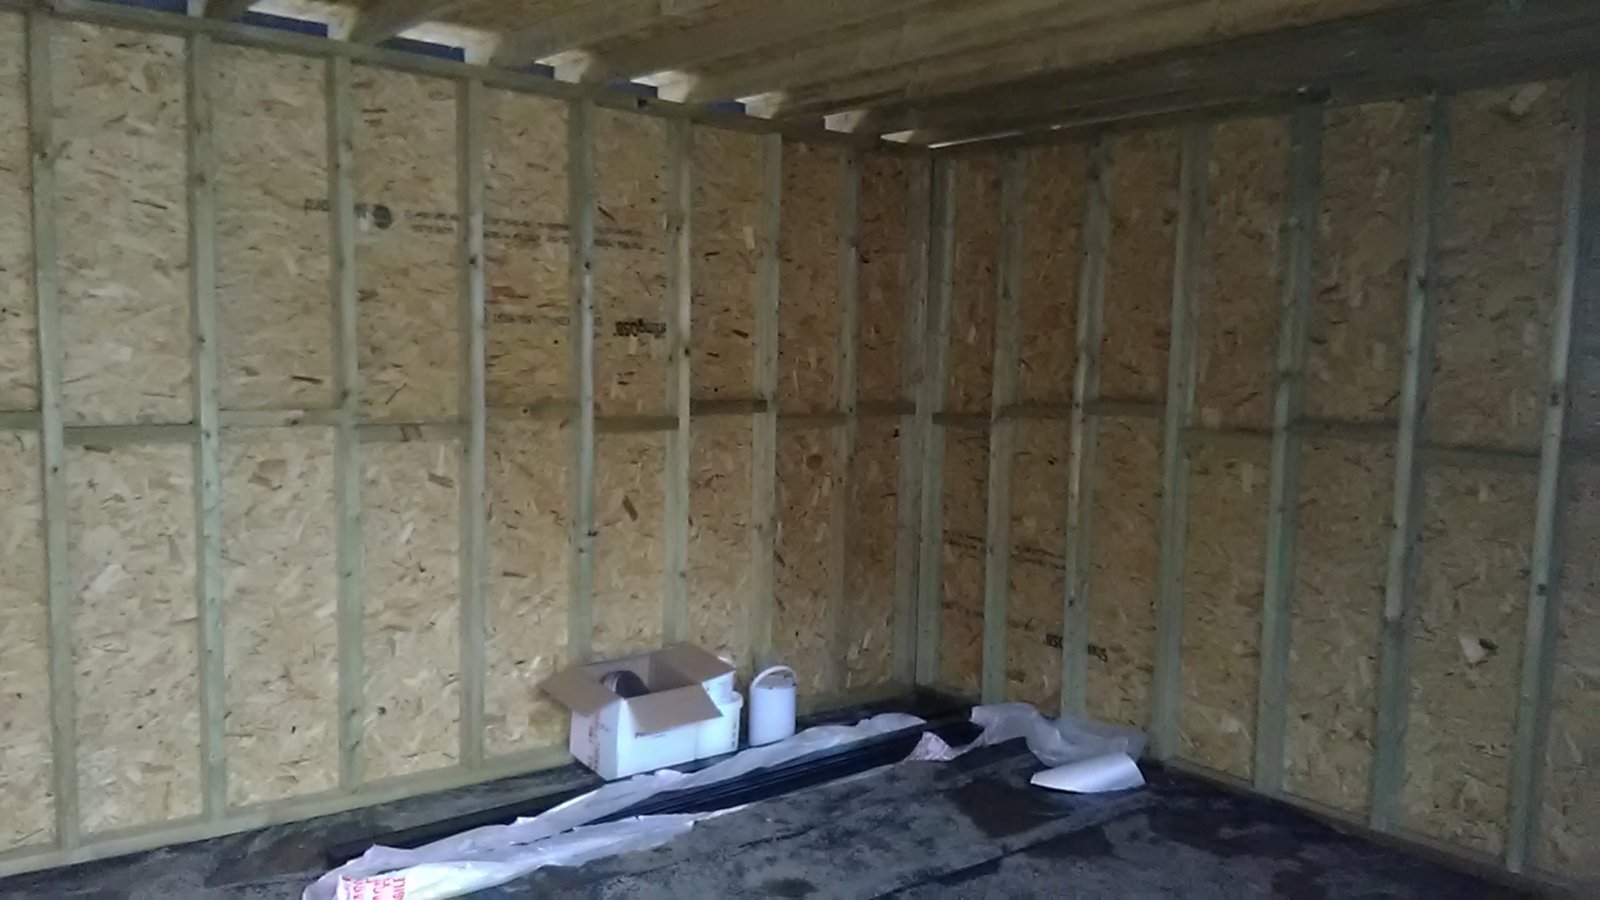
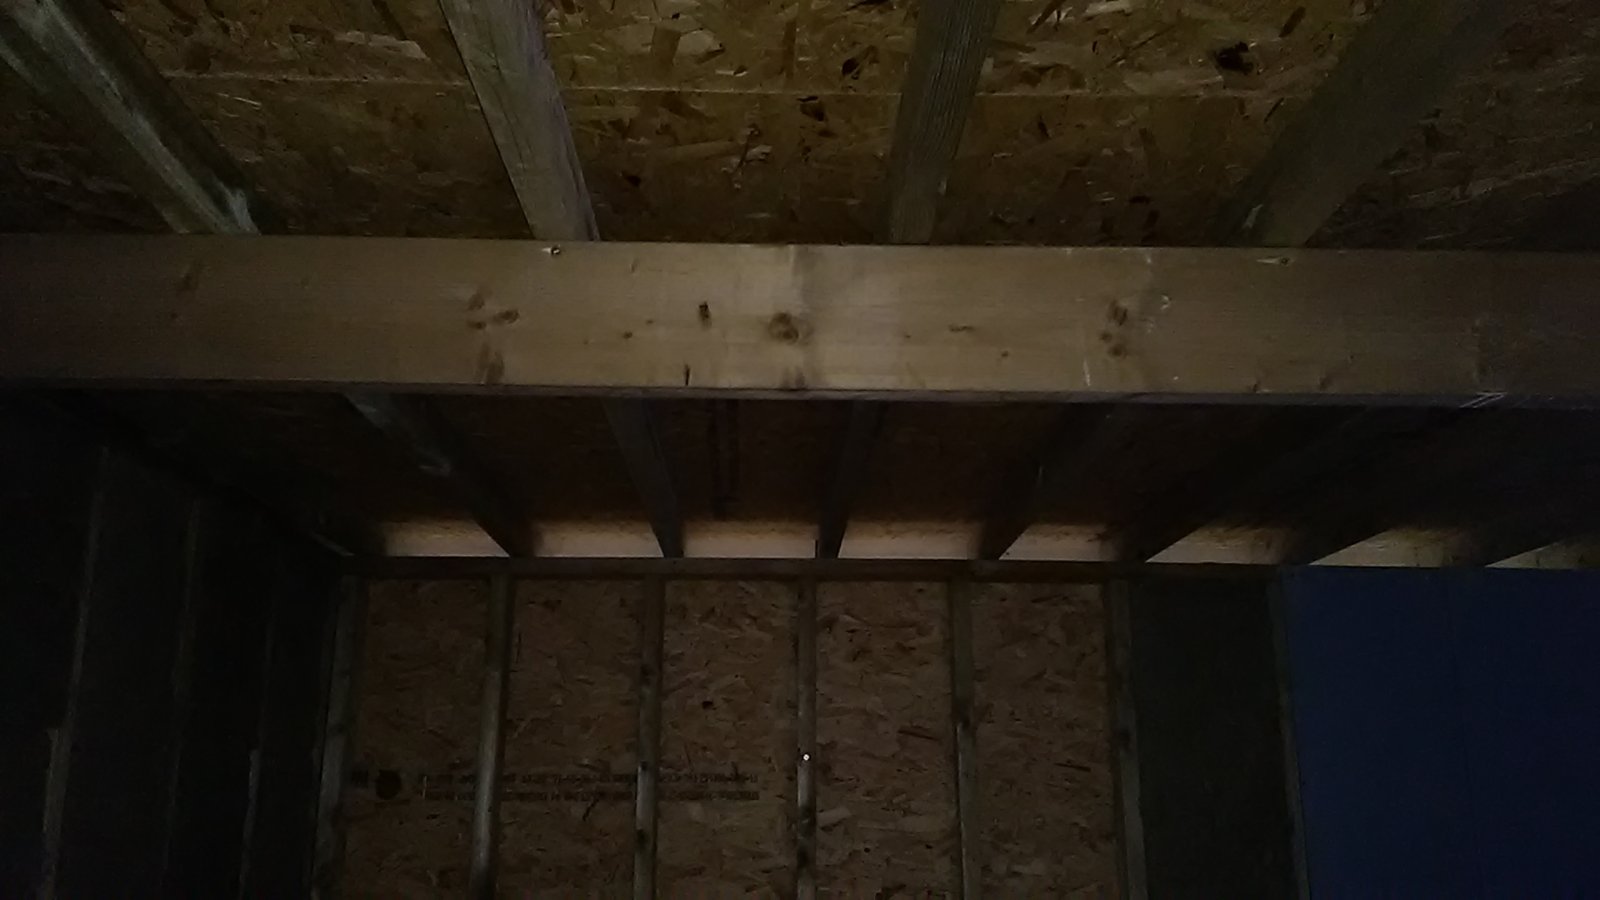
I was quite concerned when I saw how the roof has been put up with roof joists on top of walls and a huge ventilation gap from one side of room to other(see pic).
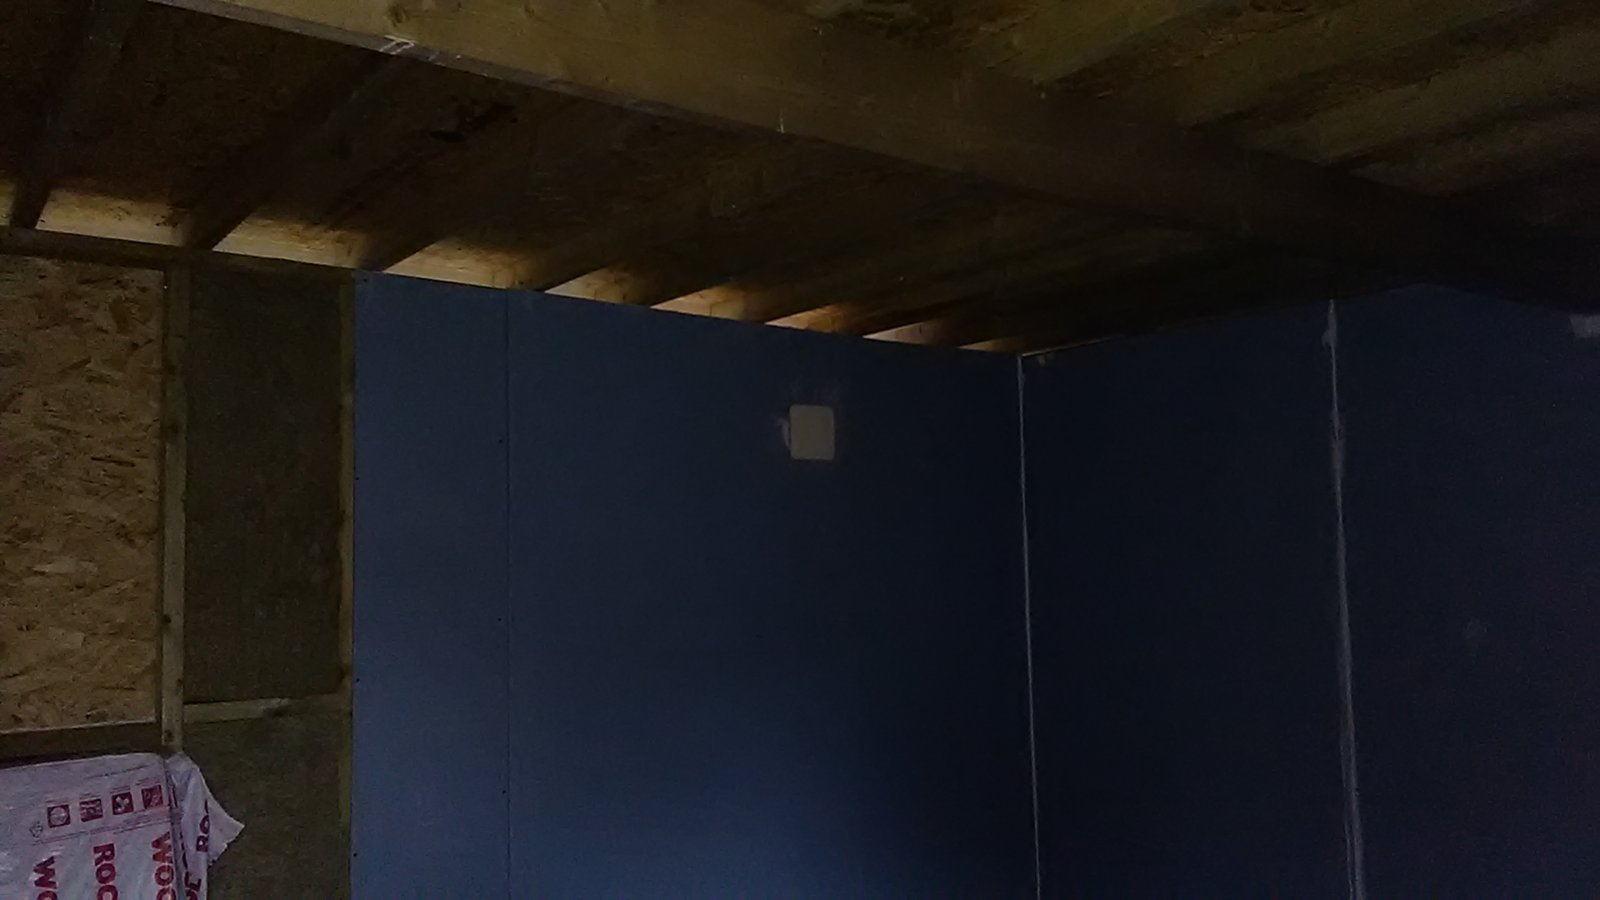
the builder intends to put 2 layers of 15mm acoustic plasterboard (as on internal walls) attached from below to the roof joists with 75mm of rockwool above.
Builder emphasises the importance of ventilation to avoid condensation (which I get) but my concern is that all that is between the inside and outside is the 2x15mm plasterboard and 75mm Rockwool (with an air gap open to the eaves)
. I am unsure if this setup will compromise the already modest isolation.
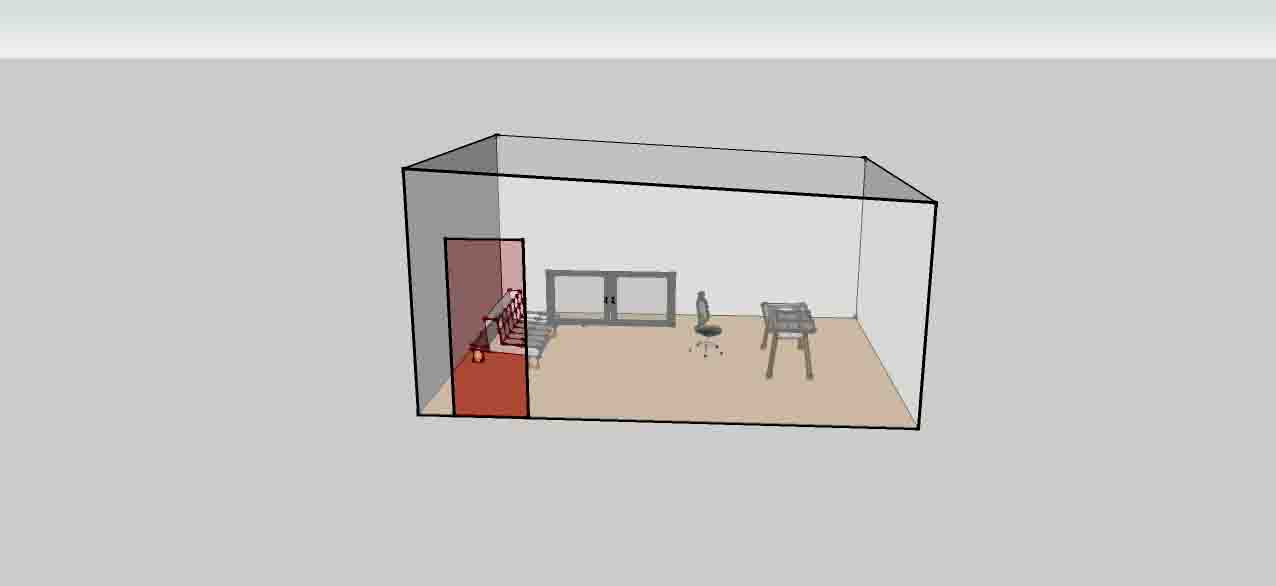
Structure today is as it appears in pic but work is due to continue in a few days. have attached a rudimentary sketchup image of the design. a pic of the roof from inside and one of outside as it is today.
Questions
Is this an acoustic disaster?
Is there anything I can do at this stage to improve the outlook if it is that bad, preferably without ripping off the roof or anything that drastic?
I feel foolish not having focussed on these details prior to construction but feel now that I need to make urgent decisions to avoid having wasted money on materials while having a massive open gap to the outside, Any advice would be very much appreciated.
many thanks
Jose
Tags
Comments
thanks for your reply Kurt, I understand what you are saying, d
thanks for your reply Kurt,
I understand what you are saying, do you (or anyone) have any suggestions on dealing with this while maintaining the necessary ventilation in roof bearing in mind the stage I am at on the build? Is it too late to remedy this?
thanks again
ventilation in studios is usually accomplished by low velocity f
ventilation in studios is usually accomplished by low velocity fans pushing air through a labyrinth of duct work. every bend in the duct attenuates the sound traveing each way. (in and out). the low velocity fan assure fan noise and the sound of air moving is kept to a minimum.
please keep in mind, i am not an acoustician. i just play one in the studio and on the interweb thingie.
Hi Kurt, Thanks for your thoughts on ventilation. Is your sugges
Hi Kurt,
Thanks for your thoughts on ventilation. Is your suggestion used for roof ventilation? I thought what you describe was for the inside studio space, might be something for me to consider if it can be used to keep airflow in roof cavity.guessing something like that could be costly.
I have seen images of cabin type home studios which have flat (pent) roof like mine but I does not have open exposed spaces between the joists under the OSB roof. BTW my cabin is not like this one in size or style but just wonder how condensation is avoided without the kind of roof design I have (see my pics) unless as you say there is a HVAC system being used and no gap needed between ceiling and OSB board roof as ventilation is supplied by mechanical means.
Appreciate your thoughts Kurt,
The studio on the link just looks more sealed? How is this achieved while maintaining ventilation and preventing condensation?
Cheers.
Jose
[[url=http://[/URL]="http://www.soundpro…"]http://www.soundpro… teaching studio.html[/]="http://www.soundpro…"]http://www.soundpro… teaching studio.html[/]
i've said what i have to offer. perhaps @Brien Holcombe will hav
i've said what i have to offer. perhaps @Brien Holcombe will have more to offer. he's the current resident acoustics guru around here. from past experiences, it's more than likely anything more i would add would be dismissed by him and other acoustic experts more in the know anyhow, so i will avoid embarrassing myself.
I'm sure Brien will be the definitive answer on this. But in th
I'm sure Brien will be the definitive answer on this.
But in the meantime I'm not seeing any picture, so we can't tell if you just mean the normal overhang you see in roof trusses. IF that's all we're talking about, I'd say your professional building contractor is on the right path. Construction methods can be very specific from one region to the next, because of your specific climate, he probably knows what works best in your area. The contractor's main objective is avoiding water damage and giving you a building that will last.
IF you're concerned about something other than this, you'll have to be more specific and/or provide drawings or photos.
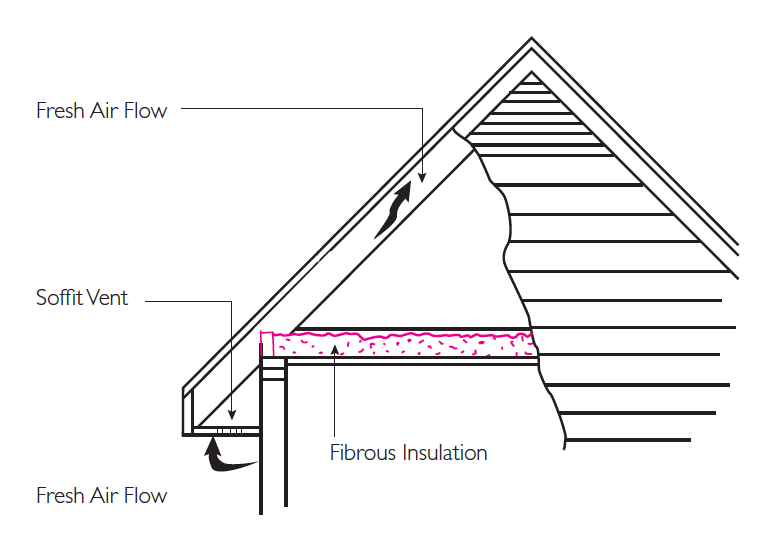
Although it's counterintuitive to your energy-efficiency and sound-loss goals, the attic space absolutely has to breath outside air freely through the soffit and usually in conjunction with either a vent down the ridge of the roof, vents at the top of the gable-ends, or vents cut into the roof. Otherwise, you will have condensation problems that will lead to water damage and rot. People also often mistakenly cram insulation over the soffits too, which leads to warm spots in the roofing. And in the wintertime that results in a cycle of snow melting/freezing that causes ice buildup around the gutters and ice working under the shingles doing even more damage.
If there's any ductwork in the attic, insulated duct has probably been recommended. In the wintertime the attic will be cold (as it should be), so any ductwork in the attic should be well insulated to prevent heat-loss and condensation. Condensation occurs when something has drastic temperature differences on the inner and outer surface, so insulated ducts are beneficial in the summertime too, if it's used for air-conditioning.
From my non-professional understanding, your sound-loss efforts need to be concentrated on sealing any and all air gaps in the ceiling layer between the interior space and the attic. That goes for the edges, around any place wires might penetrate, ductwork, light fixtures, etc. ANYTHING that might be cut into the ceiling, then install the rock wool above that. Just bear in mind that any place that leaks air, will also leak sound.
Hopefully you can benefit from Brien's professional opinion before your contractor moves on.
Best thing you can do is pause the project. And then use some ti
Best thing you can do is pause the project. And then use some time to get your plans right. Theres absolutely no need to rush.
From your description it sounds like the builder going to hang drywall from the outer shell building framing's interior faces?
This is a huge error. For any substantial isolation you've got two options. Room inside a room, or using a RISC clip/channel, or resilient channel system.
From the description it sounds like the builder is putting up a standard shed type building. And then just addding a second layer of drywall.
What you want is an exterior frame with double layers or more of sheathing, and an inner frame/ shell physically decoupled from the outer one. Decoupling is acheived by one of the methods above. It's on the interior framing/clips/channel you add your layers of drywall to.
That's the first most important issue.
2nd- if possible use fluffy insulatiinnfor the cavities not rockwool. Assuming it's cheaper where your located as it is over here in the states. Fluffy insulation is cheaper and more effective at certain frequencies. Rockwool is a waste of money inside a wall cavity.
One way or anther the building has to breathe. With docoupled inner framing and sealed drywall standard ventilation wouldn't be as much as an issue with reguarded to isolation. Your inner frame will block a healthy 30-40 db at mid range frequencies, and your beefed up sealed outer frame could add another 15-20db. That's a very very broad generalized statement. The vent holes will be a breach in the sealing and isolation, but it's something you just will have to live with.
You want a ventilation system that has the smallest sqft of penetration possible.
What's the plan for hvac inside the studio??
Ideally you would incorporate the ventilation and air exchange for the outer shell with that.
I'm not an hvac expert. if possible you would incorporate your fresh air supply and stale air exhaust into the outer shell ventilation.
If you for instance used the outer shells space as an exhcange chamber you can control the humidity within it. Whether or not this is feasible depends on codes and space availability.
Either way I'd be aiming to keep the outer shell sealed up and exchange air between the studio and the attic space. With proper circulation and conditioning you can maintain proper humidity. One way or another you need a penetration thru to the outside so you can intake fresh air. You may be able to integrate the fresh air with the roof ventilation.
A lot of the new 'green' houses are using this sort of thing to take warm air rom the upper floors and pump it down to the lower floors to help be efficient when heating in the winter, doing the opposite in the summer.
This really depends on a lot of details so it's impossible to come up with any sort of design at this point. It's definately no area to rush.
You should pick up 'build it like the pros' by rod Gervias. It's the defacto book for home studio construction.
Hello everone who responded and big apologies for not responding
Hello everone who responded and big apologies for not responding sooner (unfortunately emails ended up in my junk mail).
I really appreciate all the advice everyone took the time to give.
I am in Brighton UK. It is clear that I have not given enough clear info about my build. I will do some sketches and post them (my sketchup skills are not that good yet).
probably best to restate the info together with my sketches rather than write out at this point.
Once again , many thanks, will be back asap
Jose
Hi folks, Thanks again to you helpful people forall your advice!
Hi folks, Thanks again to you helpful people forall your advice! have attached pics etc to clarify the build so far and what I am aiming for.
My initial question was about whether the cavity below the flat roof is a problem for sound leakage, as outlined by Dvdhawk ` your sound-loss efforts need to be concentrated on sealing any and all air gaps in the ceiling layer between the interior space and the attic` from this I understand that the general roof/soffitt vent structure is acceptable providing that the inner `cabin` below is well sealed from this upper airgap?
I understand that SPL readings should be done with a proper meter, unfortunately I cannot afford to buy one at present, failing that I have done some readings with a sound meter on my mobile phone, I know how inadequate this is for accuracy but for me at the moment it serves as a very approximate guide. At approx 1m distance from monitors playing a track quite a bit louder than my usual listening level I got a max reading of 80db with an average of 40db or less.
I do not plan to record a drum kit or have a full band playing, loudest instruments would be ocassional congas, vocals and acoustic guitar. I currently record in a bedroom at home so having more space and less interuptions would really improve my workflow, I have had no complaints from neighbours and want to keep it that way! As most in my situation I don't have unlimited funds to throw at this but need to try and achieve good enough results for my needs.
Regarding the question by Kmetal about ventilation, I know that HVAC is the best way to go but again I have a very modest budget (hoped for £12-13k but now expecting to go to £15k).
What I decided on is a Rytons passive acoustic vent. According to manufacturer's data (obviously in ideal conditions) when open it can reduce sound transmission by 43db and by 50db when closed. I know it is not ideal but am prepared to periodically pause work to allow airflow by opening vent and door/window. Unfortunately this is a compromise I am obliged to make due to budget.
I know I have made mistakes in my planning and construction, some of which are irreversible so I will need to move forward from where I am.
Mistakes (am sure there are many more than listed!)
I have already had installed the Rockwool in stud cavities.
I have already had it built as in pics.
I have already bought the vent.
Listening to the advice in response to my last post I understand that I should halt adding further plasterboarding inside then my next action should be.....
* remove plasterboard already up (including vent)
* install resilient channels on walls and ceiling
* put up the 2 layers of acoustic plasterboard (15mm each) attached to RC
Am I on the right track now and is this the most cost effective route to get acceptable results given where I am in the build now? Would genie clips/furring strips be better for my situation? Don't think budget will stretch to Green Glue.
Builder is away until next Friday so it would be ideal to get my plan clear and buy extra materials needed ready for him to continue the job without delay .there are some exterior jobs he could do if there is a delay such as finishing and painting the exterior cladding although the weather is against us now!
All advice and guidance has been very valuable to me, thanks again.
Jose
Explain to us in some detail about this roof you are going to bu
Explain to us in some detail about this roof you are going to build. Developing a hermetically sealed environment is one thing...but you have to stop sound sound as close to the source as you can get. So rather than a gable roof with vents on the ends of the gable I would build one similiar to what your pictures reveal on the other structures which is termed a hip roof. You eliminate the large vent openings and simply add soffit vents which are required with either design, and install a hip ridge vent which is common practice.
Hello Brien, Thank you very much for your prompt reply. The roof
Hello Brien,
Thank you very much for your prompt reply.
The roof is already up (please see pic) with EPDM covering already in place.
If a hip ridge vent you describe requires a roof pitched either side of a higher central ridge this would not be possible as an adaptation to my build as I am building subject to UK Permitted Development rules (no planning permission required) which prohibits total height more than 2.5m unless 3 or maybe 4 meters from boundary with neighbours. I chose that location as being furthest from neighbours while still leaving some garden space. Looks like I have to go with what I have.
Must admit the builder is able to build what I want but (like me) has little experience with this type of specialised build . I have been researching as much as I can and learning a great deal but inevitably am making many mistakes and incurring extra costs despite my best efforts.
I can upload more pics if needed but assuming I can't change the basis structure is the best advice to add resilient channels to ceiling and wall joists/studs and then 2 layers of plasterboard? Some PB has already gone up directly onto studs but not too late to remove then put back if RCs are best option, obviously any extra cost of materials and labor would be tough but will have to take the pain if it means the difference between being able to work problem free or having problems with neighbours. Currently have a 7pm curfew as that is my daughters bedtime! Hope to be able to work later than that in a new space.
If these pics are no help I can take more tomorrow (in daylight).
your advice is very much appreciated!
José
I will tell you like I have told hundreds of men over 10 + years
I will tell you like I have told hundreds of men over 10 + years in my time of doing this on line. You are too far ahead of me for me to help you now. I will not say that you cannot recover but it is always better to plan your work and work your plan.
Many in this field that I am only a student of will say that you must access your needs first as to what your requirements are and build accordingly. They will also tell you that a ceiling and a wall are the same in respect to each must be designed and built to match one with the other in respect to sound containment and sound isolation properties.
To justify isolation clips and hat-track you would lean on the exterior ambient noise levels and your anticipated sound output from the room...anything beyond that is good money after bad my friend.
Hello Brien, Again thank you for your wise advice. I am sure ma
Hello Brien,
Again thank you for your wise advice.
I am sure many before me have made similar mistakes. Part of my eagerness to get the room built is simply to do it before other unforeseen financial demands take over. Another issue is that we live in a 2 bedroom house and my daughter needs her own bedroom (currently my studio!). Currently I sleep on the sofa downstairs and she with my wife upstairs!. None of this negates the good sense in your advice Brien, as you suggest there is no point throwing good money after bad, will just need to do the best I can with the understanding and money I have then live with the consequences.
Thanks to you and all others who have taken the time to pass on their thoughts.
José
Hi folks, Thanks again to you helpful people for getting me
Hi folks,
Thanks again to you helpful people for getting me on the right track! have attached pics etc to clarify the build so far and what I am aiming for. I hope they help clarify my situation.
My initial question was about whether the cavity below the flat roof is a problem for sound leakage, as outlined by Dvdhawk ` your sound-loss efforts need to be concentrated on sealing any and all air gaps in the ceiling layer between the interior space and the attic` from this I understand that the general roof/soffitt vent structure is acceptable providing that the inner `cabin` below is well sealed from this upper airgap.
I understand that SPL readings should be done with a proper meter, unfortunately I cannot afford to buy one at present, failing that I have done some readings with a sound meter on my mobile phone, I know how inadequate this is for accuracy but for me at the moment it serves as a very approximate guide.
At approx 1m distance from monitors playing a track quite a bit louder than my usual listening level I got a max reading of 80db with an average of 40db or less.
I do not plan to record a drum kit or have a full band playing, loudest instruments would be ocassional congas, vocals and acoustic guitar. I currently record in a bedroom at home so having more space and less interuptions would really improve my workflow, I have had no complaints from neighbours and want to keep it that way! As most in my situation I don't have unlimited funds to throw at this but need to try and achieve good enough results for my needs.
Regarding the question by Kmetal about ventilation, I know that HVAC is the best way to go but again I have a very modest budget (hoped for £12-13k but now expecting to go to £15k).
What I decided on is a Rytons passive acoustic vent. According to manufacturer's data (obviously in ideal conditions) when open it can reduce sound transmission by 43db and by 50db when closed. I know it is not ideal but am prepared to periodically pause work to allow airflow by opening vent and door/window. Unfortunately this is a compromise I am obliged to make due to budget.
I know I have made mistakes in my planning and construction, some of which are irreversible so I will need to move forward from where I am.
Mistakes (am sure there are more than listed!)
I have already had installed the Rockwool in stud cavities.
I have already had it built as in pics.
I have already bought the vent.
Listening to the advice in response to my last post I understand that I should halt adding further plasterboarding inside then my next action should be.....
* remove plasterboard already up (including vent)
* install resilient channels on walls and ceiling (with care to follow installation
instructions)
* put up the 2 layers of acoustic plasterboard (15mm each)
Am I on the right track now and is this the most cost effective route to get acceptable results given where I am in the build now? Would genie clips/furring strips be better for my situation? Don't think budget will stretch to Green Glue.
Builder is away until next Friday so it would be ideal to get my plan clear and buy extra materials needed ready for him to continue the job without delay .there are some exterior jobs he could do if there is a delay such as finishing and painting the exterior cladding although the weather is against us now!
All advice and guidance has been very valuable to me, thanks again.
Jose
---------------------------------------------------------------------------------------
13.11.16
hello again,
am considering all the valuable advice received. I have been thinking hard about the options still available to me to mitigate some of the irreversible mistakes I have already made. Quite a rough night of self-created despair!!
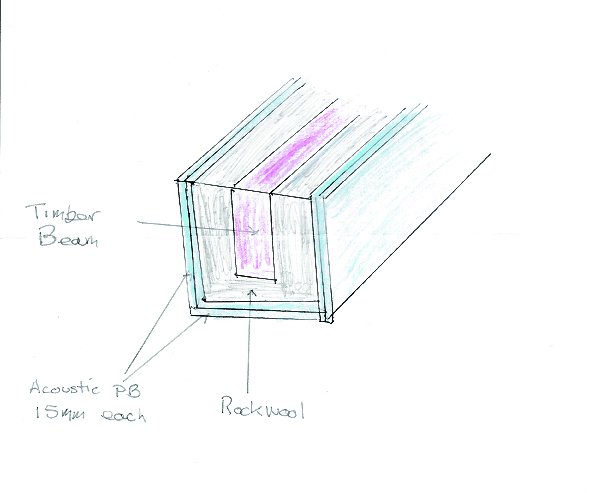
One option I am considering which could go some way to reducing sound transmission in and out of the cabin is to install resilient bars on walls studs and ceiling joists then attach to this the 2 layers of 15mm acoustic plasterboard I have already purchased.
If I do this I have realised one issue that I am uncertain how to address.
there are roof joists running from one side to the other from longest side to the opposite side. The builder then put up a supporting beam perpendicular to the joists to offer further support to the roof (he admitted an errir he had made with joists and offered this as a solution which I accepted-my responsability!)
. If this were not there the RC installation seems straightforward to me but as this supporting beam runs below the parallel joists and protrudes downwards into the room I am unsure how to deal with it as it is fixed directly to the joists above. If this is not dampened then presumably it would transmit vibration to the joists above and on to the OSB above (and also from outside to inside via the same route).
One thought I had is...
1) to also apply RC to its 3 accessible sides then box it in with 2 layers of plasterboard attached to the RC. I cannot see how to give it the similar layer of rockwool that will be applied to the walls and ceiling though.
The other thought I had which to me does not seem to match the rest of the build is
2) to box it in without the RC on it and put rockwool between the beam and the plasterboaed covering it thus making a kind of baffled beam.
any thoughts or suggestions are greatly valued.
many thanks.
Just wrap the beam with sheet rock and install the RC as you wou
Just wrap the beam with sheet rock and install the RC as you would if it were just one clear ceiling. Difference is because of this beam you have 2 ceiling areas to treat...make sense?
How much have you researched the install of the sheetrock? You can shot your self in the foot if it is not installed properly...same with the RC...it only works if installed properly, if it is installed upside down you will effectively short circuit the decoupling and lose any advantage you would have otherwise gained.
Hello and thanks again Brien for your quick reply. what I under
Hello and thanks again Brien for your quick reply.
what I understand about sheetrock application so as to not create a flanking route is to not compress it tightly within a cavity but to let it sit loosely without any compression just cut slightly oversize so it attaches with friction adhesion..
With RC I have read carefully the installation instructions (which I will pass on to the builder) about firstly fixing the right way up and not bypassing the RC by screwing PB directly into studs/joists, this would require marking where the studs/joists are so as to be able to avoid them when attaching PB. I also understand that the correct and different length screws need to be used attaching PB to the RC (corrugated webs) to again avoid screwing the PB into the timber or RC supports.
PB on walls should not touch floor , those on ceiling should not touch walls, these gaps should be sealed with acoustic sealant. I will impress on builder the importance of following these instructions in full.
I don't think I have fully understood when you say ` Just wrap the beam with sheet rock and install the RC as you would if it were just one clear ceiling. Difference is because of this beam you have 2 ceiling areas to treat...`
does this mean wrap the beam on all accesible sides with RW then attach Resilient bars to the timber on these sides (through the RW) then proceed with plasterboard installation on these sides? Unsure of how to do this.
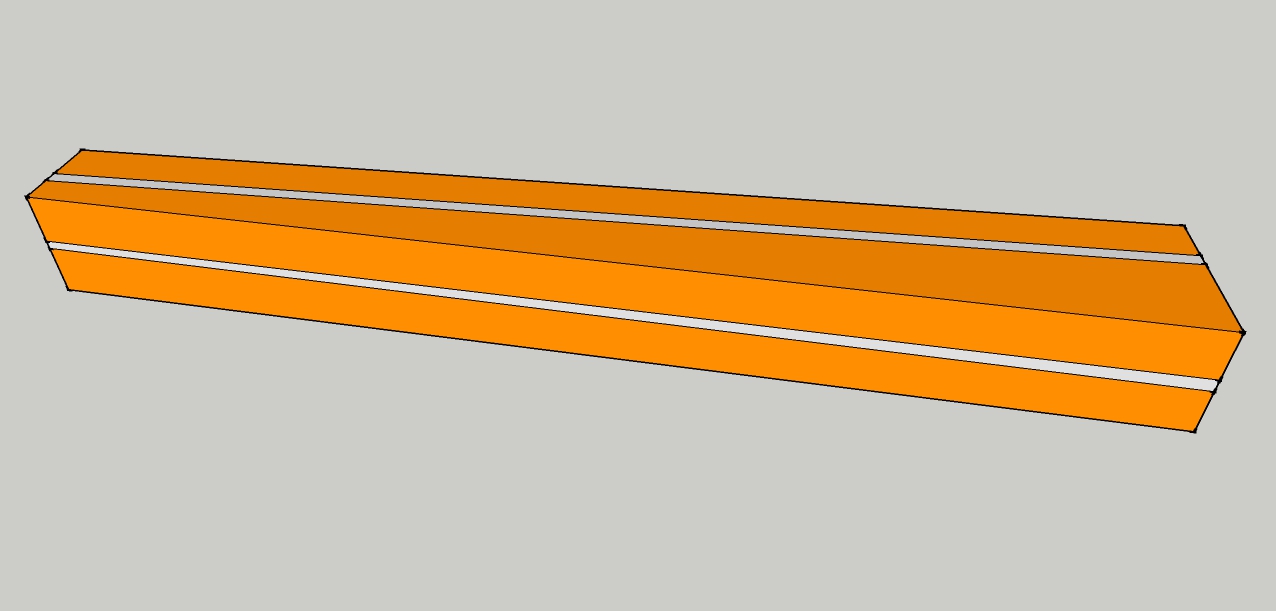
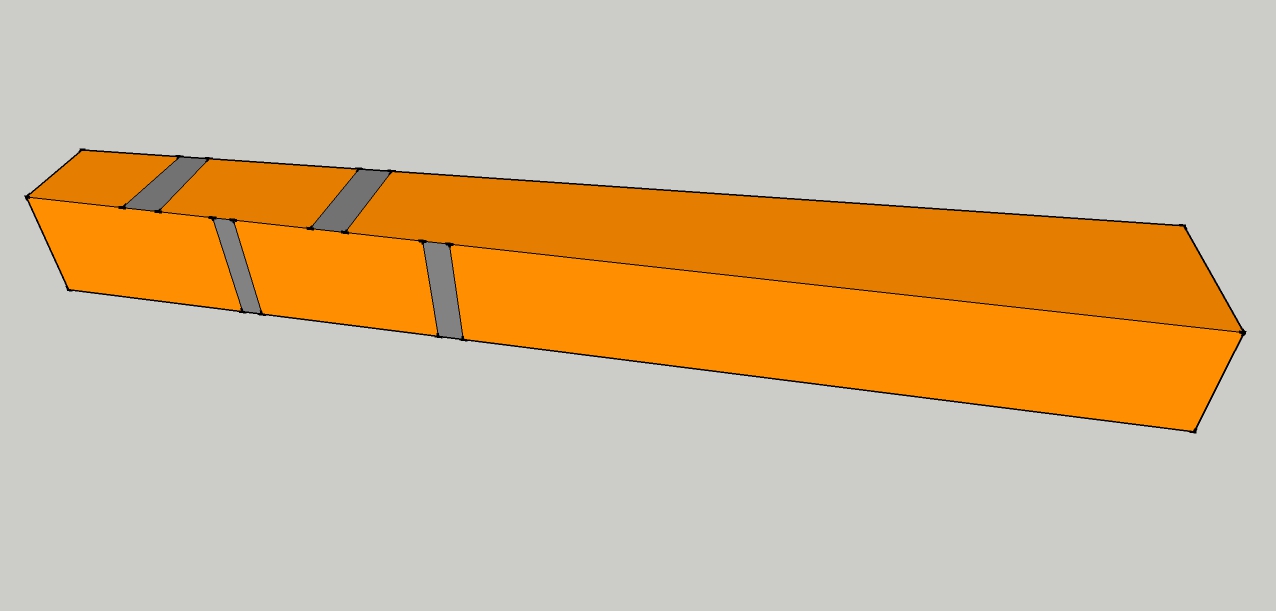
Also have another question regarding attachment of RC to the beam, I have done a rudimentary sketchup to explain my question, if option 1 is used I think RC cost would be higher, would option 2 give the right results?
thanks again Brien
Jose
Hi Brien, read your last advice just after sending my sketch, H
Hi Brien,
read your last advice just after sending my sketch, Have understood what you say is that no PB panel should directly touch any other panel apart from the one attached to the RC underneath it?. so panels on walls and ceiling should not be butted against eachother directly but have acoustic sealant between these edges.
Jose
thanks for last message, hopefully my last one summarises your g
thanks for last message, hopefully my last one summarises your guidance correctly.
Is my last sketch a correct understanding of what you earler described to box in the beam? guessing I should have included the detail of making all PB edge joins sealed with acoustic sealant and not directly butted together. should perpendicular corners of the ` box` be treated this way then perhaps taped together instead of screwed? Clearly I don't have carpentry so please forgive my questions if they are nonsensical!
The beam is simply a beam. 1 layer of pb will do fine since you
The beam is simply a beam. 1 layer of pb will do fine since you have the existing mass of the wood of the beam as a factor. You can tape and mud the out side corners of the beam just like it was a corner in your home.
The critical joints to treat as an acoustical connection will be where the ceiling meets the beam and where the beam meets the wall at either end. These should not make a hard connection.
Brien I can't thank you enough for your guidance! If I understa
Brien I can't thank you enough for your guidance!
If I understand correctly I will wrap the exposed surfaces of the beam with Rockwool, cover that with 2 layers of PB taking care to ensure the critical joins you outlined in your post are sealed with acoustic sealant and do not directly touch each other. Where the beam rests on the frame has already been sealed acoustically but will check it had been done correctly. Not sure what my options are if not.
I feel I have already taken up much of your time on a Sunday addressing my issues, my appreciation of this is huge! I feel I have a chance of a way out of the mess I have created, for this I thank you sir!
José
Jose Luis, post: 443379, member: 50063 wrote: What I decided on
Jose Luis, post: 443379, member: 50063 wrote: What I decided on is a Rytons passive acoustic vent. According to manufacturer's data (obviously in ideal conditions) when open it can reduce sound transmission by 43db and by 50db when closed. I know it is not ideal but am prepared to periodically pause work to allow airflow by opening vent and door/window. Unfortunately this is a compromise I am obliged to make due to budget.
I haven't used this product before so I can't say anything about its effectiveness.
If your using the door/window make sure they are sealed properly and have as much mass as the walls or more, so they aren't a weak point in the isolation.
Eventually if budget allows hopefully you can get a standalone ac that sits on the floor like a dehumidifier or ideally a mini split ac.
As far as the beam goes if your using RC channel or risc clips, you can simply box the beam in with a simple 'chase frame' a simple frame, hanging from the channel itself spaced off the beam 1/2" or more. Then you insulate and cover with your drywall lie the rest of the ceilings and walls.
I can't stress enough how much 'build it like the pros' by Rod Gervias would help you. It's got explanations and drawings for you and your builder. All you've got to do is follow them. He specifically addresses what to do in case of a beam on the ceiling, for making window plugs, and little doors for ac/vents.
As far as drywall goes. Here's the USG drywall installation guide.
https://www.usg.com/content/usgcom/en_CA_east/resource-center/gypsum-construction-handbook.html
If you've got the space making an isolated set of wall and ceiling frames indepdendent of the existing ones is usually about the price of RC channel or cheaper, with far more benefits with reguard to isolation from impact noise like rain, and airborne noise like music.
Have you addressed the electricity side of things.
If I were you I'd wait and plan and just set the money aside. Worse comes to worse you use it with some moving blankets on the wall for a couple months while you draw plans up.
Believe me when I say I know about the couch dwelling. I also know how rewarding it is to live with things done proper, and how dissapointing it is living with things improper.
The best way you can save money is to plan. This isn't an emergency build. There's plenty of contractors.
But either way get that book. It's pictures are worth double it's price all day. it's the best money you'll spend on your studio.
Your questions and answers are all in there.
Drwall packed in an existing ceiling/wall bay looks something li
Drwall packed in an existing ceiling/wall bay looks something like this. The bare section was left for the picture. Then insulation is placed over the drywall in the bay.
Channel on a ceiling with a support beam looks like this. You hang the 'chase frame' from the channel on either side. The chase frame is a simple 2x frame, that forms a box around the beam and doesn't touch it. Before the drwall on this ceiling is/was installed care is taken to make sure the insulation stays up in the cavity and doesn't touch the channel or drywall.
Hi Kmetal Thank you so much for taking the time and giving your
Hi Kmetal
Thank you so much for taking the time and giving your experience and insight into my issues, the pics you posted are of great value too.It means a lot to me to get advice from you who has been through this process.
I am realising that this is a practical issue requiring planning and budgeting but also an emotional one requiring resolve, adaptability and tenacity. Getting it right will have a huge payoff on all these fronts.
I am currently pricing up the RCs but will also consider your suggestion of an inner frame construction instead. The external dimensions are 4mx5mx2.5m high so I guess I could sacrifice some internal space to follow your suggestion.
The door and window have already been delivered. The glass in each is 2 panes of laminated glass, one is 8.8mm and the other 6.4mm with a 14mm gap in between. They are in a upvc frame and are really heavy! Again these may not be ideal choices but wanted something that came premade with frame and locks. If I need in the future I thought I could have a 2nd door installed on the exterior and secondary glazing on the window.
My approach (perhaps mistakenly) has been to keep future options open but to continue to keep it moving forward within the budget I have at present.
regarding electrics I have talked to an electrician about installing a fuse box with 3 or 4 separate circuits (one for audio, one for service etc). we spoke of having what here in the UK is called dado trunking (may be different name in the US). this will be surface mounted inside the cabin so minimal wall penetration. The other thing I want to look into is whether the fuse box can be installed outside instead of too many holes through the wall or floor. not even sure if this can be done (rains a lot here) what do you think of this idea? either way guess at least one cable has to penetrate.
I have been considering resilient channels to decouple the 2 layers of 15mm acoustic plasterboard from the studs and joists. The builder has estimated I would need 51x3m lengths, I know there are effectiveness/quality differences between different brands, here is one affordable option I have been looking at
Am still shopping around but as my sound output is generally quite low , phone app SPL reading 80db max (I know not good meter to use!)), even if the isolation is less than the best available the price seems to be about 50% less than auralex RC8 for example. Seems hard not to go for something like that if it gets me some acceptable results for my needs. so many brands (and unbranded) around, not sure what to look for and what gauge would be best.
Thanks too for the pics showing the chase frame construction, looks pretty straightforward.
The Rod Gervais book and others are so highly reccomended and I know I should have read them before beginning the project, I find myself now over half way through the build with studs, joists and walls up trying to reach the best result from where I am at this moment, your suggestion to chill and plan is so good and actually helps alot to get some perspective, at the same time I know winter is approaching here and I feel a sense of urgency to move it forward. Your thoughts help to balance this out for me, the roof is on, most the cladding is on (though still needs treating/painting) and inside is dry, guess I can breathe out now!!
thanks so much
Jose
As far as electrical penetrations as long as you keep them to a
As far as electrical penetrations as long as you keep them to a minimum, and seal them w non hardening caulking (silicone or butyl) it's all that can be done. There's some things that we have to live with, and that's one we all have to.
As far as channel goes brand doesn't matter per sey. The important part is to get the documentation from the manufacturer about the test data and results and make sure it's from a real lab.
You also want to make sure you follow their instructions and reccomendations as far as what channel to use where (wall, ceiling) and how many sheets it can support, and proper spacing of the channel.
Aurelex is over priced and not the best as far as RC channel brands and types.
This site has reliable proven types and brand isolation products and I've have good luck with them and so have my clients.
Everything they sell can be expected to work as perscribed. They also have some installation videos which can be helpful.
I've found my iPhone to be about 10db off from standardvsound meters so if yours is in that ballpark then 80-90 db from a few feet away should be handled reasonably well by what your planning, from the perspective of not bother neighbors.
One thing to keep in mind is how loud the neighbors are and whether they for instance play music loudly with an open window, or trains, car horns, planes ect will bleed into your Mics.
These projects are basically a series of compromises between finance and performance.
I've spent the last 8 years or so designing and building these things one after another and I've come to get used to the extended time frames and hyper detailed planning, and stretched budgets. I do understand and relate to the anxious feelings personally and professionally. There is nothing more rewarding than that first time you sit and listen, knowing you did your best. Studios never loose their sense of coolness they're truly special rooms.
I've got a box full of computer parts, and a bunch more on a list, a great set of software, and a pile of lumber outside myself ready for my own personal little edit room. I can totally relate to the anticipation.
Most channels will support a minimum of two 5/8's layer of drywall so your not asking too much on that front. Basically it comes down to what's most cost effective, and the channel vs independent are usually close both material and labour wise. The framing has the advantage of being able to support many more layers should they be needed, the channel requires less space.
I encourage you that it's never too late to pick up rods book, certainly not from where you are in the project.
As far as drywall goes like the USG manual indicates, start with the ceiling first, stagger the joints, (and seams) and seal the perimeter only with backer rod and caulking (silicone or butyl) I prefer silicone for ease of use. Order the backer rod online in bulk 3/8" is a good size and an $80 (us) size spool should give you plenty. Backer Rod is necessary to properly seal the gap air tight, and to give the caulking something to stick to, to avoid failure of the joint.
Leave a simple 3/8" space between the floor, ceiling, and left/right perimeter of the drywall for the backer of and caulk. Tape the seams with a simple rough coat (which will be pretty smooth if done by a pro or able ameture) no sanding necessary until the finish layer.
No need to caulk The seams. Just the perimeters.
Before you cover those walls up plan your electrical and audio wiring and run the wires before it gets covered to make life easier.
Just some pointers addressing commonly asked questions.
Kmetal I am truly overwhelmed by your generosity and also that o
Kmetal I am truly overwhelmed by your generosity and also that of Brien Holcombe and previous responders to my questions with the invaluable advice and expert knowledge! Gold dust! Honestly the engagement with my issues and doubts from all of you is so valuable, I can't thank you enough, I am thousands of miles away, we have never met and yet you folks give up your precious time to help me!! Wow, truly amazing!!
Kmetal your last post was encouraging and helps me balance all the compromises you outlined, I feel that perhaps all hope is not lost. thanks too for your very detailed advice on PB installation and caulking etc
I have ordered the resilient channels along with the right sized screws (2 different lengths) which I intend to use on walls and ceiling. I have talked at length with the supplier who sent me the test data which confirms that the RCs are suitable to bring a new build, a school or refurbished building up to noise transmission code here in UK, took a bit of digging online into what the code specifies (a very long document) but from what I could understand it looks like they will do the job (I know how vague that sounds!). As I will be using 2x15mm PB (he confirmed RCs can take the weight) he recommended I space the wall RCs at 450mm instead of 600mm (usual for lighter panels), ceiling RCs at 400mm spacing.
Builder is back to work on Friday, have told him that he will have to take down the PB and vent already up, install RCs (gave him full installation instructions and will supervise), he will then put back and finish PB etc. It will cost me some more on labor and the RCs but I feel alot more happy knowing that I will have done my very best and won't be left with the feeling `if only I'd done this or that`. The Rod Gervais book I am ordering and I definitely think `if only I'd have done that earlier!
I have been considering having the electrical service box outside the cabin for a couple of reasons. I want to have a motion sensor security light outside, my thought is if the service box is outside then that is one less hole to be made through the wall as the cable would have to come from inside if that's where the box is, does that make sense? (also considering a solar powered one but maybe not so reliable , don't see much sun here in the winter!) Also need to check best way box can be secured if it's inside, would have to fixed to a stud I guess but would that compromise isolation by transmitting vibration from inside to out through studs? Also wondering if it could buzz or click etc?
Thanks once again
Jose
Hi Folks, a quick question... have taken delivery of an externa
Hi Folks,
a quick question...
have taken delivery of an external double glazed door and window in a UPVC frame for my music room.
I gave the spec for glass type and thickness which was not the manufacturers standard config (typical domestic spec).
I made my choices from the options they were able to provide. for both door and window I went for different glass thicknesses to avoid both panes resonating at same frequency although the ideal (I believe) would be having one pane 1/3 of the thickness of the other these thickness proportions were not available so I went for this.
all glass is laminated acoustic glass (Pilkington Optithon)
8.8mm
14mm gap (filled with argon gas-no acoustic benefits I understand)
6.4mm
My question is, is it better to have the thicker 8.8mm side on inside or outside?
have read posts saying it makes no difference but thought I'd ask people that know more than me!
many thanks!
Jose
Jose Luis, post: 443529, member: 50063 wrote: Kmetal I am truly
Jose Luis, post: 443529, member: 50063 wrote: Kmetal I am truly overwhelmed by your generosity and also that of Brien Holcombe and previous responders to my questions with the invaluable advice and expert knowledge! Gold dust! Honestly the engagement with my issues and doubts from all of you is so valuable, I can't thank you enough, I am thousands of miles away, we have never met and yet you folks give up your precious time to help me!! Wow, truly amazing!!
Kmetal your last post was encouraging and helps me balance all the compromises you outlined, I feel that perhaps all hope is not lost. thanks too for your very detailed advice on PB installation and caulking etcI have ordered the resilient channels along with the right sized screws (2 different lengths) which I intend to use on walls and ceiling. I have talked at length with the supplier who sent me the test data which confirms that the RCs are suitable to bring a new build, a school or refurbished building up to noise transmission code here in UK, took a bit of digging online into what the code specifies (a very long document) but from what I could understand it looks like they will do the job (I know how vague that sounds!). As I will be using 2x15mm PB (he confirmed RCs can take the weight) he recommended I space the wall RCs at 450mm instead of 600mm (usual for lighter panels), ceiling RCs at 400mm spacing.
Builder is back to work on Friday, have told him that he will have to take down the PB and vent already up, install RCs (gave him full installation instructions and will supervise), he will then put back and finish PB etc. It will cost me some more on labor and the RCs but I feel alot more happy knowing that I will have done my very best and won't be left with the feeling `if only I'd done this or that`. The Rod Gervais book I am ordering and I definitely think `if only I'd have done that earlier!
I have been considering having the electrical service box outside the cabin for a couple of reasons. I want to have a motion sensor security light outside, my thought is if the service box is outside then that is one less hole to be made through the wall as the cable would have to come from inside if that's where the box is, does that make sense? (also considering a solar powered one but maybe not so reliable , don't see much sun here in the winter!) Also need to check best way box can be secured if it's inside, would have to fixed to a stud I guess but would that compromise isolation by transmitting vibration from inside to out through studs? Also wondering if it could buzz or click etc?
Thanks once again
Jose
Glad your doing it the best you can. As long as code allows I don't see a problem with mounting the box outside.
If you mount it inside you've got the choice to mount it on the inner wall face/channel. The manufacturer should have instructions on how to properly mount things to the ISO wall. The link I posted before should have some drawings as well.
If you mount it to the outer shell/shed joists then you'll need to fabricate a little doorway for access to the panel. This is described in the book illustrating a small door blocking off/opening to a window mounted AC unit. It's in the doors and windows chapter (of my version 1 at least.)
Jose Luis, post: 443540, member: 50063 wrote: Hi Folks,
a quick question...
have taken delivery of an external double glazed door and window in a UPVC frame for my music room.
I gave the spec for glass type and thickness which was not the manufacturers standard config (typical domestic spec).
I made my choices from the options they were able to provide. for both door and window I went for different glass thicknesses to avoid both panes resonating at same frequency although the ideal (I believe) would be having one pane 1/3 of the thickness of the other these thickness proportions were not available so I went for this.all glass is laminated acoustic glass (Pilkington Optithon)
8.8mm
14mm gap (filled with argon gas-no acoustic benefits I understand)
6.4mmMy question is, is it better to have the thicker 8.8mm side on inside or outside?
have read posts saying it makes no difference but thought I'd ask people that know more than me!many thanks!
Jose
Depending on the actual thickness of the glass, and who you speak to the different thicknesses may not matter.
The 1/3 thickness of the other pane is something I've not heard of and sounds mythical in nature to me.
Generally the glass selection is done by making the thin pane match or exceed the mass of the wall, and using the next size up for the thicker pane. This guarantees the window isn't a weak link as far as mass/isolation goes.
You've already got what you've got, which may be a tad on the thin side but shouldn't be too much of an issue based on your walls mass.
As far which one to face outside I would place the thicker side on the inside for two reasons, it's cheaper to replace the thinner piece of it gets broken which is more likely on the outside. and your walls are thicker on the inside so the thicker glass pairs up better with that side.
Hi Folks, Following on from previous posts I have a quick questi
Hi Folks,
Following on from previous posts I have a quick question maybe someone can help me with.
Currently the resilient channels are being put up, there will then be 2x15mm acoustic plasterboard fixed to that.
For electrics I am planning to have power sockets surface mounted with dado trunking.
My question is what would be the best and ssimplest way to fit this?
Can the plastic trunking be screwed through the PB and into the RCs ? When discussing with the electrician (way before having decided to go for RCs) he said the trunking needs to be screwed to the studs (standard non-studio way), would this not compromise the isolation I am trying to achieve?
Also need to ask him if the service box itself can be fixed in a similar way?
Any thoughts much valued
All the best
Jose



holes to the outside are never good unless you want the sound to
holes to the outside are never good unless you want the sound to migrate.