Hey everyone, my buddy ask to help him w his home theater. So I figured I'd add a thread to keep all the construction and acoustics related to it in one spot. This isn't my project so I don't have any control other than the power of suggestion, but I thought this would be a great opportunity to learn some stuff as this process goes on, and also have a documentation of some of the inevitable hangups, so maybe somebody else in a similar circumstance could have a resource. This is just at the brainstorming phase overall. Anyway here's the basics:
We're in the planning phase of a basement home theater/kitchenette,in a 7'2x15x30 and 7'2x12x20' (rough) area. It's a walk in basement, 2x8 12"oc, 2x4 walls, and foundation in some areas.
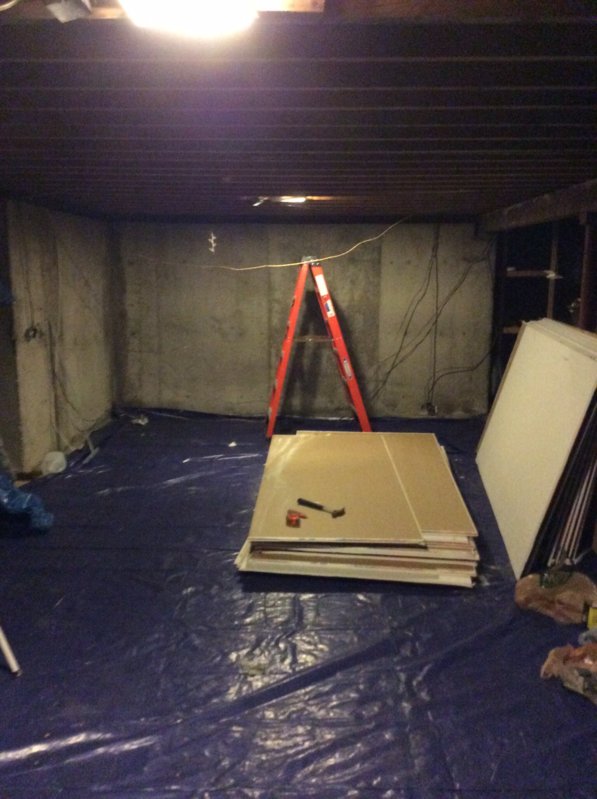
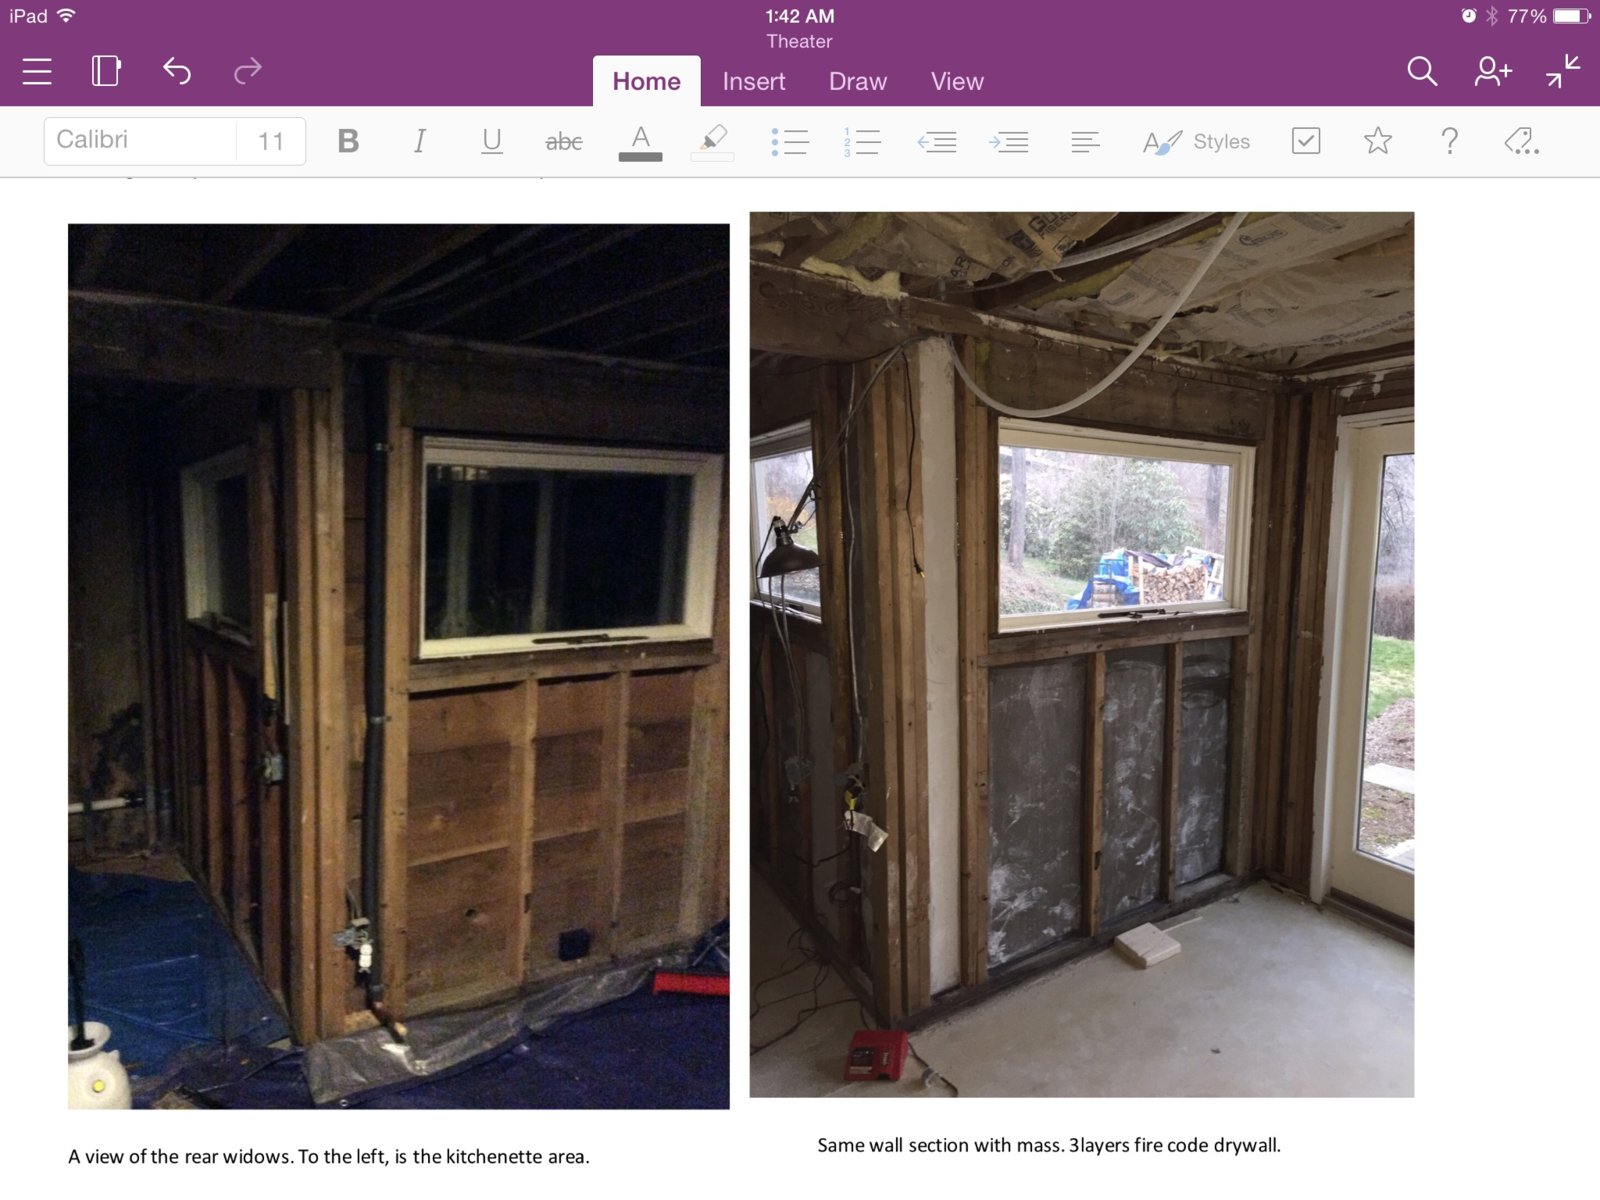
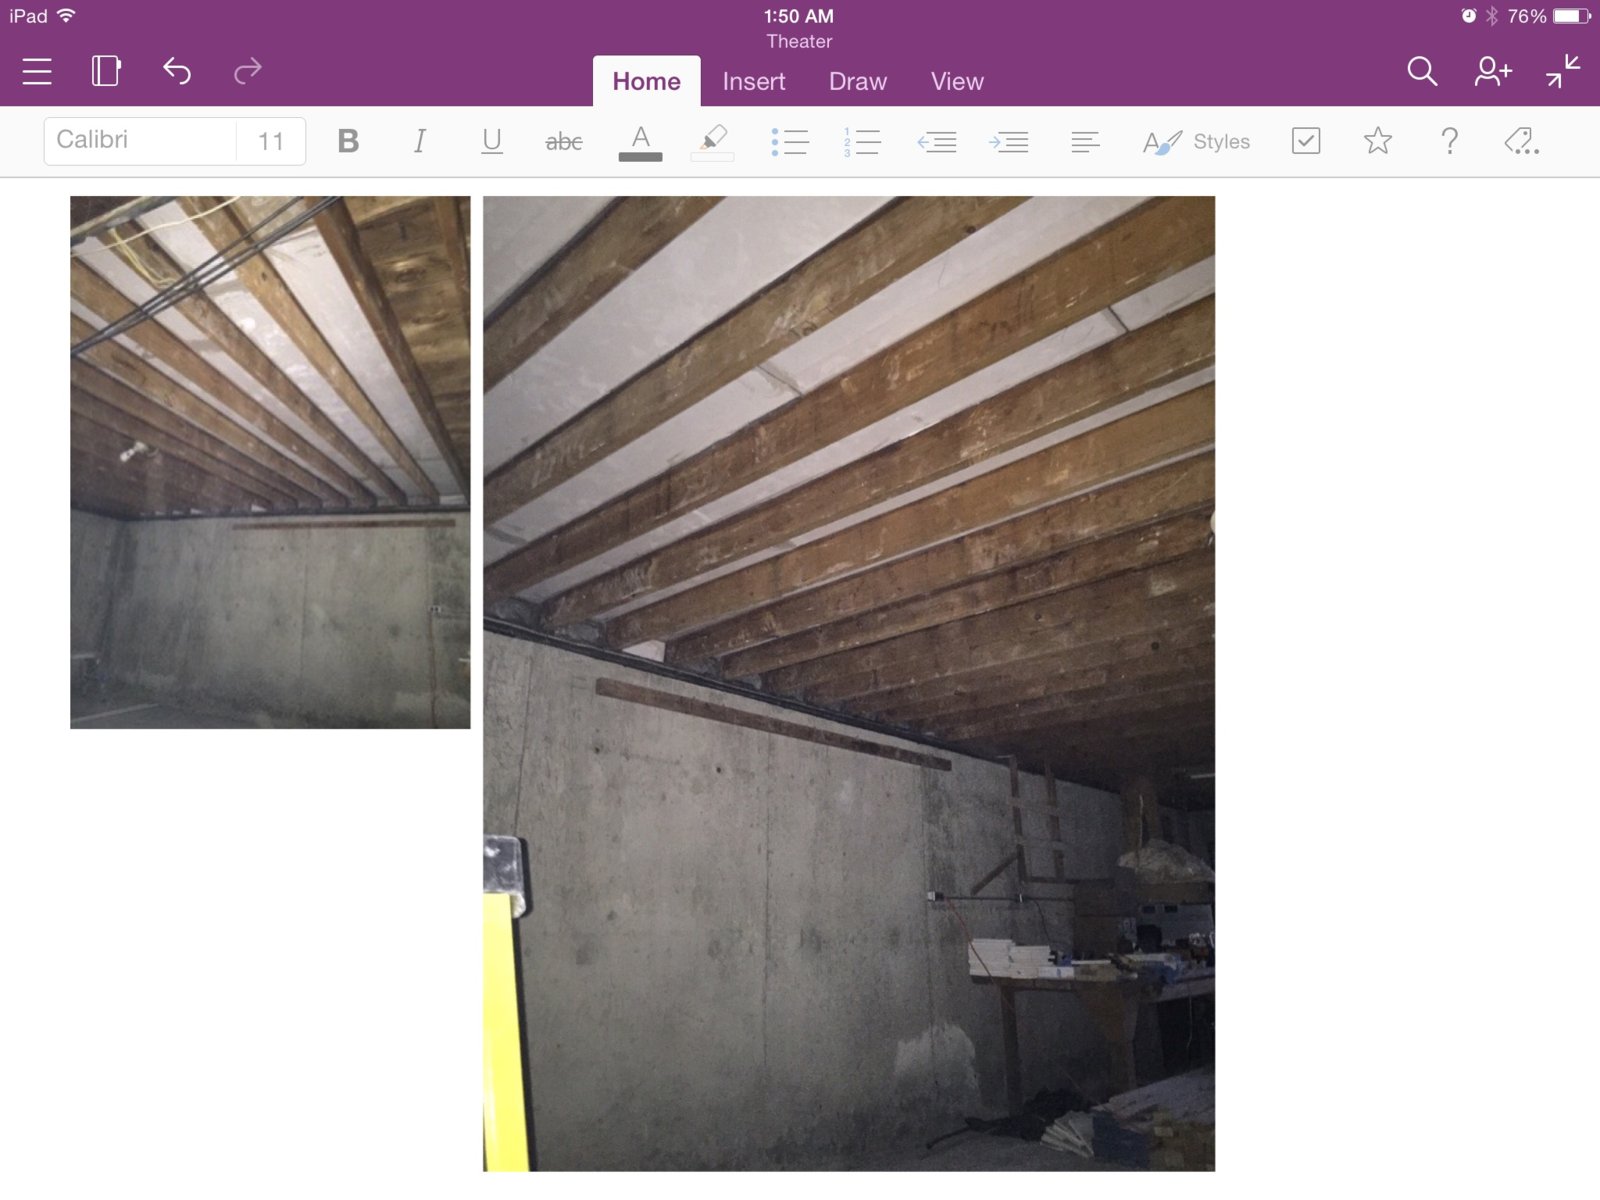
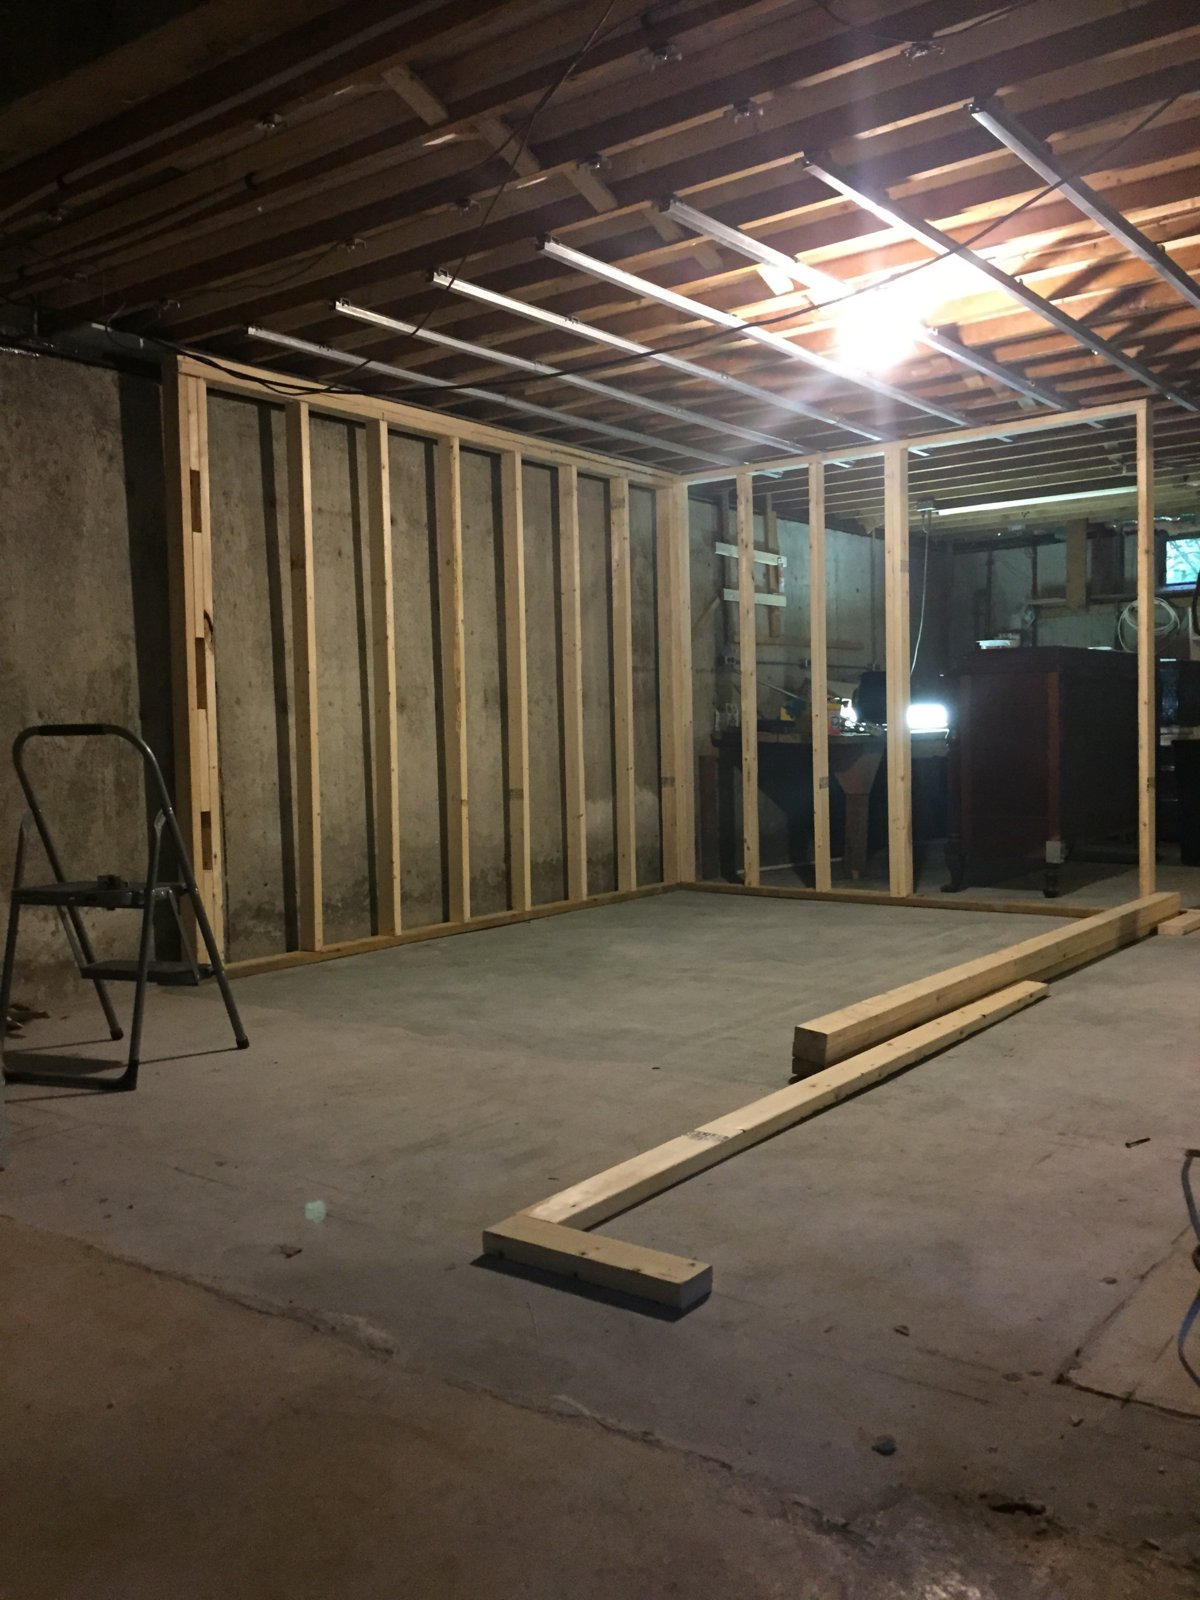
This is the 'front'.
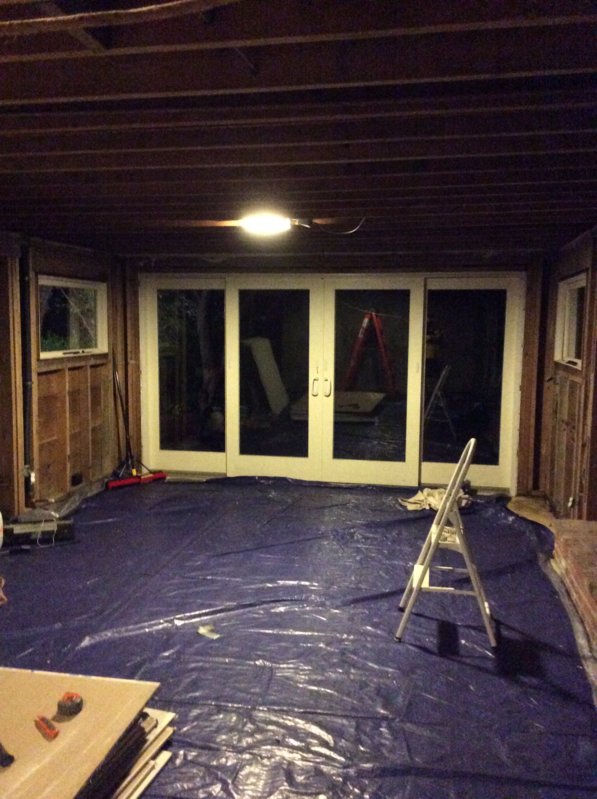
That is the 'rear' walkout part of the basement 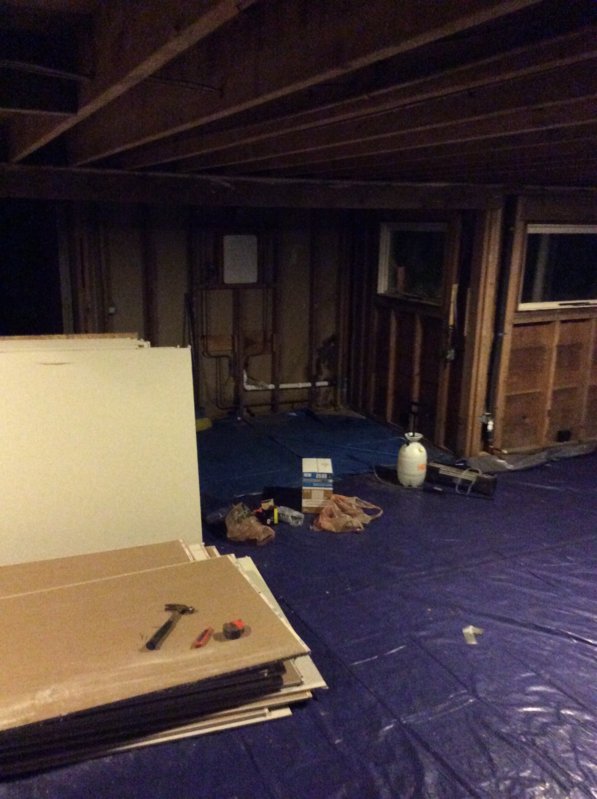
That is looking a little left from the rear door.
The plumbing you see is for the existing bathroom/shower, that will stay.
Ill attach some shots of the place so you can get a better feel. Anyway.
The ISO requirements/expectations would be met if a person could comfortably go down with an acoustic guitar and sing along at an average folk style volume. When 5 cizek speakers and 2 15" custom (it'll be a first for me) subs, powered by haflers, its gonna just get loud down there when the audio video mayhem happens, and it'd be absolutely ridiculous to have expectations of doing much against that, and with around 10k budget for the raw materials, it's gonna add up fast, although the existing physical space limitations, are really the determining factor in the overall design. So the overall idea is to just make a nice comfortable place that offers privacy, and as much isolation as possible, given the existing conditions.
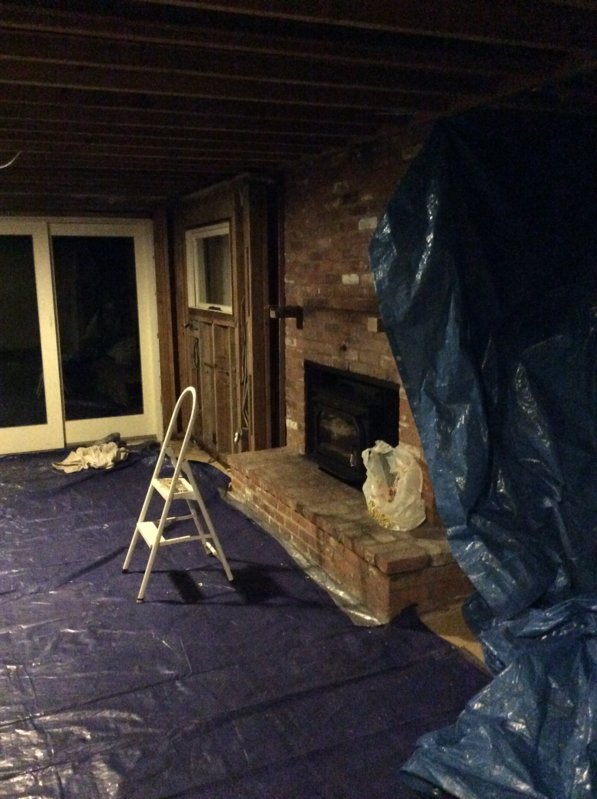
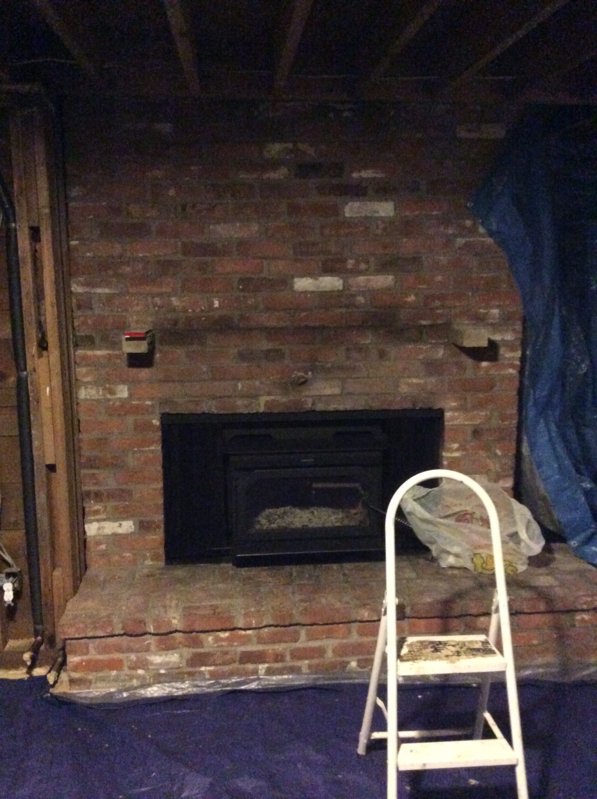
Since there's a fireplace (see pic) that runs right upstairs, and a fairly low ceiling height, it's seeming that the best option is basically similar to the example build in rods book, with a channel system for the ceiling, and double walls, stains concrete floor/area rugs. My thought was to use RSIC-1 clips and hat channel, in place of the RC channel as described in the book (ed1). After a lot of thought, that seems like the best compromise, as they can support 3 5/8" layers of drywall, and with the possibility ofgreen glue in between it seems like the direction to think towards. If the fireplace was going to be removed, the house jacked up 4 ft, and the windows all custom built, then the semi independent ceiling resting on the walls would be the way to go. but working that type of ceiling design in this just seems too elaborate, and unnecessar, although I'm of course open to any suggestions. Even though relative to the rsic-1 clips it's cheaper, I think the ceiling height would be the limiting factor anyway, as space is premium, especially the ceiling.
I found http://www.pac-intl.com and they seem to have a lot cool variations on the rsic-1. They got back to me after about 3 days, when I asked them about spacing/pattern for 12" oc as it's not listen on the site, they responded w a graphic, and saying to use the figures for 16 oc. I would obviously have to figure in the extra clips.
Does anyone have or know anyone who has had experience with this company? They have a thorough website and offer test data from riverbank laboratories.
Also they have a putty to put over outlets, this could prove very useful as there is an outlet that protrudes through the floor deck above. Seems kinda pricy, but what isn't, when the words studio or custom are involved. Are they/ that putty type in general effective, even if overpriced? We only would need a few. Are there better alternatives?
Anyway, now that everything is down to the studs, we re gonna do a sound test w some amps and some speakers to see what we got going on, especially regarding the fireplace. Again do to the limitations it's not expected that a bomb shelter is gonna be there, but it should be a fun project overall, and a great chance to try my brand new makita 12 sliding miter saw and stand! Gonna get the best blade I can afford for my new (very heavy) baby, thinking forrest chopmaster. Got the stock blade which got good ratings as a 'useable' blade, for any rougher everyday tasks, and a freud (researching better) big box blade for the good old framing lumber. After years of borrowing, I finally pulled the trigger, w the makita being the far more practical choice for my weekend warrior self, than the uber saw the festool kapex. (I drool over well engineered things :)) ramble over.
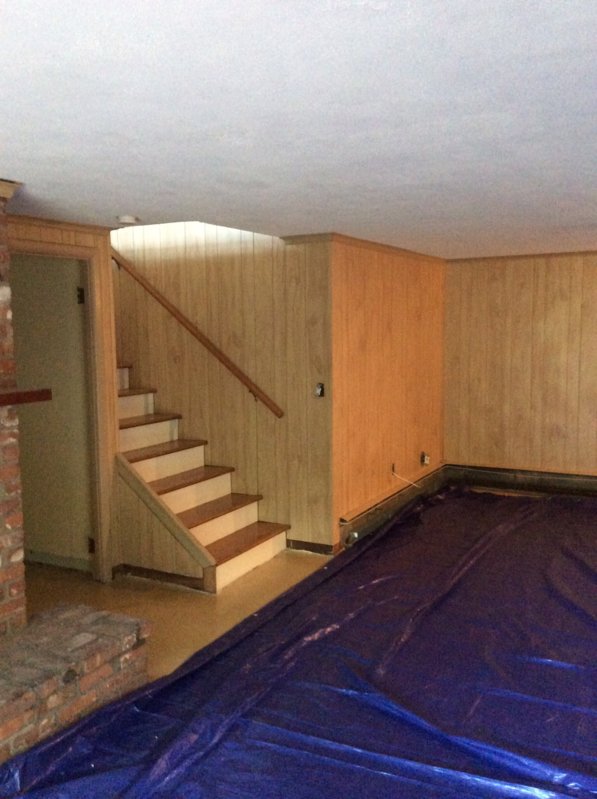
Random Problem areas I can see right now are the beam, which would prob be buried in a soffit used for trapping and lighting. Also the staircase to the left (which I hope I have a pic of). Maintaining ISO in a similar staircase is in that chapter, but this one is a little different, as is the overall design. And def a very questionable area of the project.
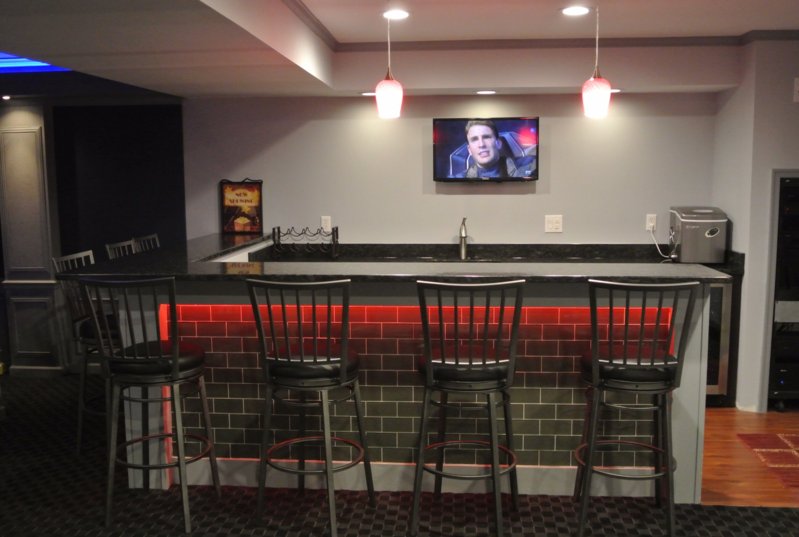
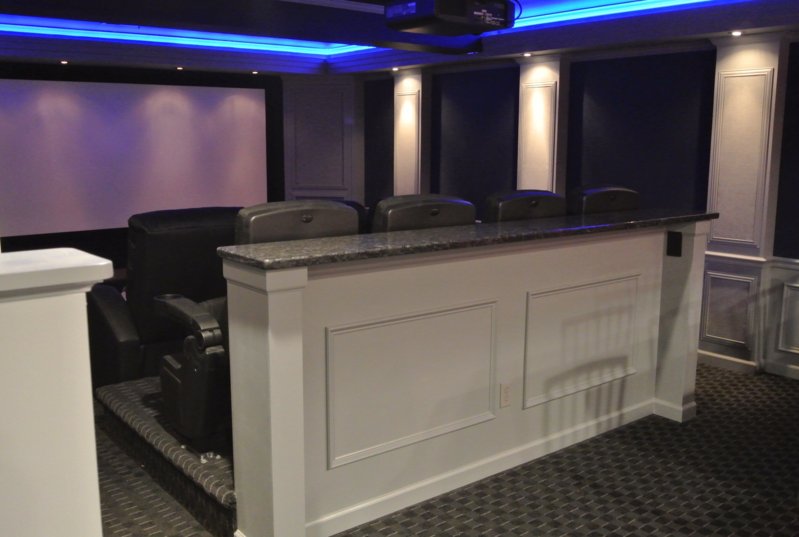
Any thoughts and suggestions are very much appreciated, the pics of the finished theatere are of one I found on line that was similar in shape and size, so something of a rough template, but w the doors wide open. Thanks!
Attached files 
Topic Tags
Comments


Eh good Ol DVDs. Did you use any channel or clips for your dryw
Eh good Ol DVDs. Did you use any channel or clips for your drywall PC?
As far as acoustic treatment I'm thinking flattering more than flat, that said when a bunch of sound geeks get together undoubtably some mixing isn't out of the question, again in the realm of entertainment.
Affects the shell layer goes up I was thinking of a lightweight fabric false wall behind the screen, hiding the front 3 speakers. Figured mount each speaker on a stack of cinder blocks, or something far from figured out yet, right on the concrete floor and be done w it . Then it's just audio to the front, video and power to the projector, and another set of audio for the rears, prob thru the ceiling or wall.
Just throwing a lot out there as I don't know whole lot about theaters, or sound for them. Any caution tales or anything is surely welcome!
I would think that Rod's book would come in handy for a project
I would think that Rod's book would come in handy for a project like this, no?
Yeah I picked it up like 5 or so years ago when my cousin wanted a a little studio made and I knew nada about what was special about acoustic construction. That thing has made it's cost back hundreds of times over. There it is lol.
I actually got to speak w rod one time, he's unbelievably knowledgable, he was cool, had interesting stories. And look how good max's studio came out! Besides screw ups, most of what I know about the construction part of acoustics is from that book and this site, as well as js an gs. There's some truly amazing places out there, the studios themselves are works of art.
Yeah a lot of DVDs but I'm adding blurays now ;) I haven't done
Yeah a lot of DVDs but I'm adding blurays now ;)
I haven't done anything special to the walls except the one which is communicating to the recording room.
I did double walls with rockwool with a 2 inches space between them.
But I isoleted the ceilling completely with rockwool and installed a suspended ceilling. That way you hear less of it upstairs.
How are you supporting the walls? Are they attach to the joists?
How are you supporting the walls? Are they attach to the joists? This is such a critical point in the design. Especially w any potential deflection from people moving around upstairs, I think it's the critical part of a msm system, and key flanking paths. The book has some good details on on where to incorporate what clips to use, and attach what where, so I'm not thinking using the rsic clips, and hat channel, won't be too different from the rc channel in the drawings. But still the clips are new to me, although I have used rc channel before. It's kind of a bit more of a pita that just wood frames and drywall, but space is tight. Were planning on fluffy insulation for most things, except acoustic panels, going to incorporate the superchunk traps wherever possible. It's more readily available and cheaper around here, and there's no evidence to support the added cost of having it burning behind inches worth of drywall.
Pac international has these http://www.pac-intl.com/rsic_cwb.html
They have a standard, a double deflection, and one other one, that I'm kind of unclear about the differences. They seem to look different from the ones in the book, which look more like interlocking U shapes w neoprene in between. Gonna have to look around a bit more and try to maybe get some more info about test performance of the different options, or if it's just based on load capacity.
I'm sure that you will have a better construction than mine. Wit
I'm sure that you will have a better construction than mine. With 3k of budget for the entire construction, I had to compromise. And of course, it is in my girlfriend's house so I had some restrictions.
When I got there, 2/3 of the basement was finished leaving a bare part for tools and storage.
My priority was to make a drum bearable. So I thought of doing a room within a room to be a good idea.
We striped down the ceilling and removed the wall that communicate with the bare part of the basement.
I sealed the end of the sidewalls with isolation to stop the sound from traveling in them and I built a wall with a 2 doors and a sliding window door that I split in 2 parts using one part in the first wall.
I built the recording room supporting its own ceilling leaving a 2'' air space between the upstair joist and its ceilling and the same space between the walls with 2 doors facing each others.

It is far from perfect because the recording room is small. But for now it gets the job done.
Wow it's been a while huh.? Lots and lots going on between the s
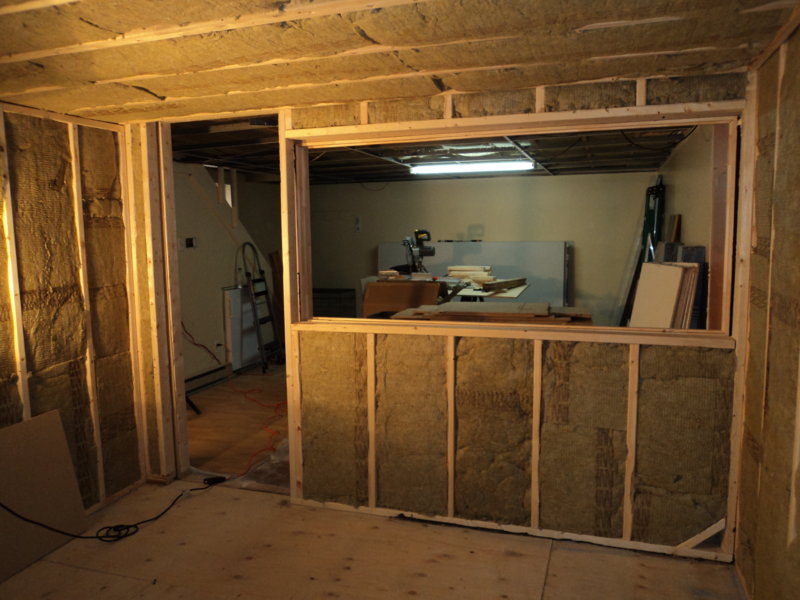
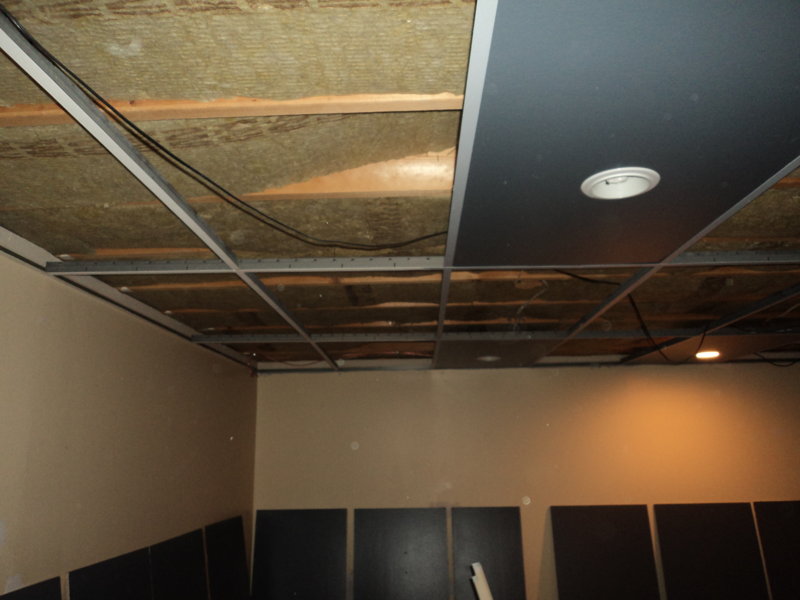
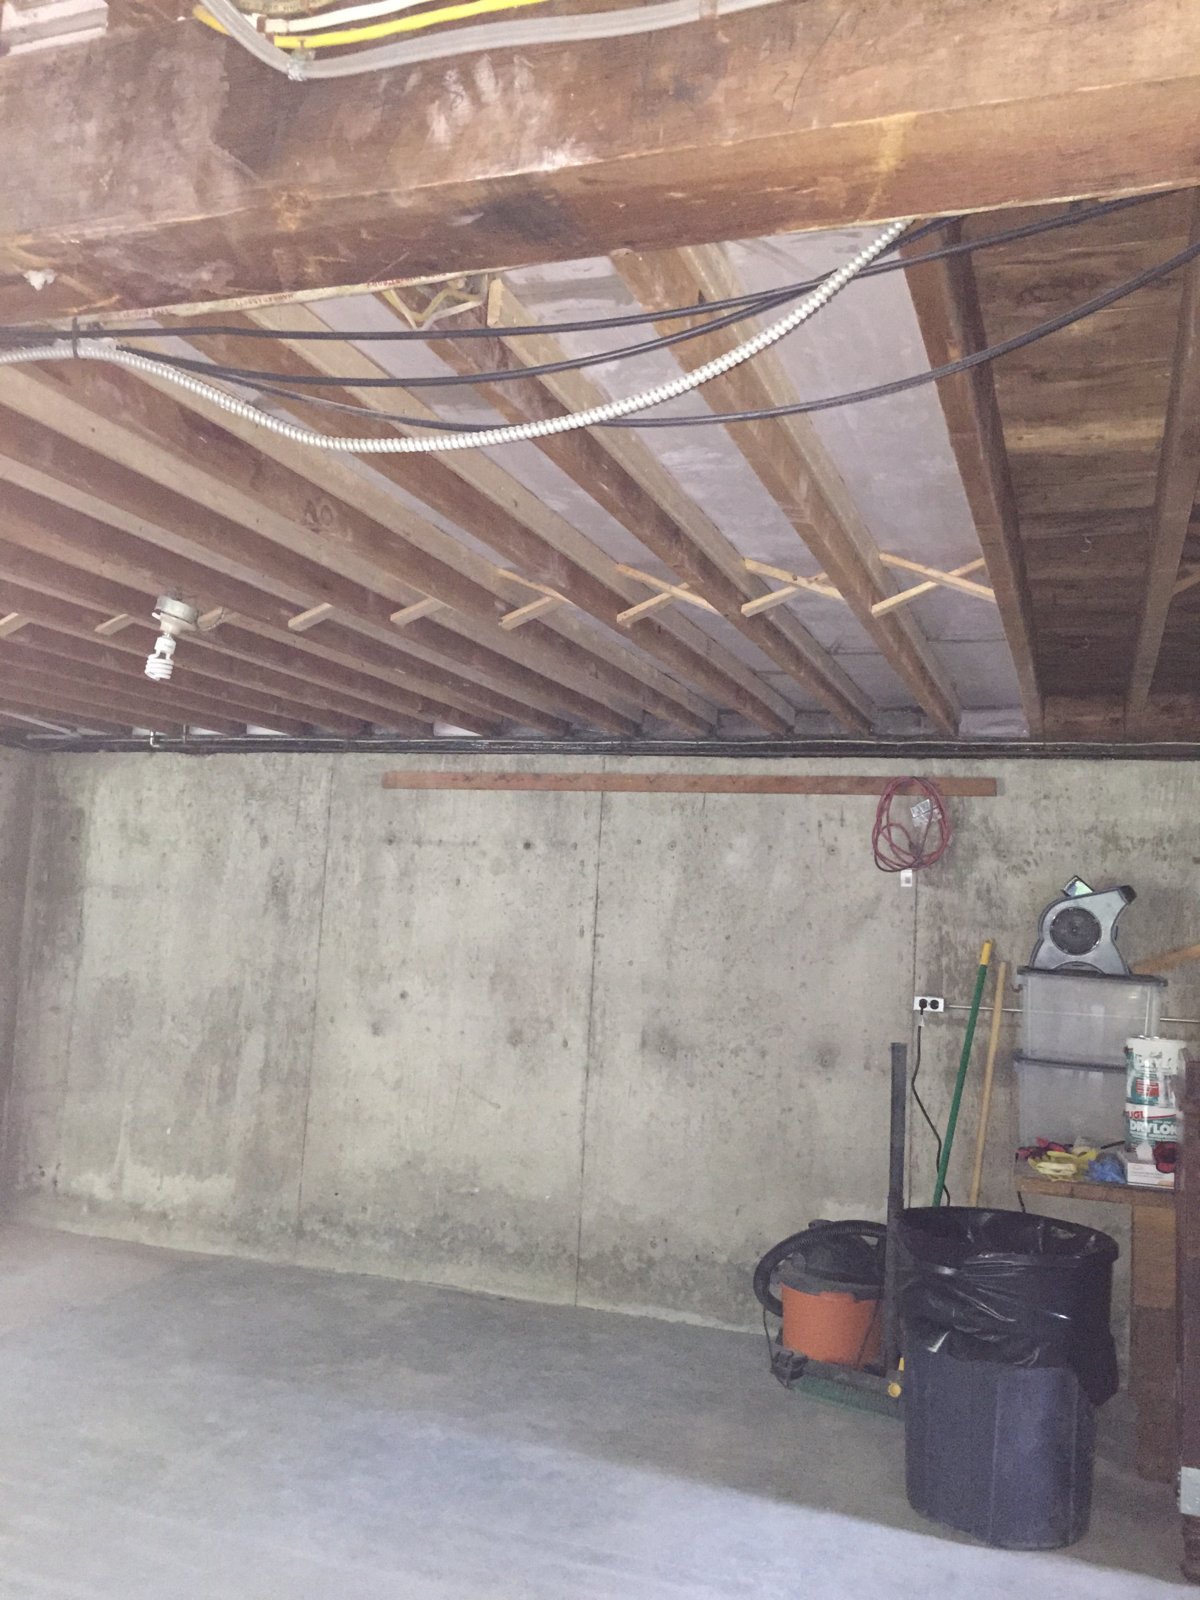
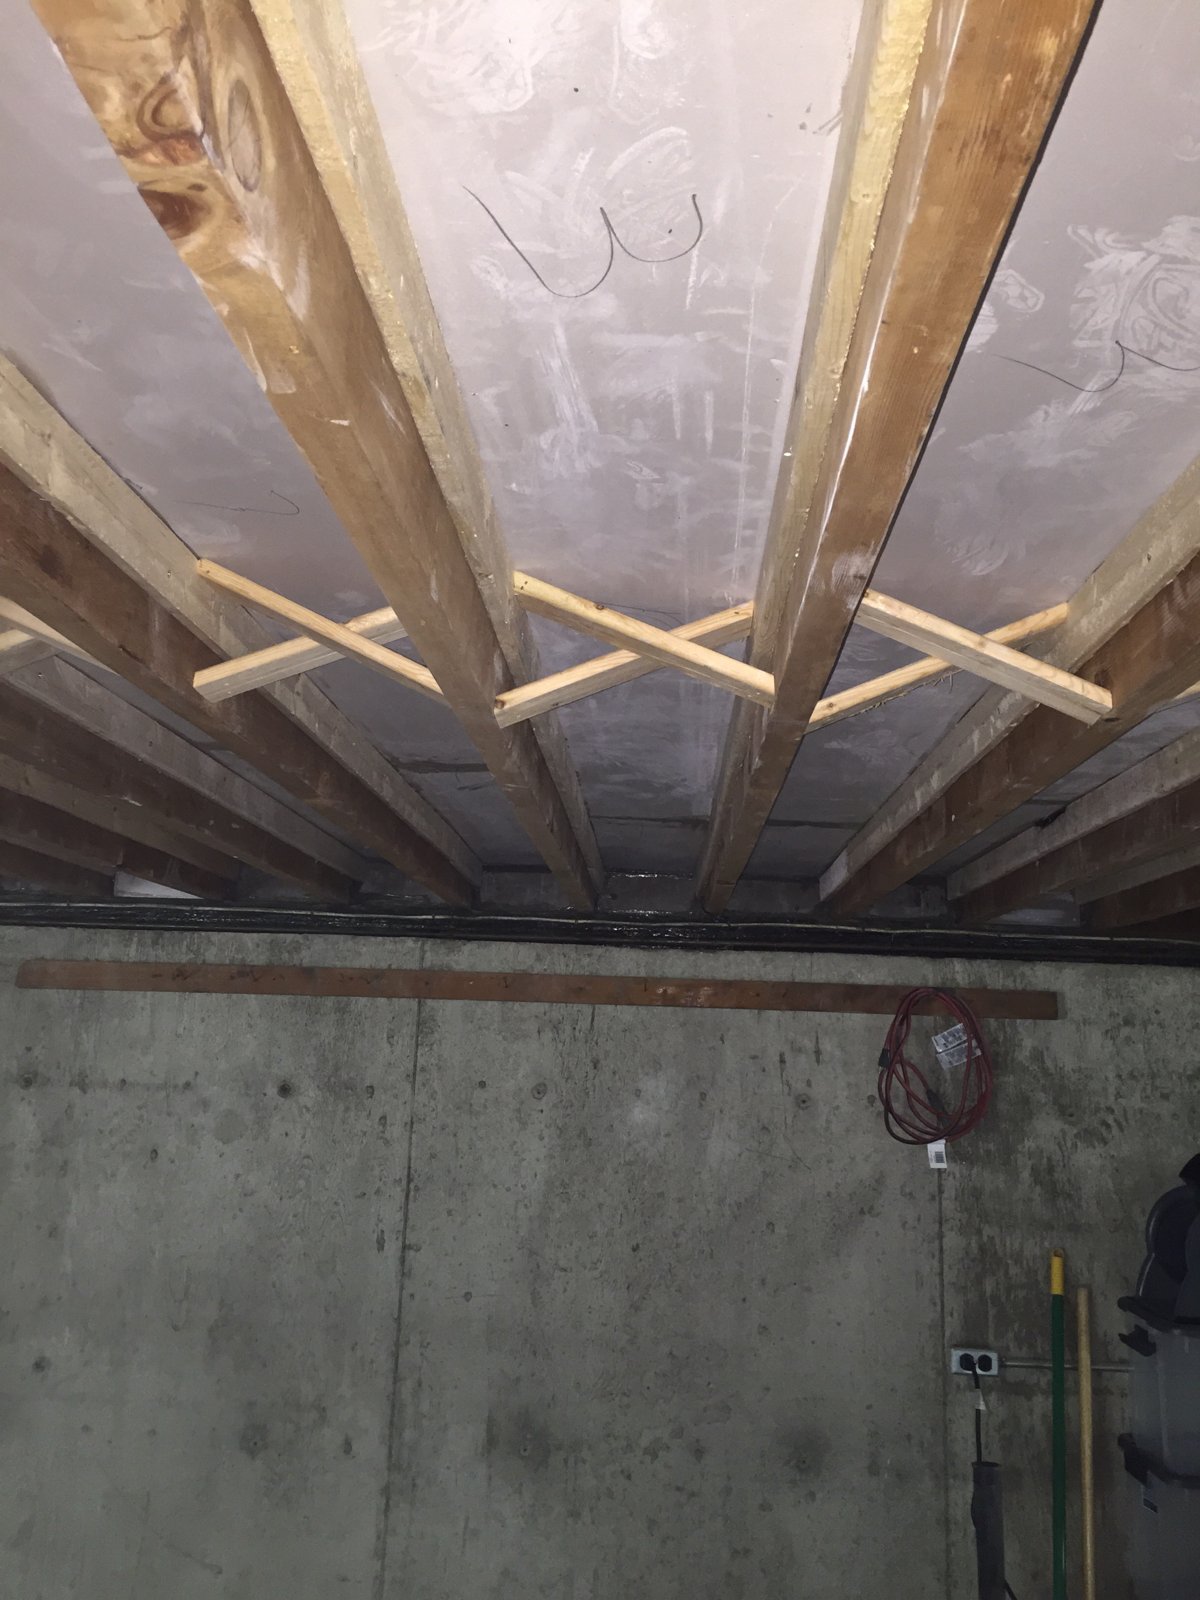
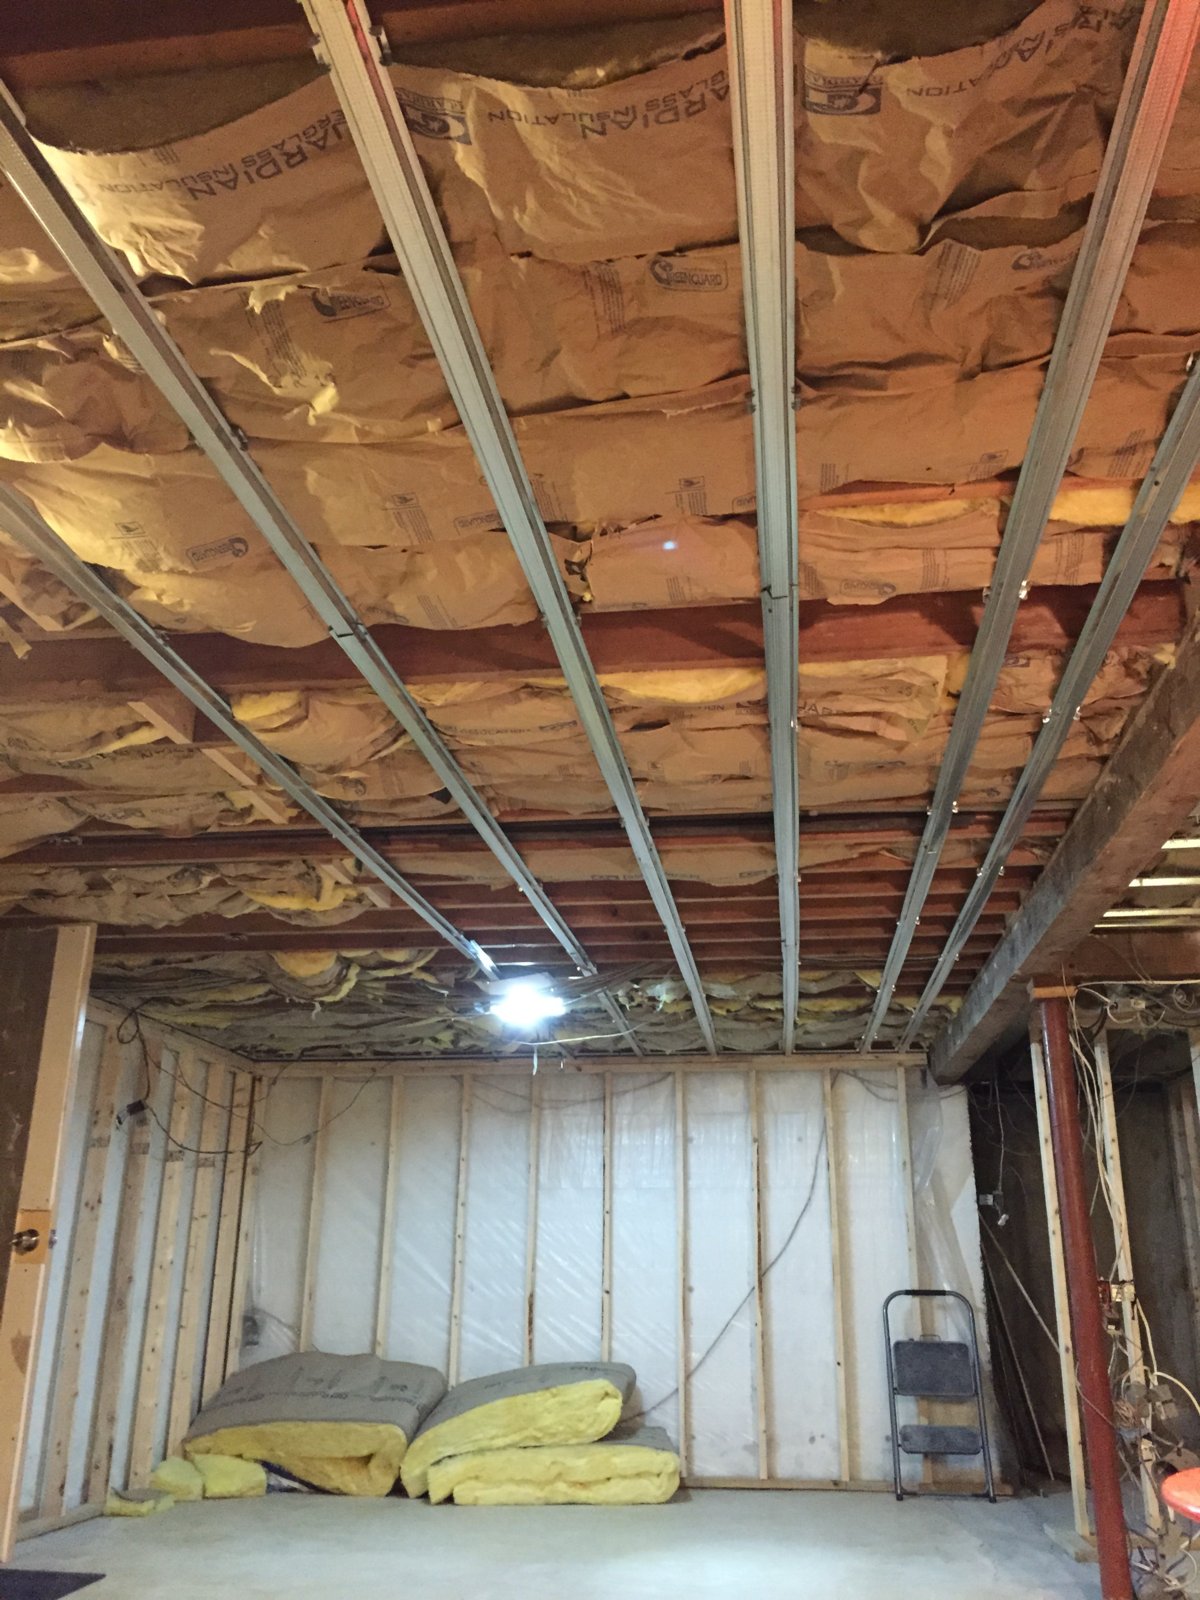
Wow it's been a while huh.? Lots and lots going on between the studios and theater and life I'm general but here's some more pics. I've just about finished the under decking drywalls 3rd and final layer. Phew. like a lot of things studio extremely tedious, but should prove rewarding.
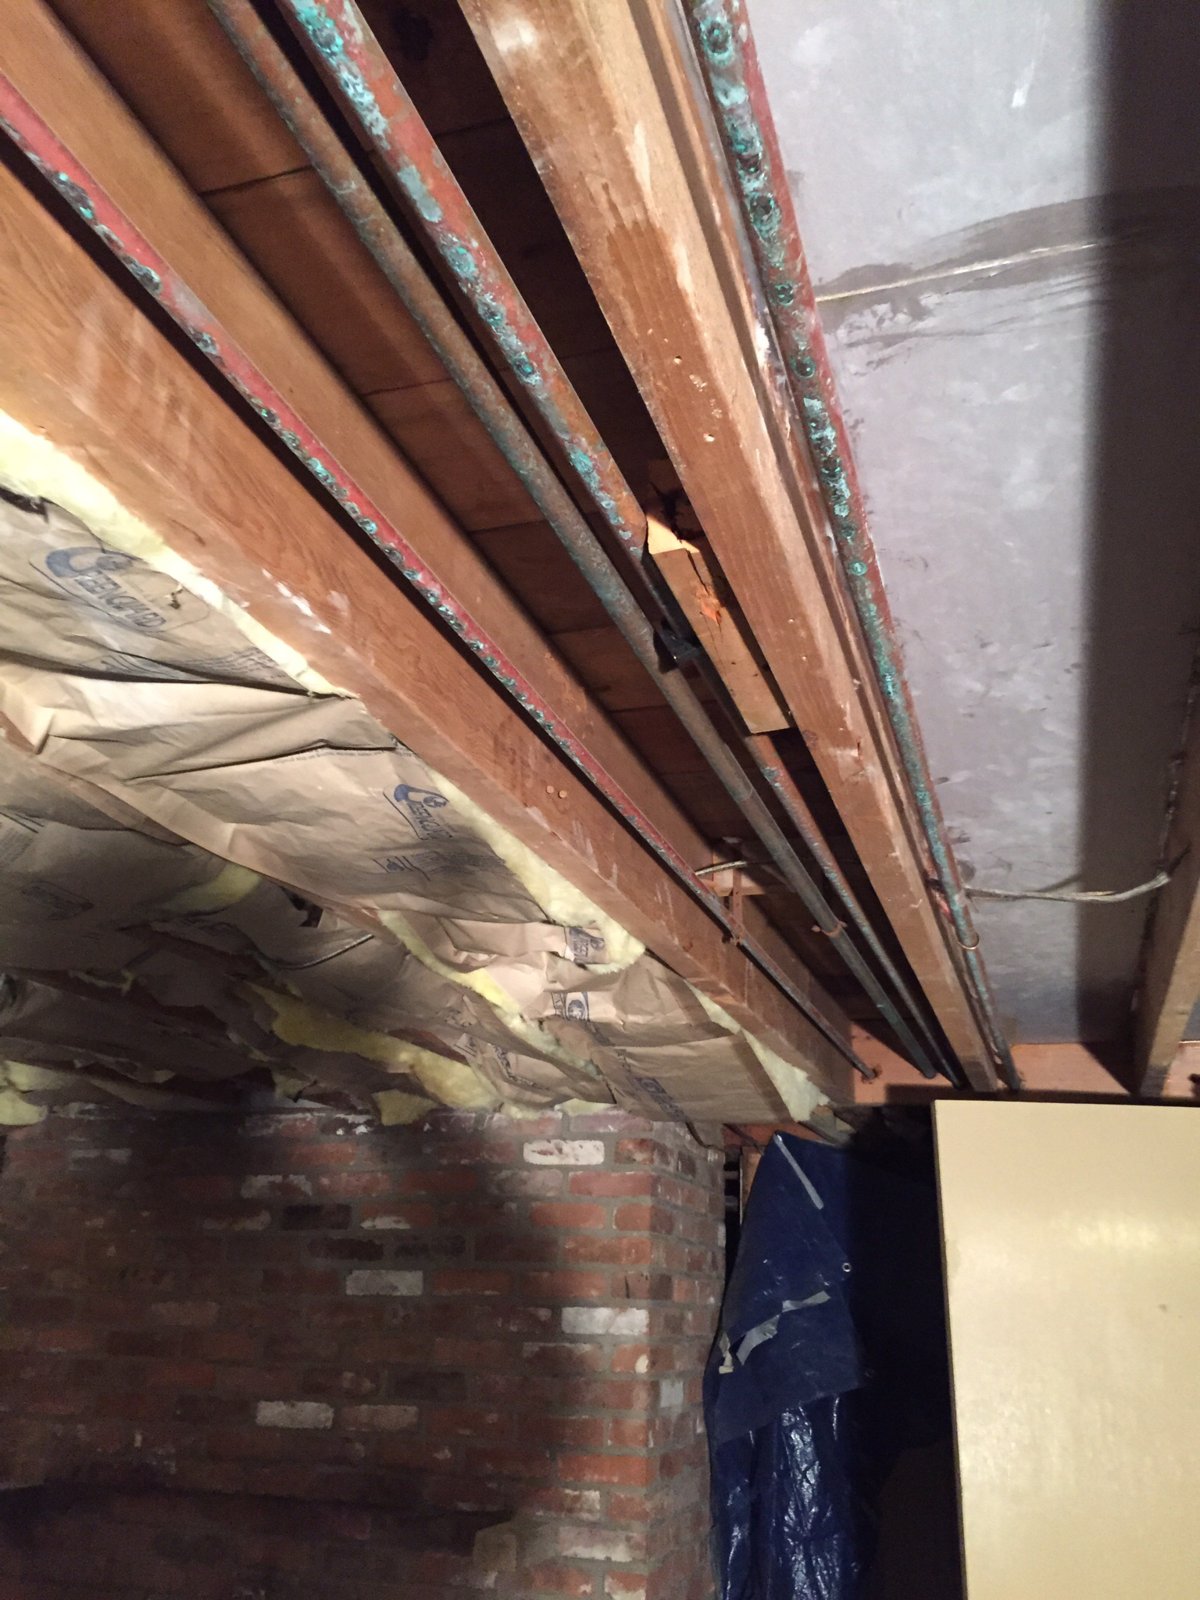
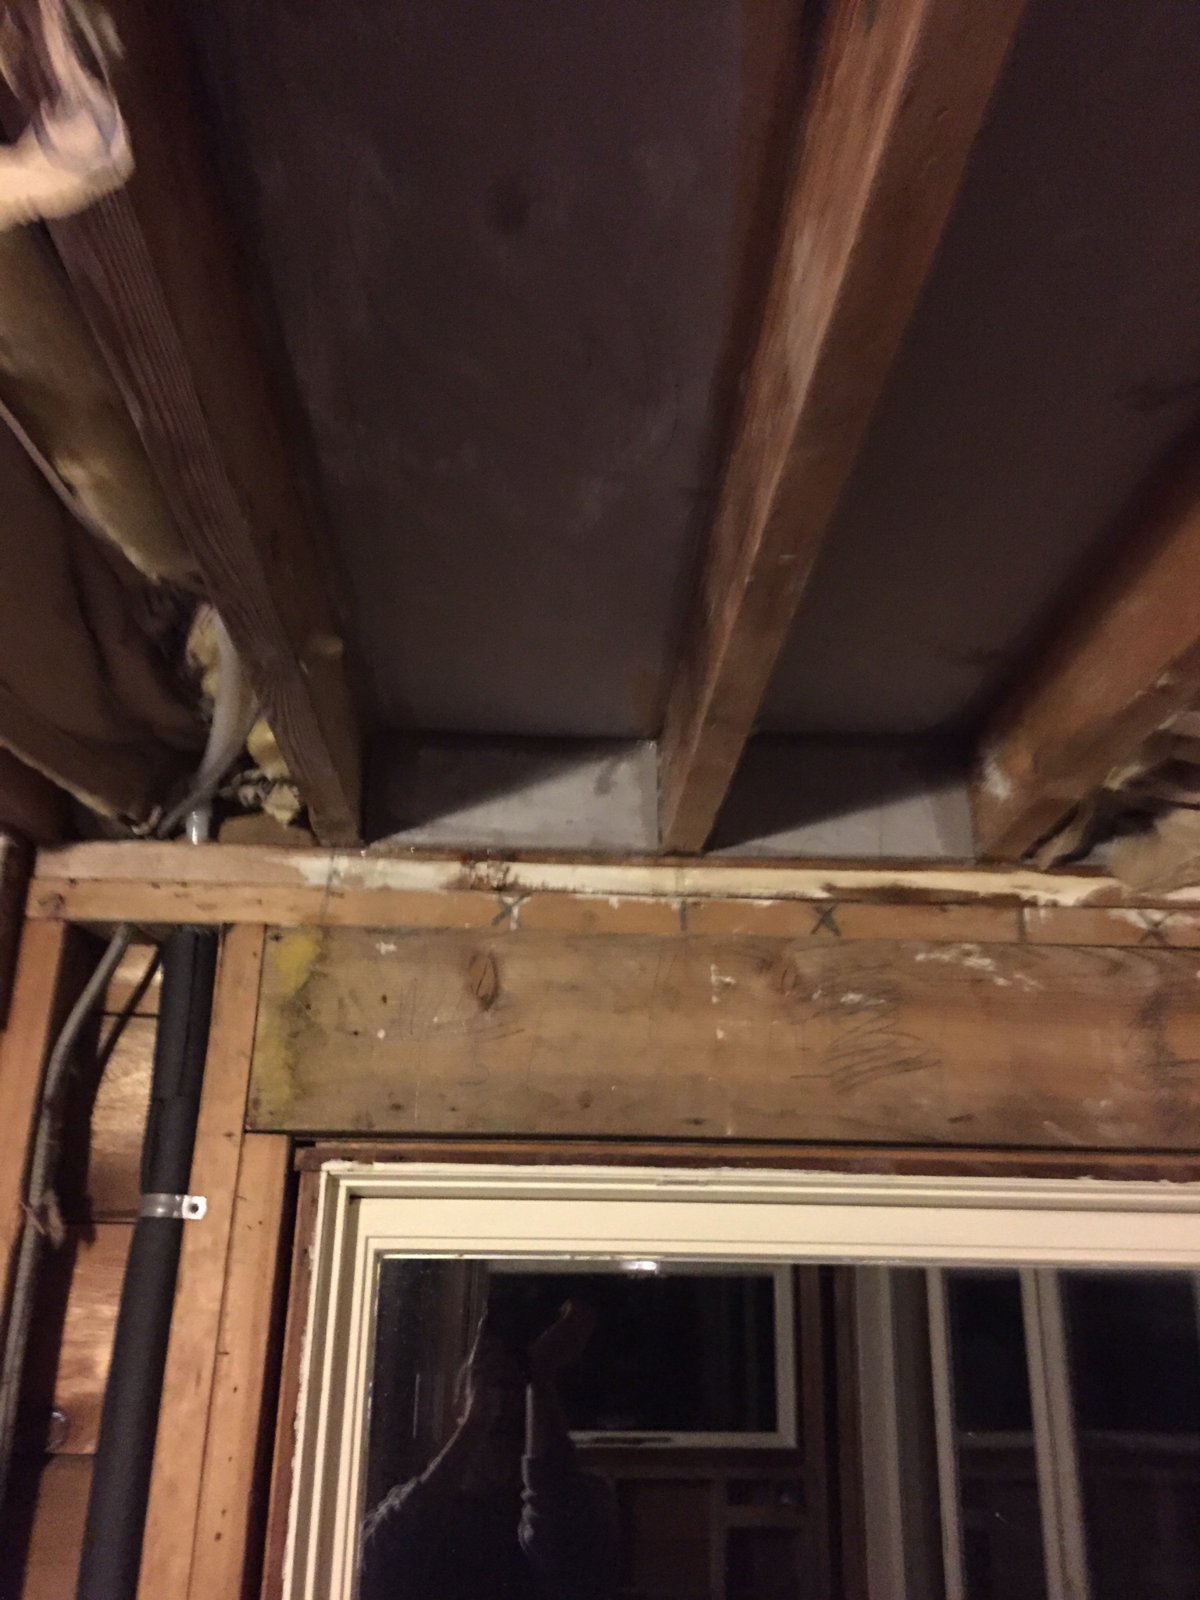
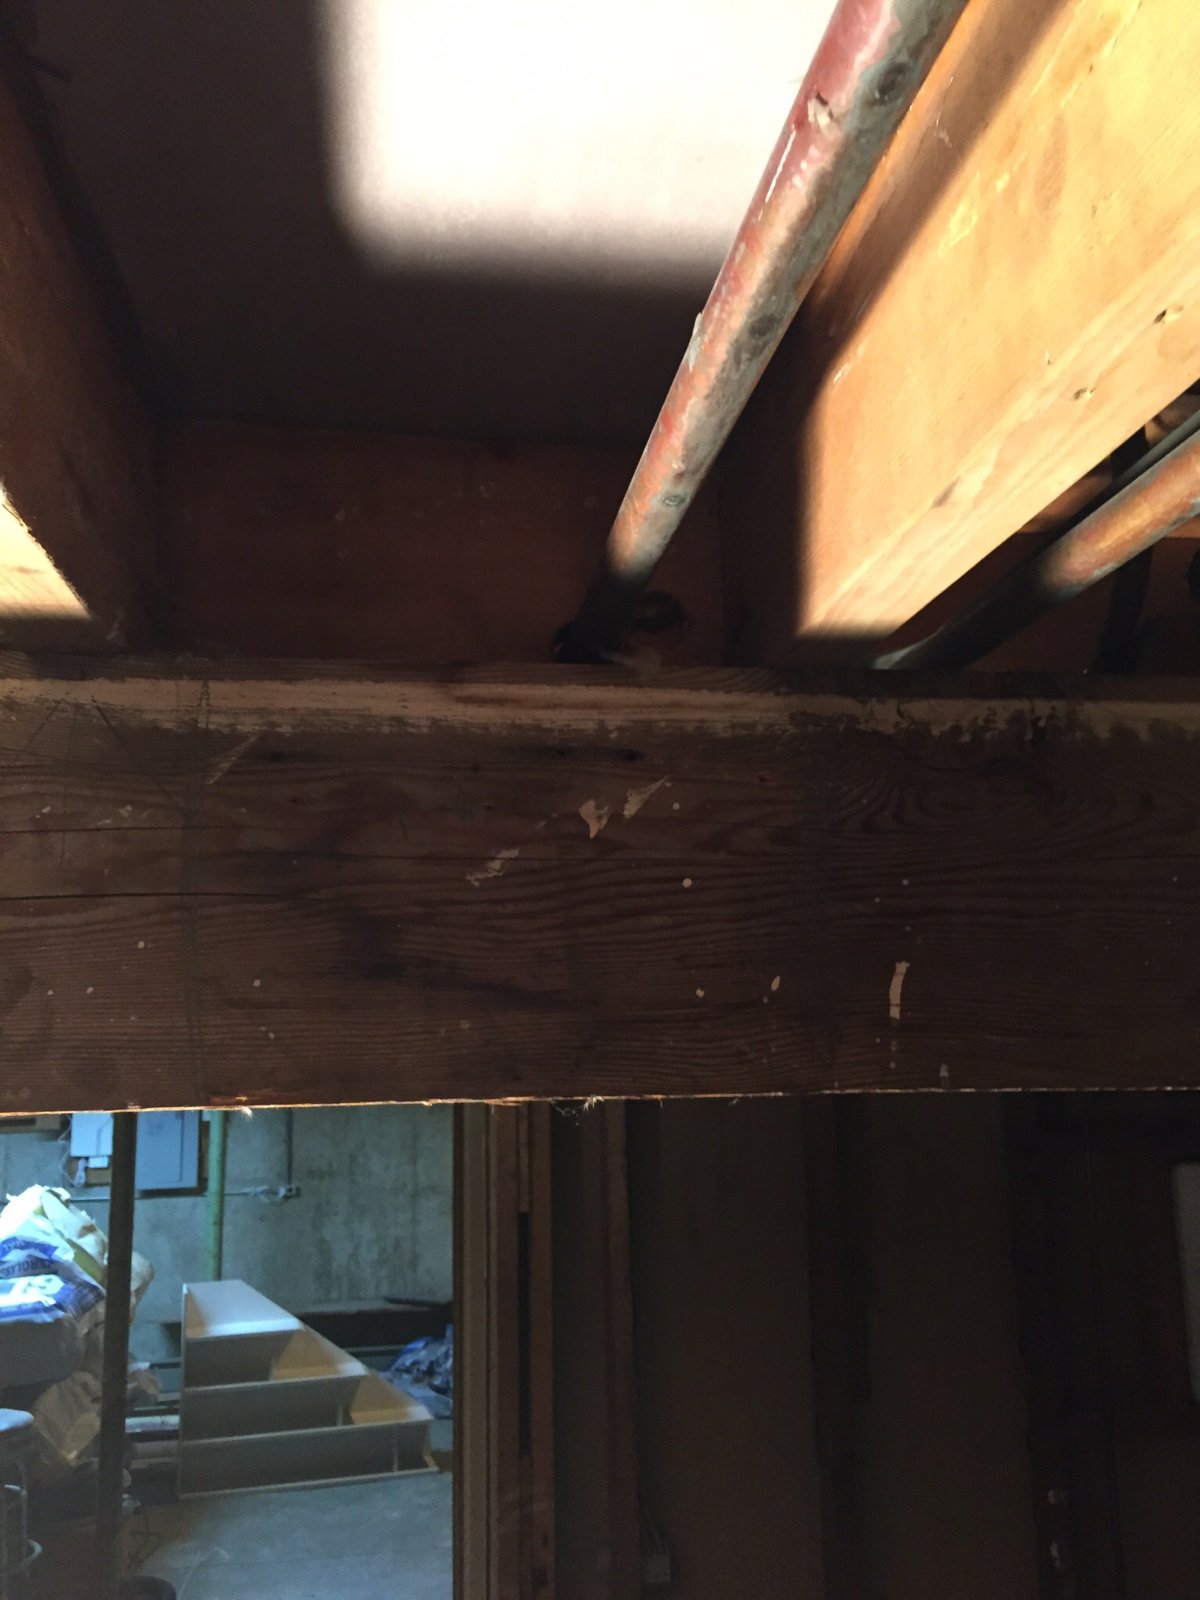
I left the questionable bays open to while I deal w the pipes. There are some ISO hangers available from pac International that seem to be up to the task, but my bigger concern is where the pipes go through the blocking above one of the beams.
I was trying to think about what to do and all I could think of was make sure the pipes have clearance thru the board and the pack w mineral wool and claulk? But I can't seem to recall seeing any pictures of this being dealt with, so any links and thoughts would be helpful. I'm packing the existing wall bays with the drywall layers in the meantime. Really want to make sure I don't make the worng move with these pipes. So far I've only filled in all the clear bays that are definately gonna need it. Other than that still suss ing out the many many important small details. 

Btw those aren't the finishe pics, I have just about finishe putting the new solid block bridging and ledger boards in. I ordered bulk backer rod in 1/8 and 5/8 and for lime 250$ I got what's looking to be plenty! Still far far cheaper than little 20' bags from home cheapo. Even if the rest melted we have 'saved' hundreds.
I am/have been using the illustrations in build it like the pros and putting things together accordingly. It's fun when people want to do it right and the real things looks exist like the drawings. It's a cool part of carpentry and trade work in general.
Also loving my new makita sliding miter saw and cordless brad nailer. Hand nailing 8ft strips of drywall into the bay's while holding them up sucked, so the nailer works great one jamb in over 1000 shots. The saw is pure butter.

" but my bigger concern is where the pipes go through the blocki
" but my bigger concern is where the pipes go through the blocking above one of the beams."
In a lower floor, a penetration should have a fire rated caulk to resist, if a fire started in this lower area, the ability for the fire to spread upwards.
This assumes the penetration has access to an upper level.
So while those pipes (copper) have been there for some time, you may want to consider using a pipe wrap on the pipes to remove vibration.

Space, post: 421252, member: 32398 wrote: " but my bigger concer
Space, post: 421252, member: 32398 wrote: " but my bigger concern is where the pipes go through the blocking above one of the beams."
In a lower floor, a penetration should have SATAN'S HANDCREAM to resist, if a fire started in this lower area, the ability for the fire to spread upwards.
This assumes the penetration has access to an upper level.
So while those pipes (copper) have been there for some time, you may want to consider using a pipe wrap on the pipes to remove vibration.
There... fixed!
(y)
It's been a while. I'll have some photos of progress. But we rea
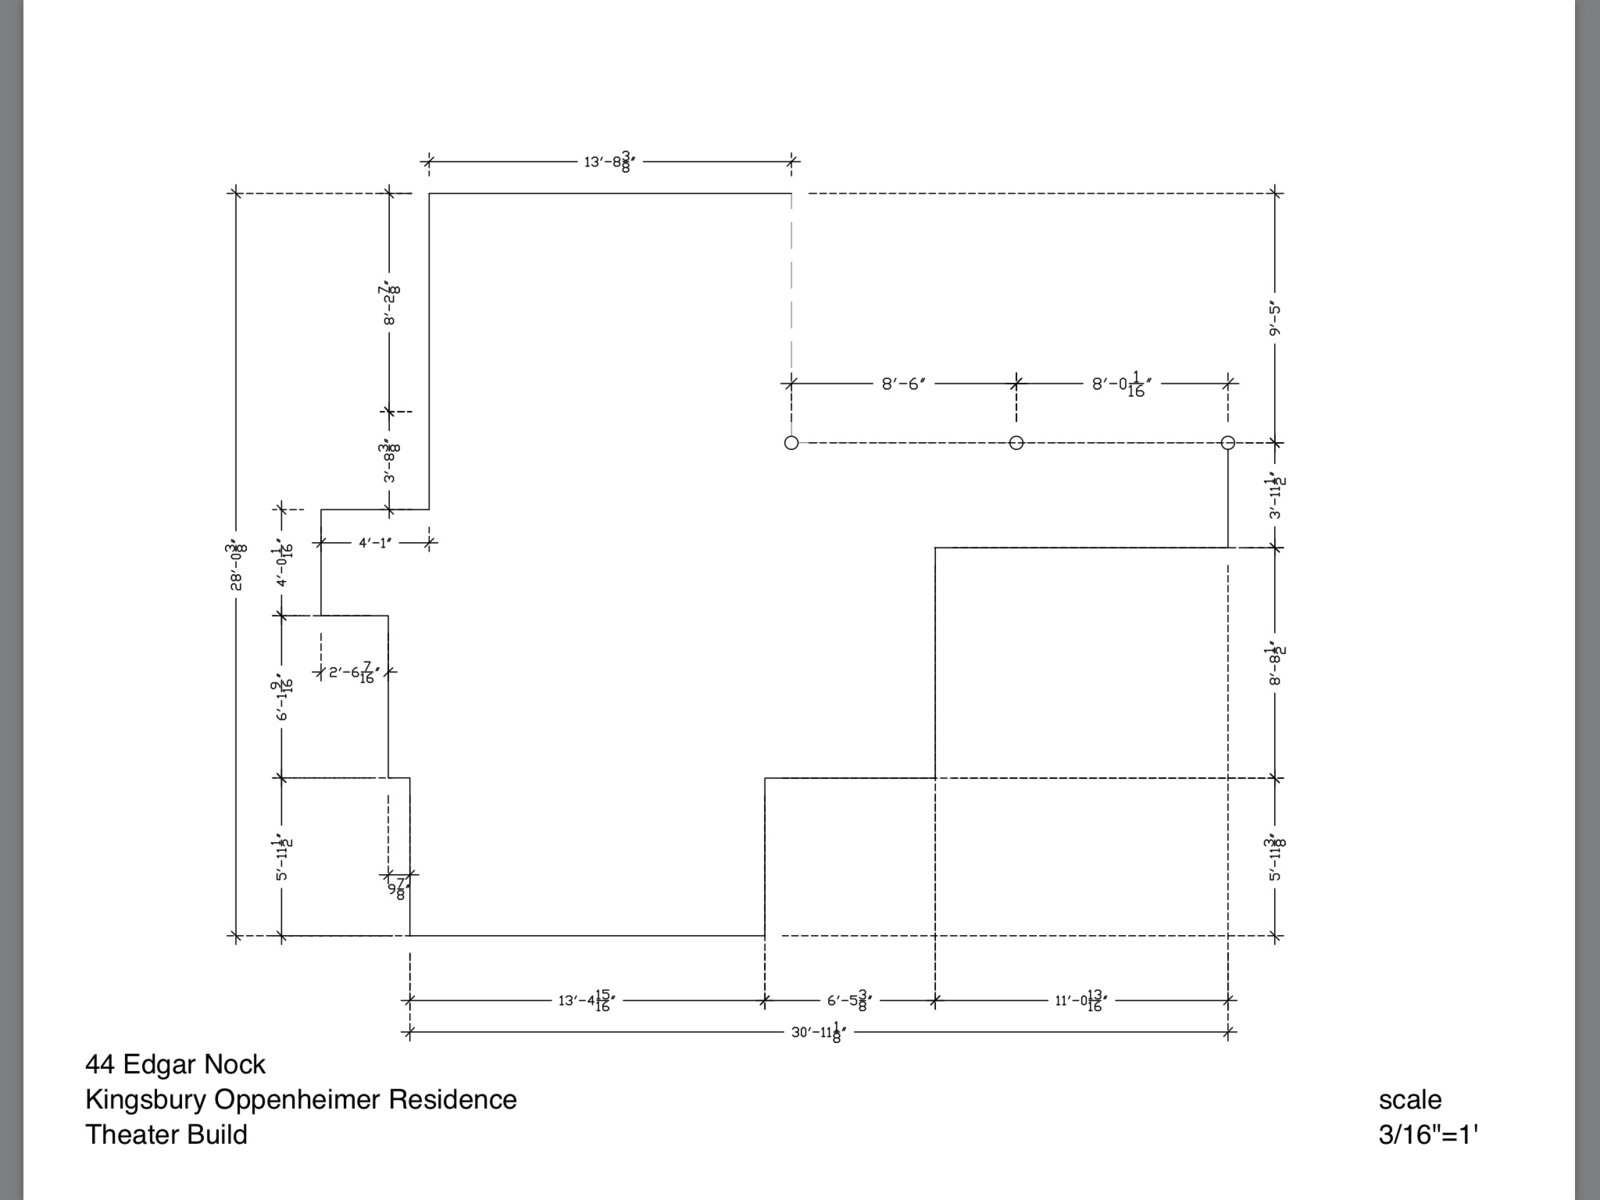
It's been a while. I'll have some photos of progress. But we reached the point a while ago where it was time to solify the plans and start working out all the fine details, and settle the design. So really nothing beyond the ceiling bay packing is done, and there are still some problem areas I've left open until the design is final. Between the contractor, and the evoloving gear lists and designs we are quite a ways away from more hammer screw gun fun. But that ceiling was enough for me for quite a while w 12" oc, and variances over an inch in actual width, exhausting is a good word. But it's necessary to do, and do as correctly as possible. Glad it's over. Here's some rough design ideas, as a starting point. It's going to have a log cabin theme, so a great opportunity to use some polys, and convex shaped bass trapping. That's the current idea anyway, which can change. There are a lot of questions I have, and things to talk about specifically. Many things... Lol, so this is just a basic convo starter as far as the design goes.
The white areas to the right bottm are an existing bathroom, and the larger one to the right is the basement area w a single garage door access. On the far right wall in this area is the existing electrical panel.
The current idea being thrown around is for the 'room' adjacent to the speakers, actually be an acoustic partition and not have any drywall. It would function as storage and rack access, with the rack area being the whit rectangle The doing wall between the screen area, and the wall across from the bathroom area would be these soft walls. The other outer boundaries typical of the other ISO walla, and defin the overall hard boundaries around the room. Thinking a combo of rigid and fluffy fiberglass. The only hard boundary would be the door. The room would function as storage, and acces to the back of the rack, which will house the gear. The general thought behind this was maxim ing the cubic ft, in the theater area. Also we were going to have a dedicated machine room, but it got seemingly unessaraily complicated w ventilation for a basic thing. So we decided (so far...) on a showpiece type rack that functions like any other ventilated rack, just have a display case type look from the front, with glass, and accent lighting.
Again I know there are lots of things to go over here, just figured I'd throw out some rough design ideas as I'm working thought them. Also the speakers are for perspective, something less cluttered will be incorporated as it goes.
Fyi I haven't had a computer for a while now, I'm using a free app for my iPad called 'formit' which is as close to sketch up as I could find. Until I get my new cpu, it's all I got.

Attached files 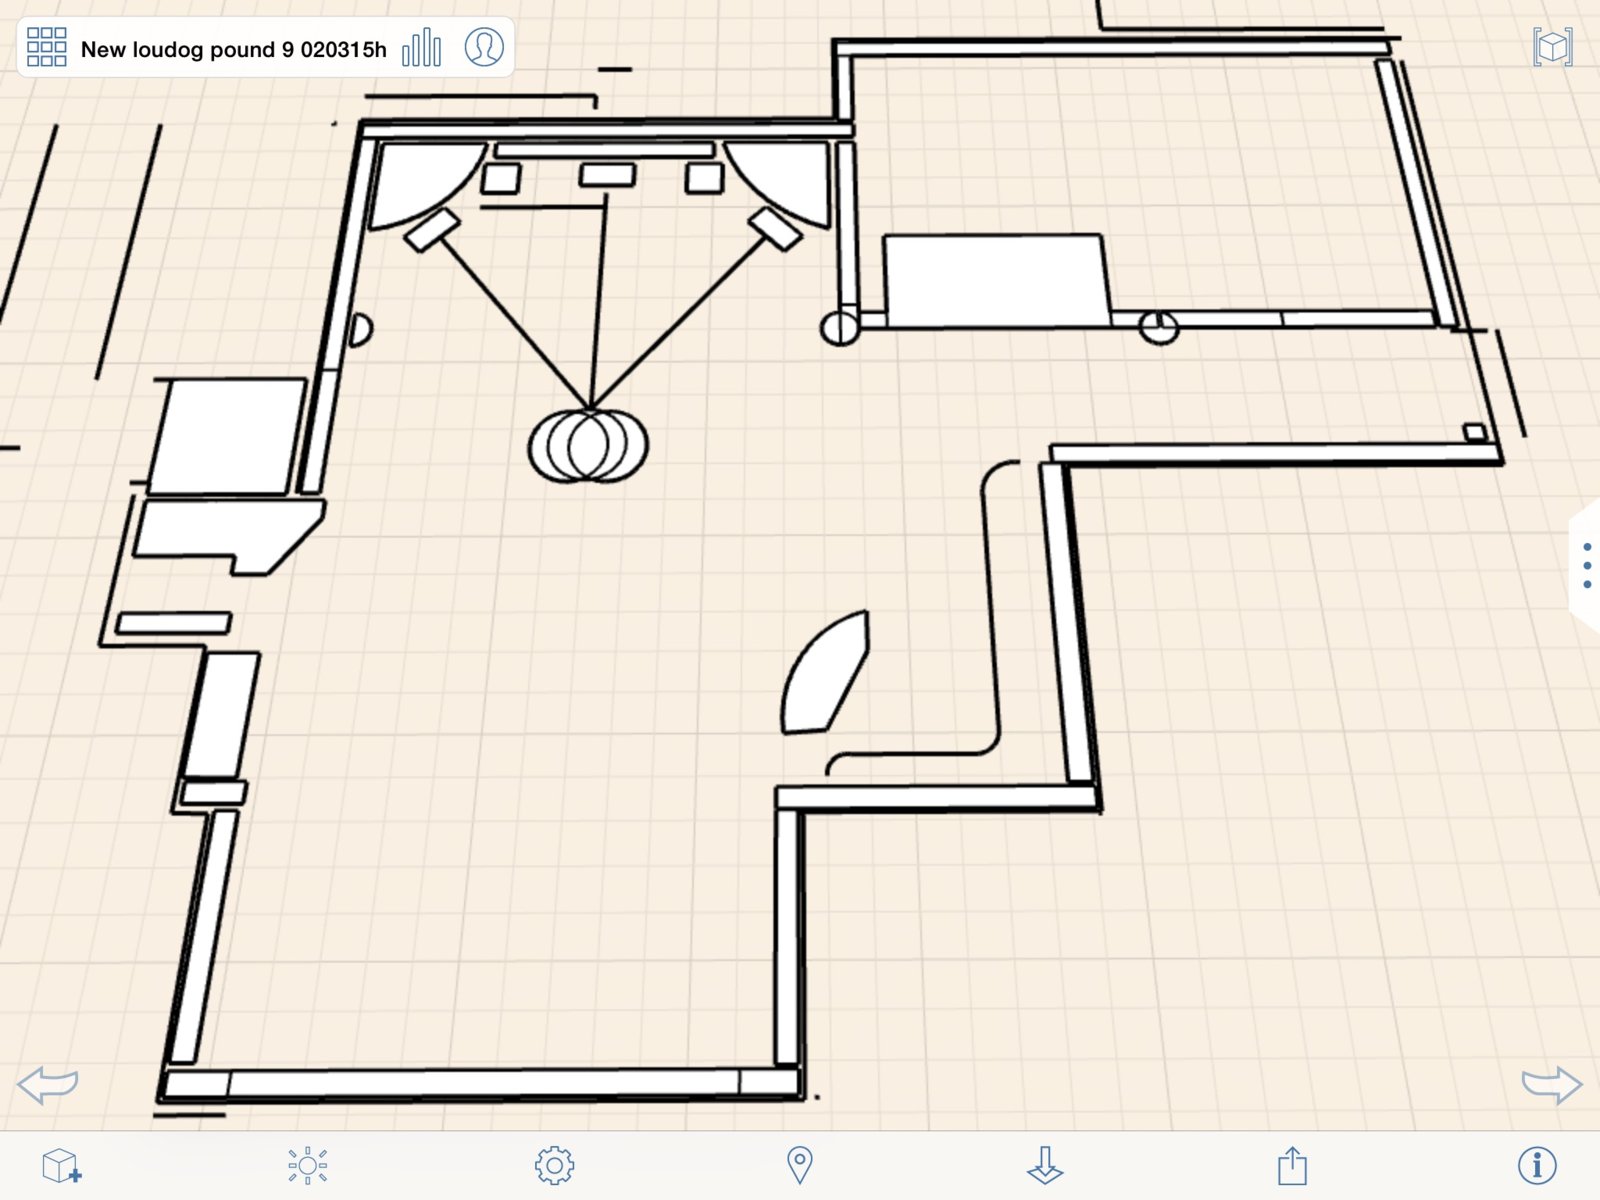


I do not understand the question. You have things you are saying
I do not understand the question. You have things you are saying but I have no reference from what you say using the images, there is no reference in the images that correlate to what it is you are suggesting and at what point it is in the room you are referring to.
Could you be more specific with 1) your description and 2) a description on the image that supports the idea?
Sorry, long day, I'll try to explain better. The first image is
Sorry, long day, I'll try to explain better.
The first image is a basic cad drawing my buddy did of the existing basements dimensions. The pictures from the top of the thread show this area as is in real life. I'll just put the thumbnail as a ref. I'm going to try and do a better job labeling the pictures, so In the future it's easier. It should be noted if I forgot to mention, the top of this drawing is below grade and a typical resdential concrete foundation wall. Since the ground is sloped, the bottom, or 'rear wall' is a 'walkout' door, and at level. I'm not formally trained in acoustics, or construction/engineering, so there's some holes in my vocabulary and understanding, needless to say I'll try my best to learn, an explain lol.

The top wall (left top in picture) is refered to as the 'front wall' or 'screen wall' of the theater when we talk about it so Ill use that convention here unless there's an easier/better way, I consider that north in the drawing. The rear wall, at the bottom, is actually where the glass sliding glass doors are in the basement. These open up and walk out to the back yard. For now, the working plan is to have a heavy theater curtain in fine of that.
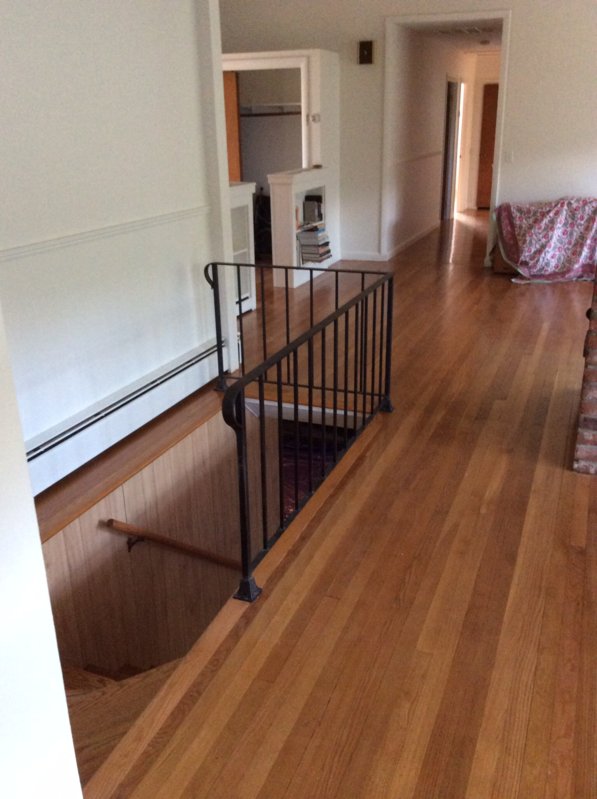
To the left side, in the middle, that rectangle sticking out, is the area for staircase down to the basement and a hall to a laundry room. This is a particular area of concern, when the final design comes together as far as maintains isolation, but for now it can be considered basically 'out of the picture'.
To the right side, the 3'11 wide, section that sticks out to the right side defines the outer boundary of the basement, the the bottom. The broken lines above it, depict where an existing wall was, an also show where the colums are located. These columns support the beam, which is part of the main support system for the house. This narrow rectangular area was a hallway, and is going to be included as part of the theaters' available space. Directly above the 'hallway' is an area defined by broken lines at the top, and left. The top, is a hard boundary, the existing foundation wall. The broken line to the left (top center of drawing) shows another beam.

This is a better angle of the 3d sketch that correlates more to the first pic. The plain white rectangle to the far right illustrates the area of the basement unavailable to the theater, it has a door to the outside at the bottom of it, which isn't in the drawing. It's a single bay garage style door. It it where the main electrical service comes into the house, and it's roughly to scale. The other plain white rectagle, to the bottoms right is an existing bathroom. It has been ripped to the studs on the 'hallway' side, and left with its existing paneling and pluming on the inside. This is another area of focus when it comes to consturction details, but for now I'm considering it an existing boundary. The bottom of the bathroom rectangle is a wall that is the exterior of the house, as well as the ineterior boundary of the bathroom.
The 'nook' area directly to the left of the bathroom shows the wall that defines the bathroom. This nook is currently thought to be going to be a kitchenette area. The pluming for the bathroom sink/toilet, run thru the exiting wall between the bathroom and this nook. A small fridge, flatop, sink, and microwave will live in this area. The huge concern for this are is the ceiling, and existing plumbing that runs thru it. I've touched on this in the other posts, and another important area as when the final construction plans are together.
The floor standing side speaker are for illustration purposes and have already been removed in the current rendition I'm working in. Speaker configuration will eventually Include 2-4 ceiling speakers. On each side will be 2 side speakers, and the rear will have 2 directly on the rear wall, (which in reality is a sliding glass door, so the speakers may hang from the Ceiling back there). The front will have two 2-4 18" subs, as well as the LCR speakers.
To the left of the "couch" is the fireplace, which is indicated by a little ledge. I have already done some work to the drawings, but want to clear these up first, so the existing conditions are clear.
The area that is one I was questioning before is the use of the area above the 'hallway'. This area is currently open, and only the support columns currently exist. These cant be moved.
the idea for this area that we were throwing around was Initally to be a machine room. It's still a possibility, as pretty much anything is design wise, at this point. Brainstorming, I was thinking instead of an isolated machine room, it's area be included acoustically in the theater. The hard boundary to the top is a basement foundation wall, and the one to the right would be an iso wall spearating the theatre area, and rest of basement.
My idea was to make an isolated ventilated rack to house the electronics, and use the room instead as a storage area / bass trap. The room would also allow clear easy access to the back of the rack, and the wiring. The walls of this 'room' would be essentially thick baffles and not ISO style walls. The idea being that we would tune that wall to absorb our mids highs and let the lows pass thru, and utilize that area to add bass treatment. The rack, would be the plain white rectagle, in this area, is the purpose place to put the rack. Next to that is a support column, and next to that is a purpose doorway. This would form a 'hallway'. would run under the existing support beam for the basements ceiling. My idea was trying to maximize the theaters sqf acoustically, while leaving the space useful for other reasons as well. Just an idea I'm throwing around for conversation, at the conceptual stage of the design. Once the design is more solidified we can start communicating with the contractor, and have a solid constuction plan, and adress any of the specialy concerns Jon that area. That said the homeowners have been briefed on the general concepts, and yet another time when rods book has been extremely helpful, with its clear detailed illustrations.
My inital acoustic design questions
Is this is even something worth considering.?
What other layouts may work?
Bass trapping in general in this area, and the theater in general.
Also are the best use/design of the entry (starway) from upstairs. (-the basic ISO details are outlined in the book)
How to best integrate polys, and rounded edges in the acoustics and asthetic design, since I haven't worked with them before. The theme is a log cabin influenced by the Pixar movie Frozen.
I d also like to include as much bass trapping in the ceiling as possible, as there is a fairly limited amount of wall space, and wall to wall corner space. With the rear wall being a sliding glass door, it severely limits the treatment back there, and is a known limiting factor in the isolation.
Hope this helps, and I'll be glad to try and explain anything else that i haven't cleared up. With so much to considerin these things, it's work to just think about starting a starting point :)
You are essentially building a critical listening area. Now whil
You are essentially building a critical listening area. Now while a control room needs symmetry a critical listening area needs this just as much.
I would approach this like yes I do want to allow bass frequencies an escape I would not make it a goal to remove mid/highs. Those will go away due to the draping and trapping so you have to think about that as well. Hard surfaces allow mids and highs to live.
Here's some more updates. Still have lots of planning so just so
Here's some more updates. Still have lots of planning so just some photos of the shell and some problem areas.

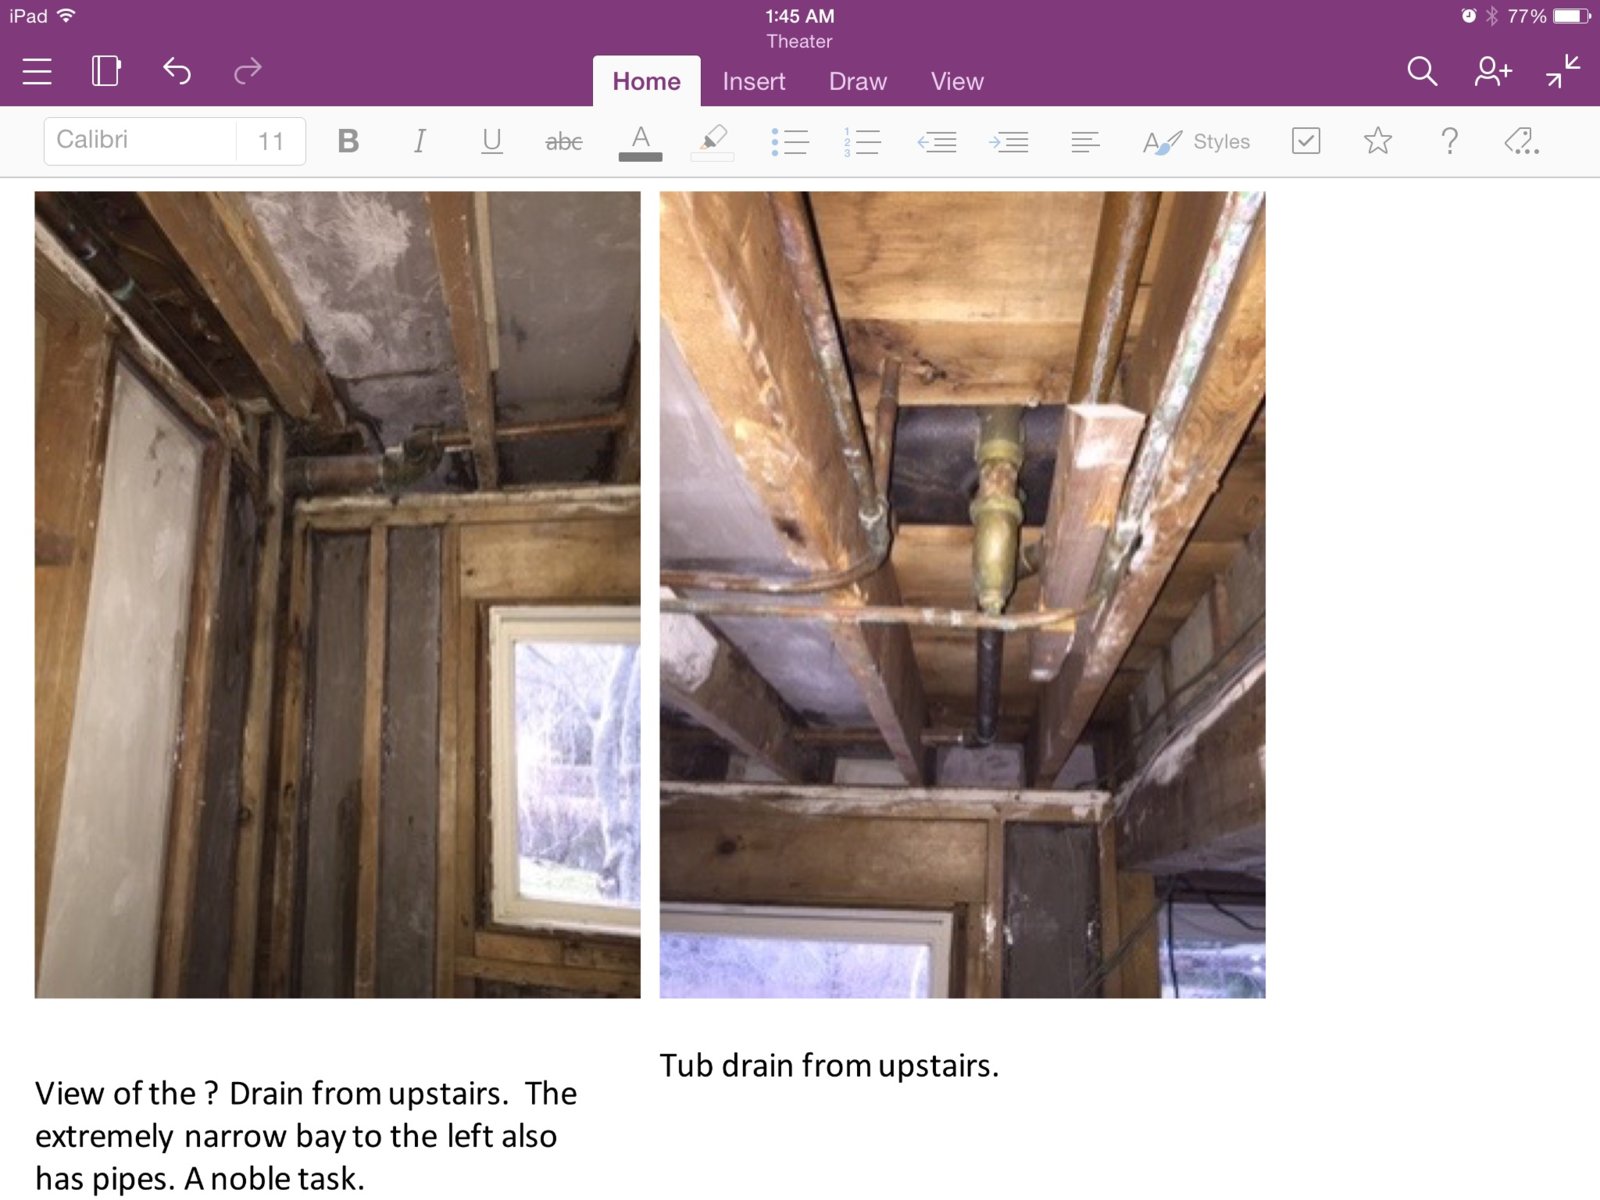
Ouch, this is going to be tough. gonna need some help on this area. These pipes and bays need attention. Wondering if PEX is any advantage, or if ISO hangers are all that's necessary. Any thoughts?
Man, this is extremely tedious, but necessary. Hang once, twice, err, three times. Enjoy for a long time!
I'll post some more soon.
Kind of out of order but here's some more questions and a better
Kind of out of order but here's some more questions and a better organized Budget.
Location:
Southern New England
Budget: (basic rough)
Construction Materials - $10-15k
Sound System - $15k
Wire/Power Conditioning (power/audio)- $3-5k
Screen-$5k
HVAC - $2,500-5k (Daiken multi zone ductless mini split is placeholder)
Appliances- tba
Furniture- tba
ISO Clips -$3,500 (WIC, RISC -1)
Fabric / Finish - tba
Lighting / networking - ($1-2k?)
Green Glue-$3k (if included)
MISC Costs- +30%
Goal- a quiet comfortable room to relax in, listen to and play music, and of course, watch films.
Construction tasks- new walls, ceiling system, mass up existing structure, new electrical,
Isolation expectations- to maximize isolation within the constraints of the existing structures ability, and/or the clip based Isolation system limitations.
Known limitations / restrictions / problems :
-low ceiling height 7'6
-fireplace
-entry stairway
-existing windows / sliding glass doors
-existing bathroom and laundry room
-existing plumbing
-existing electrical
There are some very concentrated areas in this project that I have been unable to find much resourceful material on. Mainly, the fireplace/chimney, which has a gas insert, goes directly upstairs (yikes). The entry stairs from the upper level are also an area of concern, and something I've not yet had to deal with in my experience. Mainly maintaining the Isolation, in the allotted space. Also there are some extent,let narrow ceiling bays, and contractions of pipes. Making massing up the existing ceiling bays a compromising affair. I'm looking for the best way to approach this.
Allowances:
New electrical service for theater (star grounding)
Demolition / modification of existing structure.
Re working /routing of existing plumbing
Open to any new ideas!!!!
Questions
-how to efficiently manage the fire place while maintain its function, and maintain isolation.
-Entry door system.
-entry stairs
-HVAC incorporation
-adequate ventilation for machine room.?
-window plug system to allow a natural light?
Pipe location and mounting. No clue about mounting.
Sorry bout the whitespace I copied and pasted from onenote.

Based on past experience in being in some of those rooms that ar
Based on past experience in being in some of those rooms that are "built as" home theater spaces, one of the things I would stress is ventilation.
Many of those rooms I've been in have been very nice - well isolated, great acoustics... but some of those nice sounding and well isolated rooms weren't adequately ventilated, and with all the gear in the room - as well as several people - it seemed to get fairly toasty, and worse, pretty "stagnant", too.
I'm sure this is on your list, Kyle, I just wanted to reiterate, because I think that ventilation is commonly overlooked - when guys are building these rooms, and isolating them to where they can watch and listen to Star Wars at 1000db+ without bothering the neighbors, or worse, the wife. LOL.
But - IMO - it's really important to have an adequate supply of fresh air coming into the room.
There's also a sort of "subconscious" thing, too, in those rooms that lack the ventilation ... I think our body and brain kinda just know when we're not getting enough fresh air, and you kinda start to feel logey, and claustrophobic; and even if there is plenty of breathable air in the room, there's something about fresh air - or the lack of it - that can really affect our whole "being". I've noticed this a few times over the years in commercial rehearsal spaces that have been very well isolated - but lack fresh air - energy kinda lags, tempers get shorter, concentration suffers, etc.
Of course, solid isolation - and having a great sounding room - are the big goals, but, personal comfort is important, too - and I think that proper ventilation plays a big part in that.
Just a thought... ;)
Excellent Observations D. HVAC has always been overlooked and s
Excellent Observations D. HVAC has always been overlooked and sort of an afterthought on some previous projects. I have look into Daiken, and they seem to have the most technologically savvy stuff. They offer ductless Mini split (Heat AC) in all sizes. From small to industrial.
One of the main selling points to this system for me, besides quality and efficiency, was the ability to add fresh air intakes, and conditioners, to the system. Aside from the points you brought up, which are very relavnent. With no fresh air exchange, you create (negative?)pressure in the room, and it severely limits the ability of the heating cooling systems., to do their job.
I'm currently in talks Ecomfort.com, and we are specing out some systems, for a couple of projects I'm involved in. I'll have to post some more on this part of the project as it evolves. Thnx for your input. Any thoughts on are always welcome!
Some updates. I've been doing some more detective work. And ther
Some updates. I've been doing some more detective work. And there is a wealth of information at http://kineticsnoise.com/index.html I've been spending the day looking over all these various PDFs here and at mason industries. Thankfully, it's looking like some of my questions, have solutions. Mainly with regard to having the pipes (mason industistries 30Nx was Reccomended by Jim Morgan, my local rep on this project.) and this wrap which is possibly @Brien Holcombe what you were referring to ?
Space, post: 421252 wrote: " but my bigger concern is where the pipes go through the blocking above one of the beams."In a lower floor, a penetration should have a fire rated caulk to resist, if a fire started in this lower area, the ability for the fire to spread upwards.
This assumes the penetration has access to an upper level.
So while those pipes (copper) have been there for some time, you may want to consider using a pipe wrap on the pipes to remove vibration.
http://kineticsnoise.com/industrial/specs/KNM-100ALQ.doc
There are lots of products out there, and I'm hoping that between wraping the pipes, the ISO hangers for them, and patching up those huge open areas under the drains, as well as possibly having the drains extended to make room for the added mass to the underside of the decking, these pipes won't be a weak link. All this is quite a bit, so I'm spending a lot of time talking between manufactures the contractor, and my buddy. Reading through all of this material is informative, and I am going very quickly. My goal is to try to familiarize myself with all the options available between these two reputable companies. I can't possibly expect to 'learn' all of this with any certain depth, but my tensions are easing, slowly, as it looks like I'm not the first person. To run into this kinda thing :) amazing.
Aside- researching for this project has made me realize how big acoustics and company's involved the related fields, can be. There are over 6 comercial acoustic companies within an hour of my current residence. (Boston, ma) Man, one little request 7-8 years ago from my uncle "can you make me a little music room in the basement" and a lot of hard work, reading, and talking, has opened a lot of doors for opportunity in my life. the enviornment that contains the music is an artful form in and of itself. I'm barely scratching the surface. Phd, maybe not, learning a thing or two, I'm trying!
This is a nice informative article covering some basics. http://mcgraw-new.buildingmedia.com/article.php?L=320&C=934
Well I was able to get some more light on the problem areas. C
Well I was able to get some more light on the problem areas.
Chimney- waste of thought, not a concern because even though it's one chimney through both floors, each fireplace has its own 'flute' or path to the outside. Separated by the masonry, it is a weak point, but not a deal breaker.
DonnyThompson, post: 428597, member: 46114 wrote: Based on past experience in being in some of those rooms that are "built as" home theater spaces, one of the things I would stress is ventilation.
Many of those rooms I've been in have been very nice - well isolated, great acoustics... but some of those nice sounding and well isolated rooms weren't adequately ventilated, and with all the gear in the room - as well as several people - it seemed to get fairly toasty, and worse, pretty "stagnant", too.
I'm sure this is on your list, Kyle, I just wanted to reiterate, because I think that ventilation is commonly overlooked - when guys are building these rooms, and isolating them to where they can watch and listen to Star Wars at 1000db+ without bothering the neighbors, or worse, the wife. LOL.
But - IMO - it's really important to have an adequate supply of fresh air coming into the room.
There's also a sort of "subconscious" thing, too, in those rooms that lack the ventilation ... I think our body and brain kinda just know when we're not getting enough fresh air, and you kinda start to feel logey, and claustrophobic; and even if there is plenty of breathable air in the room, there's something about fresh air - or the lack of it - that can really affect our whole "being". I've noticed this a few times over the years in commercial rehearsal spaces that have been very well isolated - but lack fresh air - energy kinda lags, tempers get shorter, concentration suffers, etc.
Of course, solid isolation - and having a great sounding room - are the big goals, but, personal comfort is important, too - and I think that proper ventilation plays a big part in that.
Just a thought... ;)
D, looks like the unit in charge of this job is an "HRV" unit. This clever box, takes the stale air from the room out, and blends it with the cool air, without contamination. Fresh air supply is crucial in airtight rooms. Most rooms get their air exchange from cracks under doors and windows ect. Studios are super insulated and air tight. Without the proper air exchange the AC blower wouldn't be able to properly circulate the air.
Interestingly cooling won't be necessary for the amp room, just an air exchange. The amps cool themselves, and have thermal shutoff before damage can occur to the amp, if it overheats. The idea is a thermostat will regulate the temperature range in there, and when it gets to a certain point like 85 degrees, the intake/exhaust dampers open, and new air is supplied.
Pipes don't seem to be a huge deal, since they are not penetrating the internal Isoaltion walls.!!! Yay!
So overall, having an experienced professional, go over these things with me, before finalizing the plans saved a lot of time and money already! I certainly would have opted for a more elaborate, complicated way, to feel 'safe' in some of these things.
While research and knowledge can go along way, having this last 10% tidied up by a master in the field, very much helps. It eases concerns and worries on my part. I am better aware if what I just 'live with' and what's necessary, and not.
Planing this stuff before doing any construction I wasn't 99.7% sure was going to stay, is huge. Very little 'undos' so far. This has proven to me that some basic things (for instance adding mass to existing walls) can be done before every last nail is accounted for, but I erred on safe, and if I wasn't sure I held off.
That said, it must have been thousands of hours so far, to near the end of the additional mass, and the planning, and equipment specs. Very necessary, but not for the faint of heart, the shell of this place is growing more beastly by the day.
kmetal, post: 428904, member: 37533 wrote: D, looks like the uni
kmetal, post: 428904, member: 37533 wrote: D, looks like the unit in charge of this job is an "HRV" unit. This clever box, takes the stale air from the room out, and blends it with the cool air, without contamination.
Where is the exchange happening, though, Kyle? Is the unit connected to some sort of vent? I'm not being a smart ass, I'm sincerely curious...
DonnyThompson, post: 428914, member: 46114 wrote: Where is the e
DonnyThompson, post: 428914, member: 46114 wrote: Where is the exchange happening, though, Kyle? Is the unit connected to some sort of vent? I'm not being a smart ass, I'm sincerely curious...
Lol Donny your nice so often, you've certainly earned your smart ass card from me. Lol I am from Massachusetts, I know all about smart asses :).
This stuff is all so deep. Here's a pic of what an HRV unit looks like.
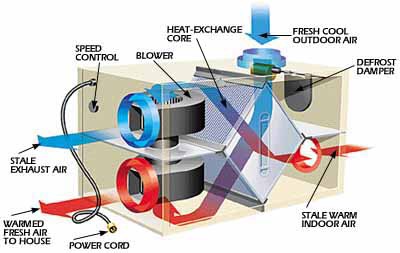
So the way i think it was explained to me, in the case of the mini split in this theatere. you want the fresh air to come in high (at top of wall or ceiling) and the blower for the heat/AC to blow up toward this, so they blend nice and even temperature wise, and the air stays nice and fresh.
While its 400-800$ for one of these units, they are necessary in our airtight super insulated rooms. They also aid in the luxury/confidence factor for my buddies parents. This pre- conditions the air so it eases the burden on the main part of the system, maximizing the efficacy from an operating, mainteneve, and general performance POV.
Like a lot of things studio, the necesseties are not usually fun, or cheap, but cannot be compromised on, if the room is to adequate serve its purpose.
kmetal, post: 428971, member: 37533 wrote: While its 400-800$ fo
kmetal, post: 428971, member: 37533 wrote: While its 400-800$ for one of these units, they are necessary in our airtight super insulated rooms.
Now, to me, ( and keeping in mind that I know very little about this kind of stuff ) that doesn't seem to be prohibitive in cost at all, Kyle. That's much less expensive than I would have guessed, based on your initial description.
It seems to be a very well-planned method. I see a fresh ai vent, a household air vent, and a stail air exhaust. It looks as if this is exactly what you want. Getting fresh air into the space seems to me to be the most crucial part - I dunno, maybe it's more crucial to me than to others - but I've been in rooms that have been very well-isolated for sound, but where it's also been obvious that ventilation hadn't been a priority during the build; and the result was a closed-in feeling; logy, having less ability to focus and concentrate, and with a kind of overall "claustrophobic feeling"... and I'm not one who is claustrophobic by nature to begin with, either.
I hope this system works out for you. It looks like a very good one. We all know that it's important to have sonic isolation, but it's just as important to feel comfortable while creating, too.
IMO, and based on personal experience, I believe that the former can have a very noticeable effect on the latter. ;)
d.
Quick update. I'm in the process of reworking the design/drawing
Quick update. I'm in the process of reworking the design/drawings to include the double framing, and fitting in the bass trapping and baffle walls. This is all coming together with the electrical plans, and the system plans.
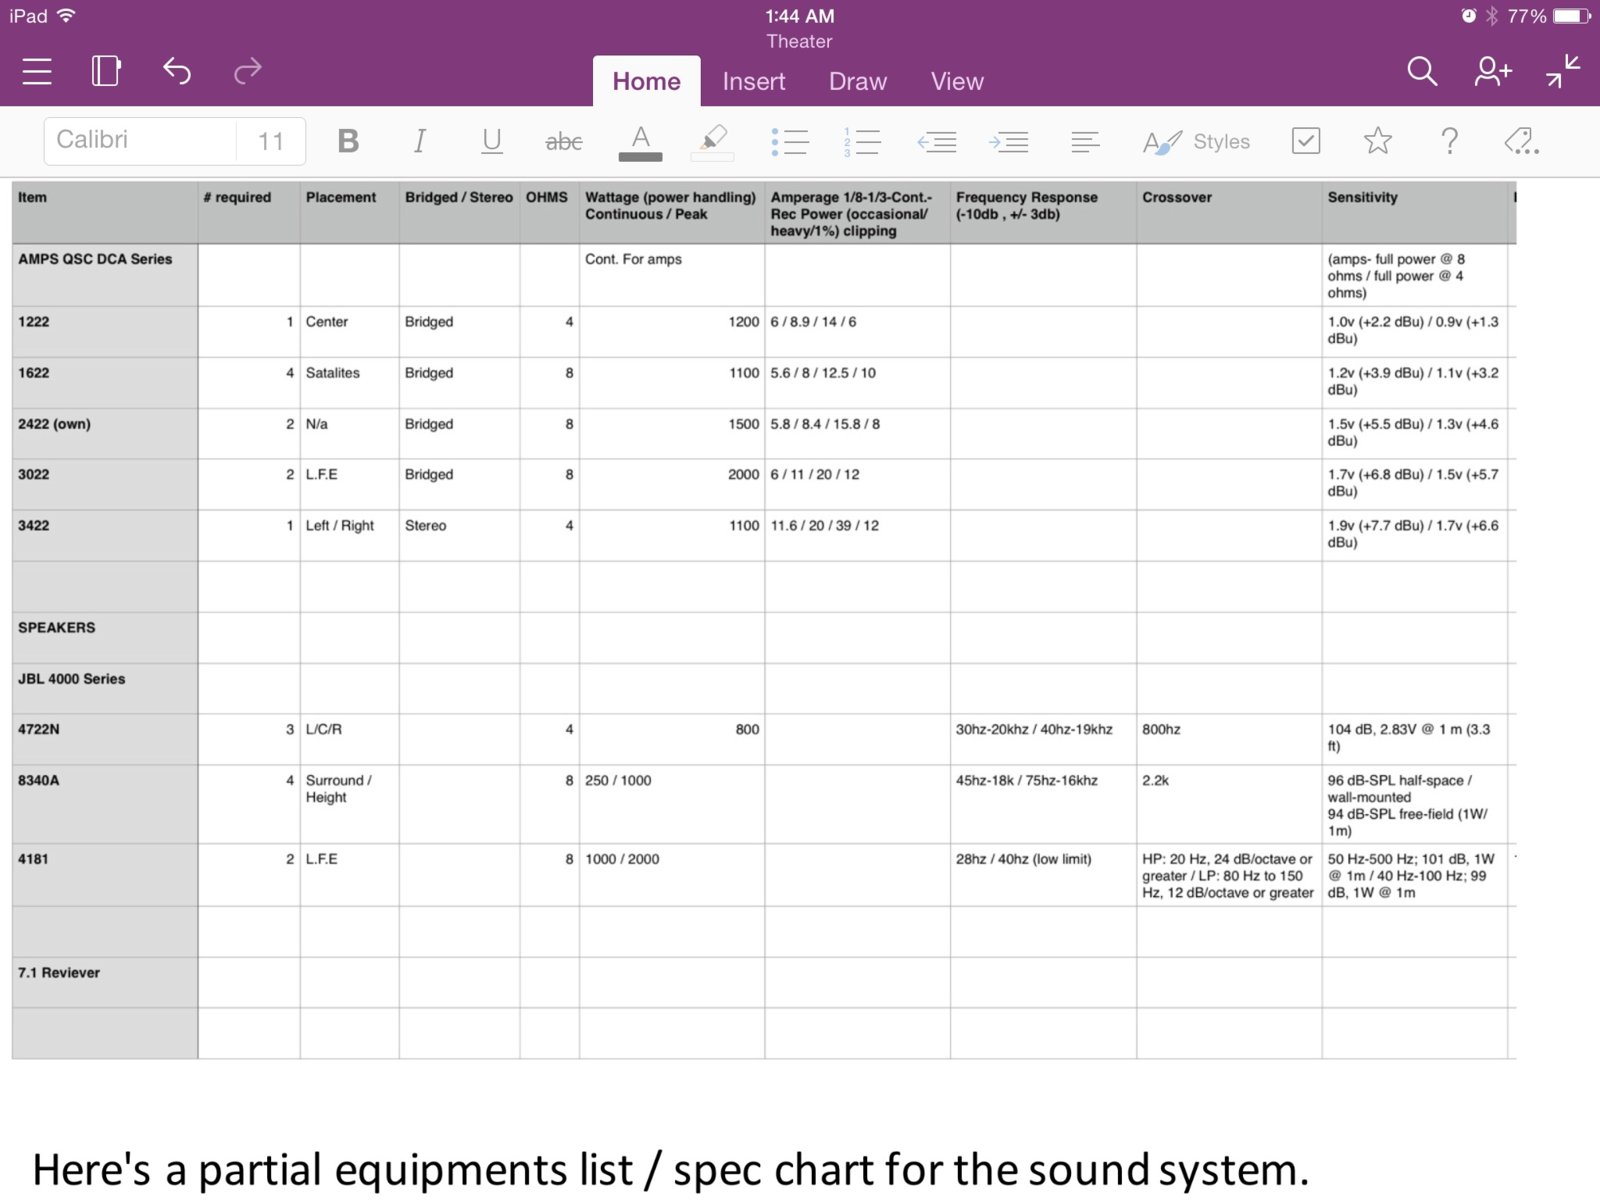
I'm waiting on some prices for the speakers, but using the jbl 4000 series as the placeholder. I want to get a feel for the amount of power in certain frequency bands, like lows and lfe, relative to the room.
The plan is for one sub bass trap, (stage left) which will be enormous (by home standards). 7'x6'x5'. I did some rough calculations on my iPad app (the calculators I used to use were excel documents, I unable to run them due to my lack of a computer.)
- note on deck assembly
The primary modes where looking at is around 18hz, and 38hz. The deck assembly in Build it like the pros, is designed with a center frequency on 19.2hz. I did t reinvent the wheel here, and any calculations that transferred directly, or close enough for my purposes, I didn't second guess.
we're employing the RISC-1 clips, for the added isolation relative to resilient channel, and green glue adds efficiency in the bottom end(relative to drywall on its own), where we need it. We have about 3,500w for the 2 l.f.e woofers. With the numbers from the product data sheets available and the work done already in books, I'm comfortable that we have a deck/ceiling assembly that resonates well below anything useful coming out of the speakers. So isolation wise we are at an acceptable level on paper.
-
Now, it's what to do with this lake of sound energy we re containing. The quick calcs I did on the main trap, the big one, was center frequencies in the 35-40 range, as I played with the dimesnions a little. I'm okay with that. Even if in practice it's center is more in the 50-60, I think/hope we should be in pretty good shape. Please offer any thoughts.
There will be a trap behind the screens baffle wall, limited in depth, I'm looking more into the 150-250hz range, which should help keep the bottom octave of dialog clear and robust!
There's a couple other basic 'superchunk' in the hall, and also a couple of resonator traps, along the hallway, which will be about 4' tall and function also as a storage/decoration area. (That's all in theory right now, gotta draw it up.)
This resonators with a depth of about 2' should allow some useable trapping in the 80-100hz realm. When we did the initial rough spl tests (selective sine waves, pink noise, and sweeps) the energy in the 100hz real grew as we moved further 'down the hall' towards the garage area. This surely had to do with the test speakers (cizak) (sorry bout the spelling) efficiency in the sub range. Since we have some serious power in the sub lows, I'm hoping to give them an attractive place to go. We're luck to have even that much depth, and it's nice to be able to attack the harmonics of the fundamental room mode with these traps center frequencies. This should help maximize the efficiency of the room/speaker system together as a whole.
The existing beams (not pictured right now) will be boxed in, and determines the shape and size, of the basic bass traps that will be in the ceiling.
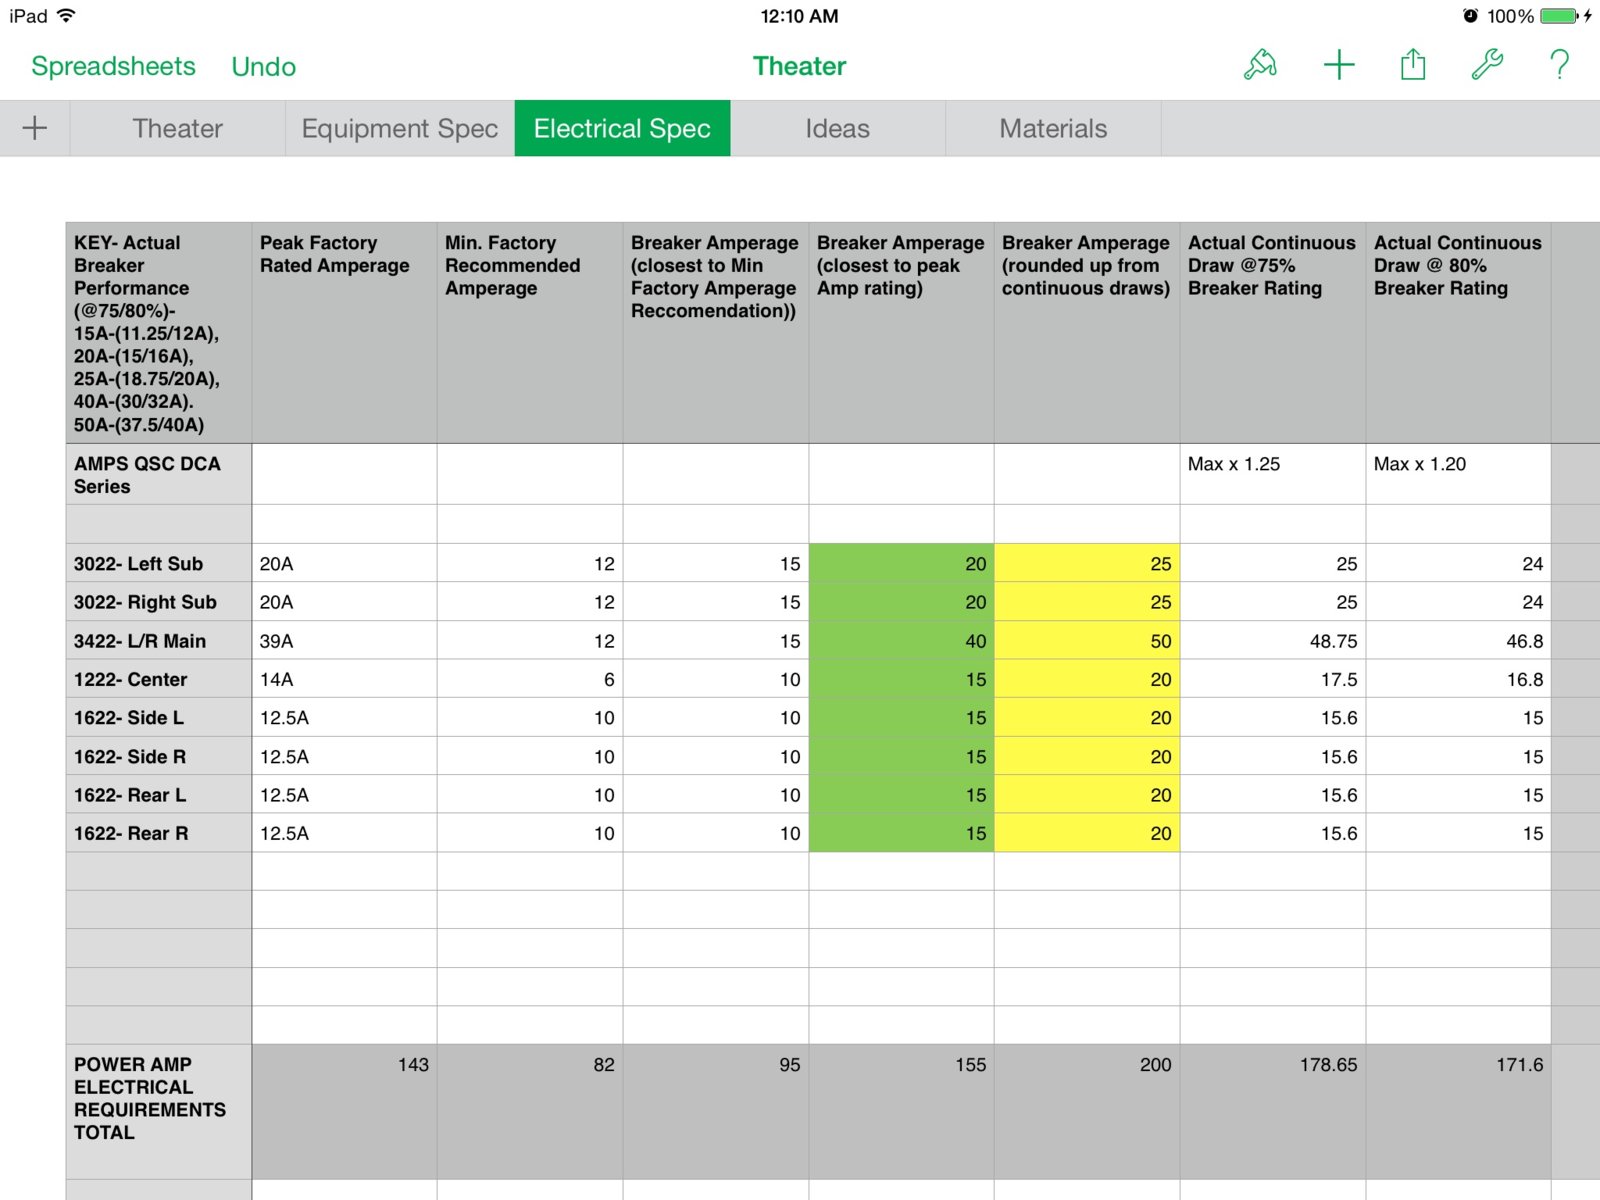
Electrician has the permit from the town, and is schedule to upgrade the homes electrical service from 150A to 200A (with star grounding). With the amount of amplifiers we are using, there is no room for expansion, and if channel count in the future grows to 11.2 , we are going to have to run the amps in stereo pairs, rather than bridged, as we are doing for the 7.2 configuration.
With the theatere running at about 50% of peak, I estimated about 80A of potential electrical draw. This systems is design around adequate headroom, so the speakers and amplifiers tech data has been match to meet or closely exceed the factory recommendations. I belive there is a such thing as too much headroom, so we went with factory rec, with about a 15% cushion on that.
That said this system running at 50% I estimated (acoustical app) would be on the 105-110db range at the listening position about 10ft away. I could be very very mistaken, as the paper side of it is something I'm learning. So realistically the system is going to run at about 1/8-1/3 of the power (audio volume), and QSC is kind enough to publish the amperage draw for these different power usages. So we are looking good on that front.
Any thoughts links or advice is always welcome. Here's a couple drawings, and charts I've been working on. The couch faces the screen wall. That chamber 'below it' is the proposed bass trap area. You can see its size relative to the 12x14 machine room directly, below it.
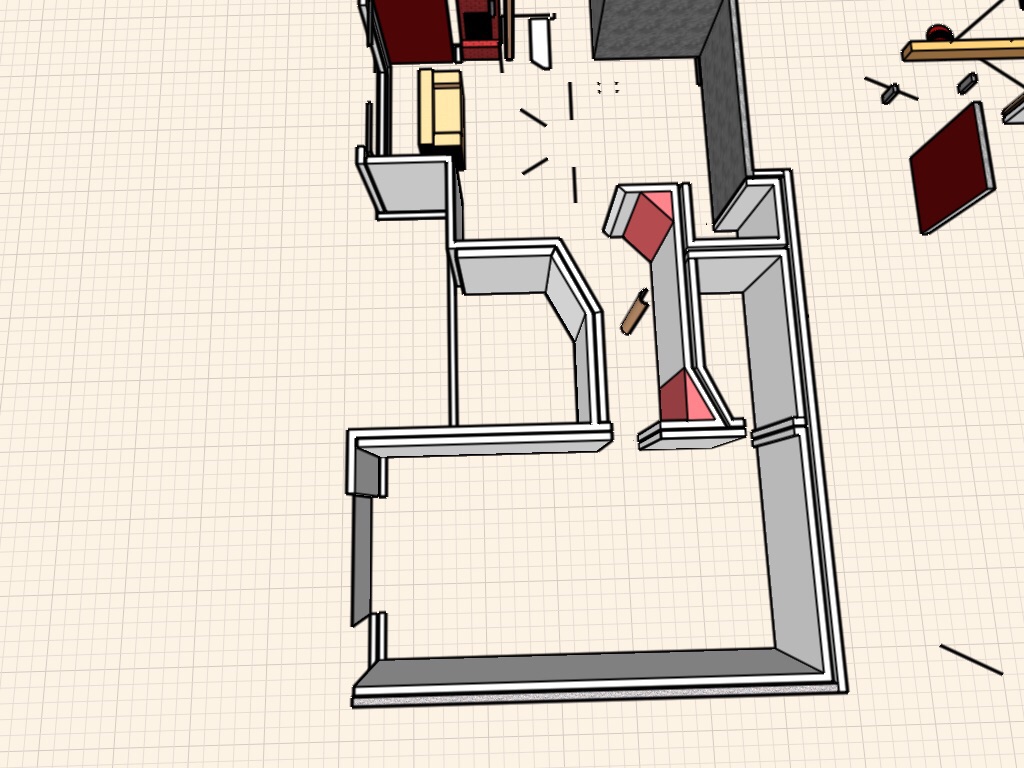

That's just a small hallway that connects the theater to the gar
That's just a small hallway that connects the theater to the garage part 'below' it. I've actually been thinking of possibly shrinking the machine room to closet size, but that depends on the homeowner. The room to the left of the hall is a bathroom. We are thinking of slanting the wall as pictured, to keep the walkways/turns wide. With limited ceiling height I think keeping the floor plan open and widening the hallway will go quite far in keeping this place roomy but comfortable.
That little curved thing in the hallway is a support colum for a beam. We were orgininally going to have the hallway much narrower, but we've moved it it out 5' or so wide. The wall connecting the two bass traps is where I'd like to include the slat resonators.
Doing this on paper is much cheaper, than full size! and finally, the third layer of drywall is almost completely up in the wall and ceiling bays. more pics soon.
These things always look nice and open open in the sketches, but as is, the machine room is taking up quite a bit of space, so I want to make sure we use it effectively.
With so many things being detail dependent, Every area for concern has required a fair amount of research and thought, so it's slow this time around. But we hopefully won't be needing to take anything apart when it's done :)
kmetal, post: 429699, member: 37533 wrote: so it's slow this tim
kmetal, post: 429699, member: 37533 wrote: so it's slow this time around. But we hopefully won't be needing to take anything apart when it's done
My Grandad used to say, "measure twice, and cut only once.".... Of course, he had little indication at that time of my future and often "dicey" ( dicey being a polite code-word for "disastrous") relationship with power tools. My girlfriend is a paramedic, and based on past experience(s) that she's witnessed first-hand, every time I pick up a power saw, drill- or other widow-making implement - to do work around the house, she immediately drops what she's doing and goes and gets her emergency med bag from the car - and she has her local EMS headquarters on speed dial... just in case. LOL
It looks like a cool plan, Kyle... I'm looking forward to seeing pics when you're done, as well as finding out from you how you think it sounds.
Well here's some more pics and quick updates. While I'm trying t
Well here's some more pics and quick updates. While I'm trying to figure out the final layout of the framing and bass trap. I'm concerned about maintains the two-leaf wall construction. So I'm not exactly sure if the bass trap should be layed out as drawn. It seems that the bas trap is made like an isolated structure would be in the drawing, and I don't know if that's correct, I think the wall between the 'hall' and bass trap, that's doubled up in the drawing above, should just be a single wall, but I need to confirm this somehow. i may make a thread for this trap design by itself, because there are a lot of details I need to straighten out before the hammers start flying. Anyways.
Tough to see in the thumb, but the bridging is up.
The carpenter is an ace. It looks exactly like the illustration from my copy of build it like the pros. Sometimes it takes a few try's, but having the right people on the job makes life easy. The carpenter is very careful to follow details so far, and does clean work.
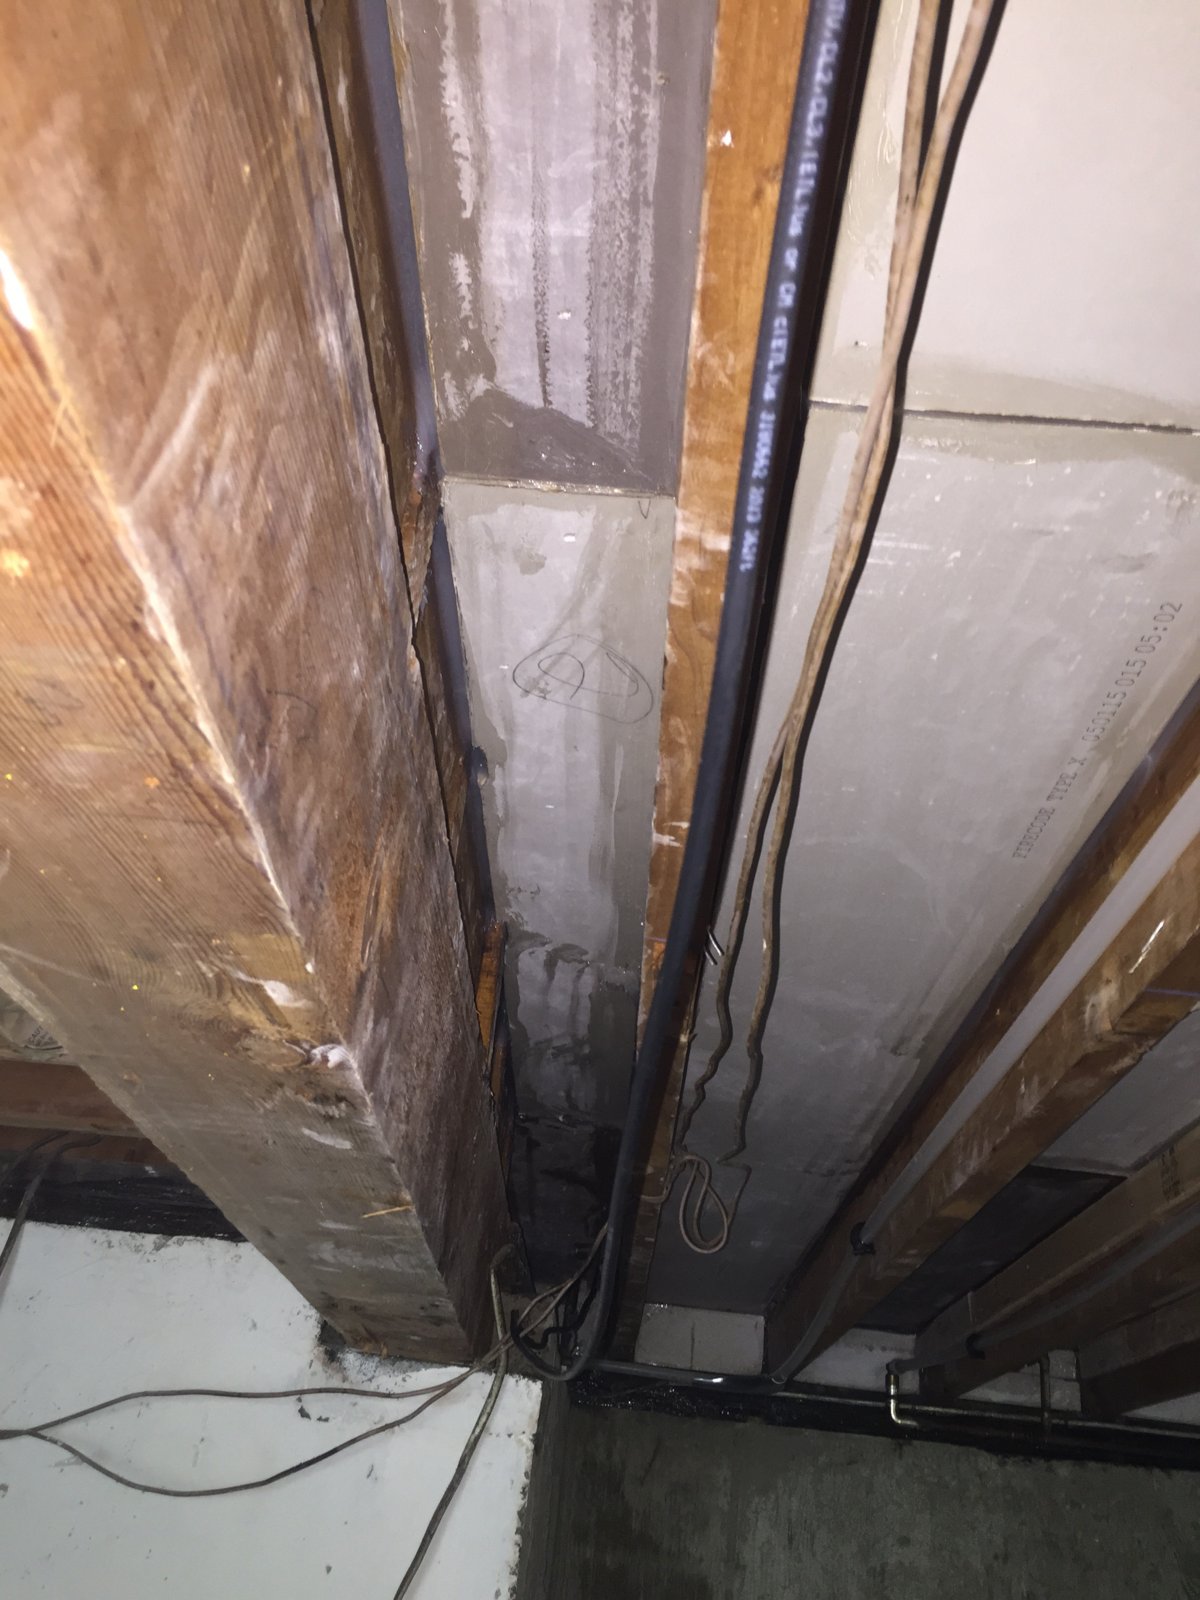
Anyone who is under the misconception that home studios are easy to make because he they are small, that bay to the left. 6" wide, and 15' long in both directions, of the beam. This was one of the more challenging and time consuming sections of drywall of my life lol. This would not have been possible, if the plumber had not moved the pipes to the next bay. Well worth it in the long run. No funny box outs, nothing weird. Just simple and close to the drawings/illustrations as we can make in the real world. This bay alone, took about 16-18 hours from demo to pipe move to drywall.

Fml.....

For the 3rd layer, we wanted to keep as many full length strips as possible, to keep seems minimal. So it took a while to notch out each piece for the joists, poking over the beam. Each one was a different measurement, and I wanted to stay as close to the 1/4-3/8" gap around the drywall, as possible. Man, I just kept telling myself, do this one more time and it's done forever. These tediums take every once of determination I have to maintain as much attention to detail as possible. This is where I am particularly weary of very day workers, not being aware of the importance of a good seal. After 'it's getting covered up, right?".
More pics to fill up Chris's server. Thanx @audiokid, Let me kno
More pics to fill up Chris's server. Thanx audiokid, Let me know if you get that cabin, I'll volunteer some time.

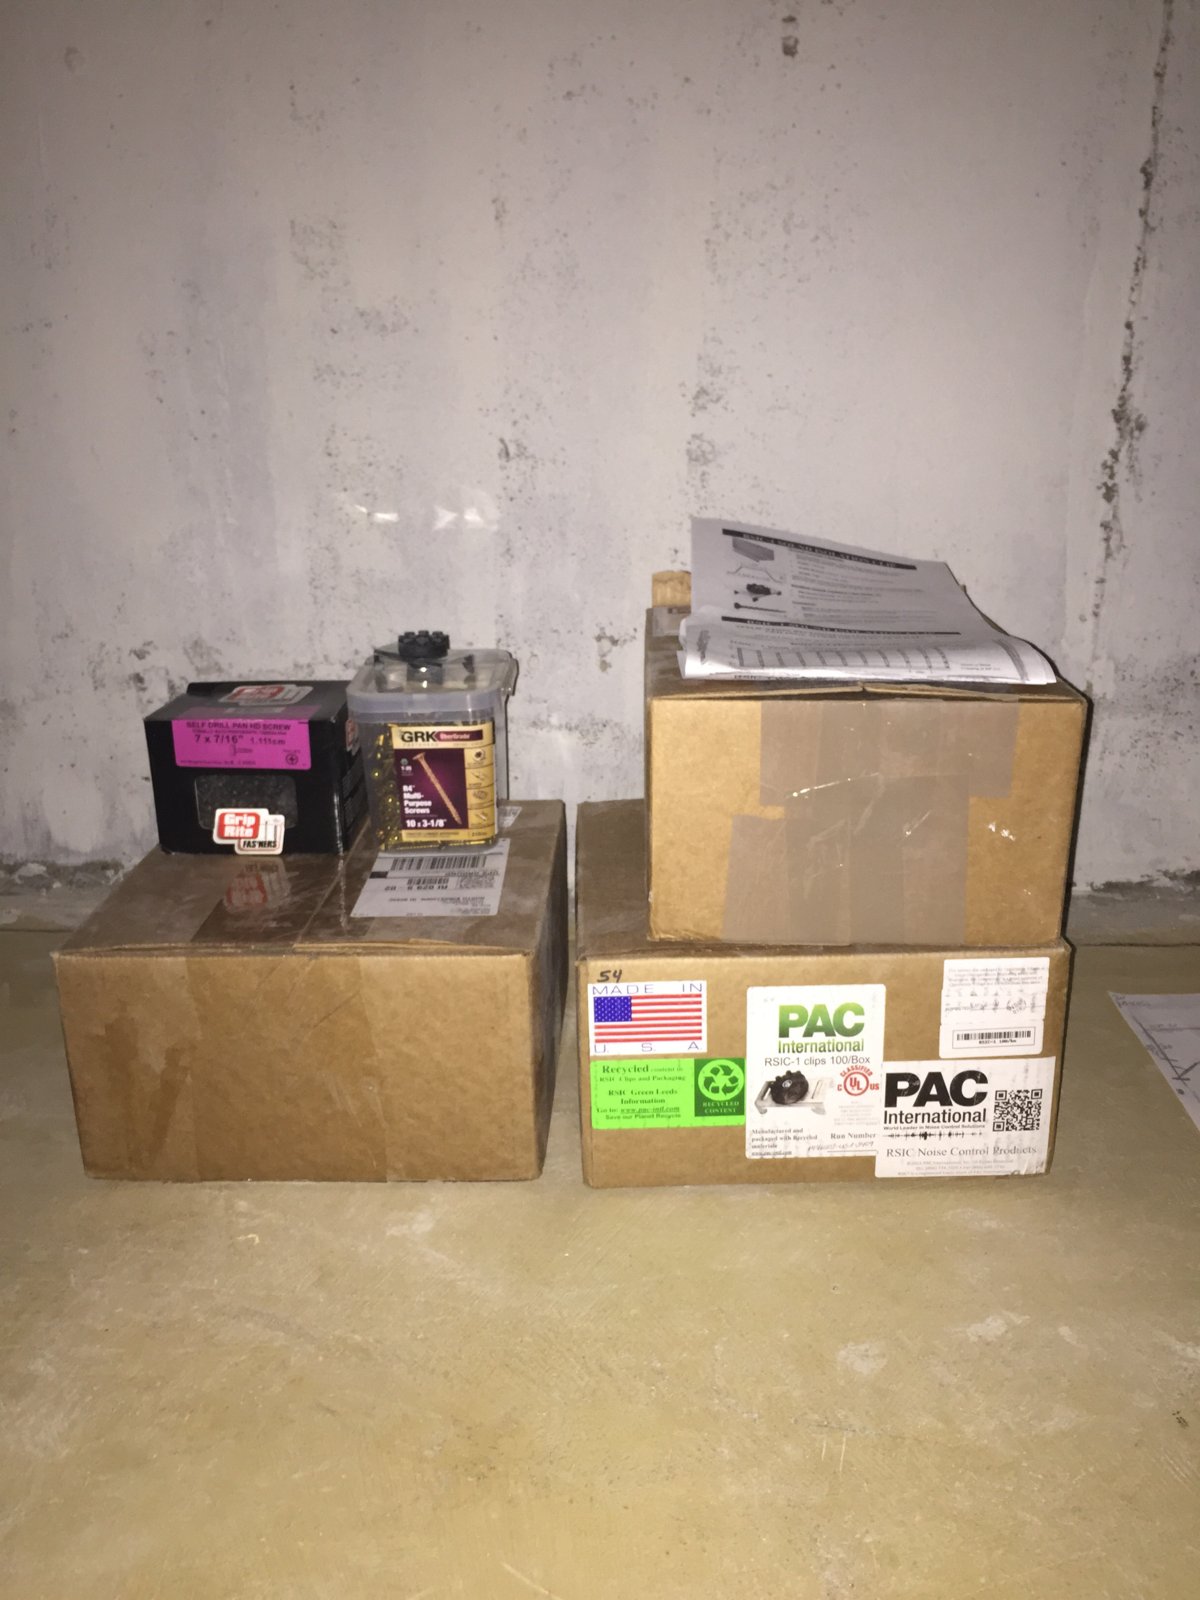
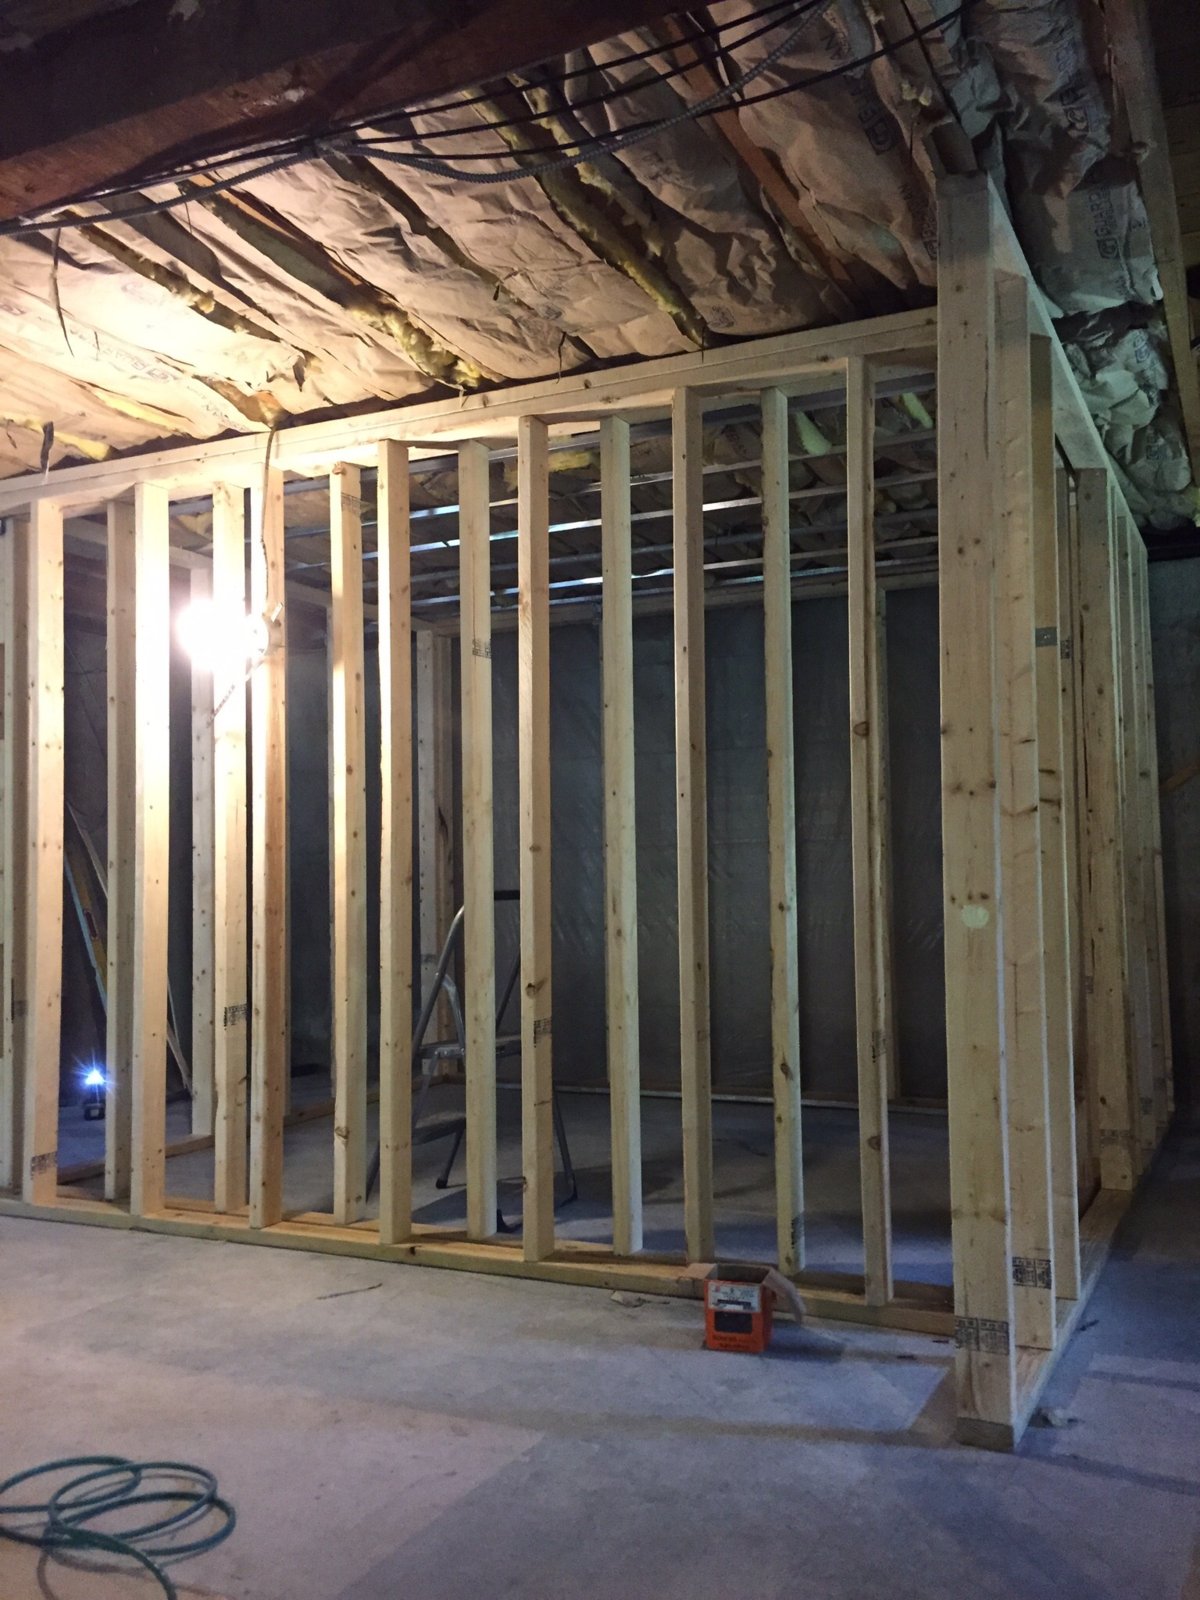
The boxes of RISC-1 clips, the #10 3-1/8" screws (#8 2-1/2"min factory reccomended.) the pan screws are for seams in the channel, which require a 6" overlap if memory serves me right. This cost about $1,500 for this stuff. The clips offer a good isolation advantage over the channel as stated in the paperwork, and was a good choice considering isolation per dollar. With limited ceiling height we opted out of independent ceilings.
The clips and glue systems, seem to be about 3x the cost of the equivalent drywall, upfront, but when you figure the labor saved from not having 6 or so layers of physical drywall installed, it becomes much closer in cost. it would take an independent ceiling to support that kind of mass, bring the ceiling height way too low. In a rough rough guess, I would say the green glue and clips probably about 30% or so more in cost per square foot that the equivalent drywall. Consider the hat channel is about .$30 per foot and it snaps in fast, I don't feel this was a compromise on the budget. After long long hours of crunching numbers and possibilities, I am satisfied that this is going to give us the highest performance possible given the constraints, and while not the 'cheapest' all out. I think it's cost efficient for this project.
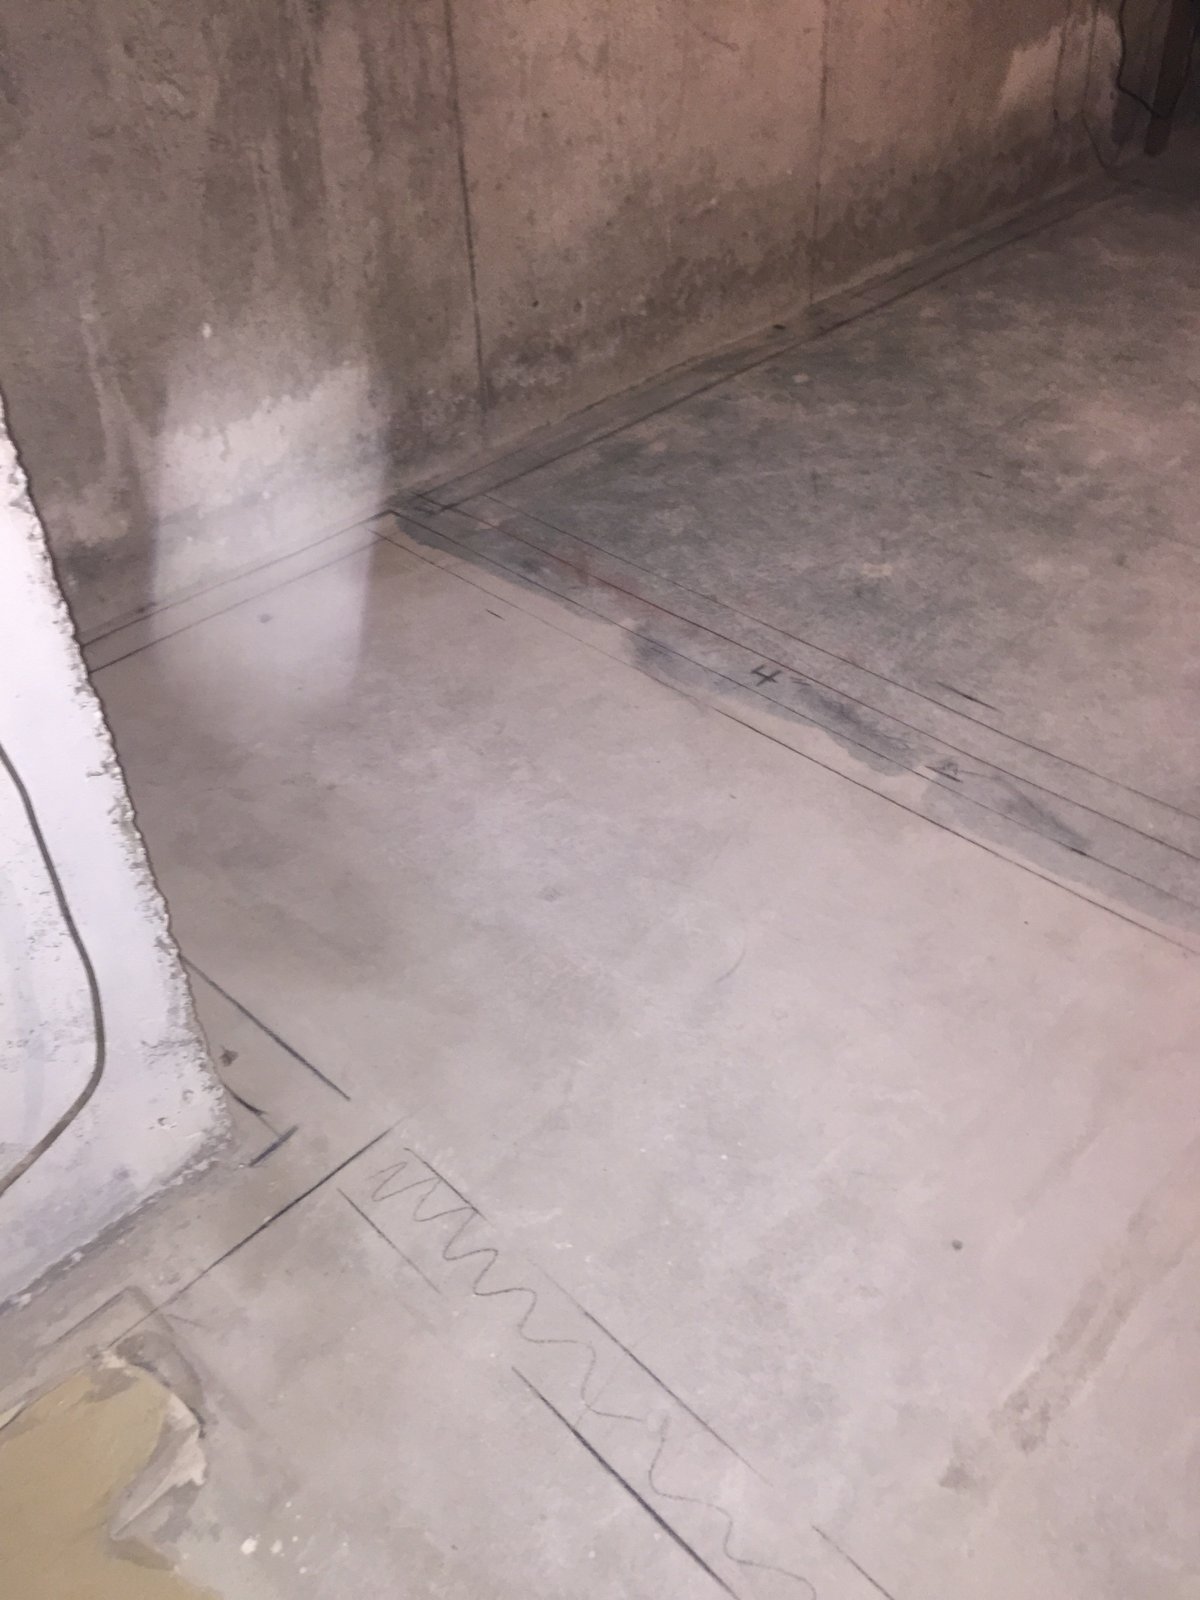
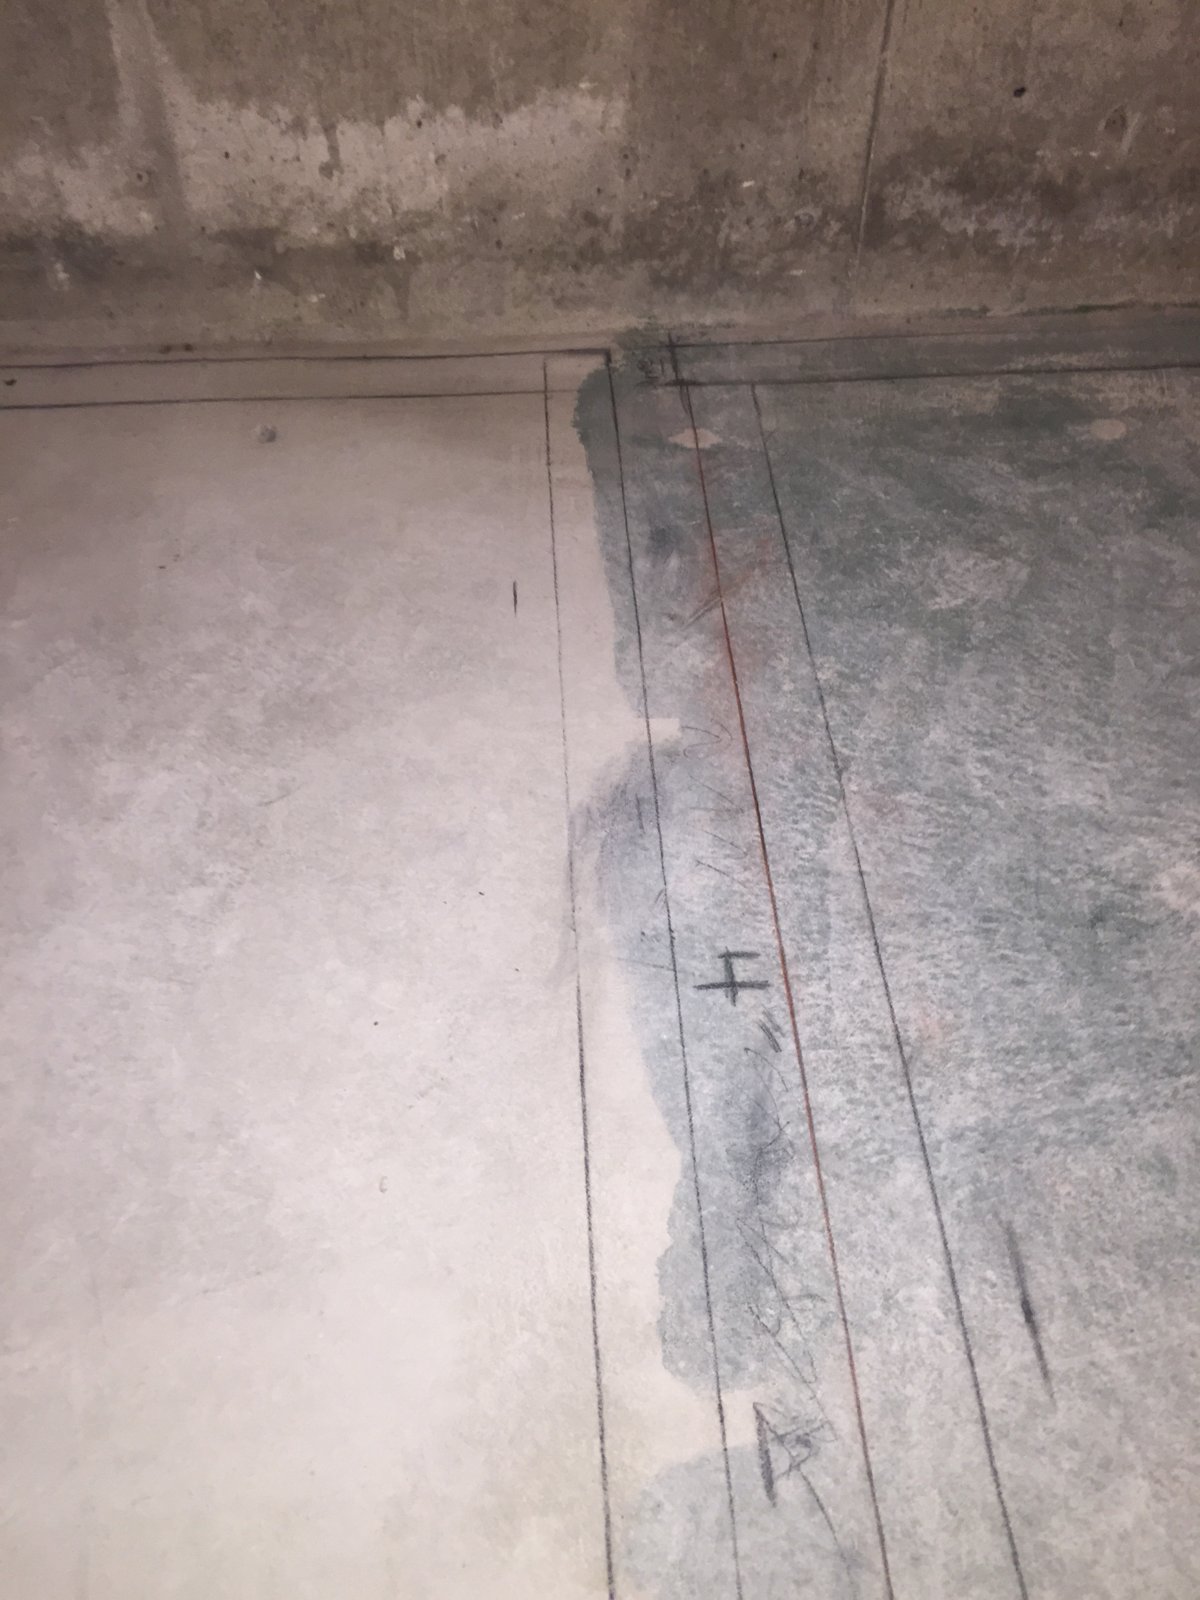
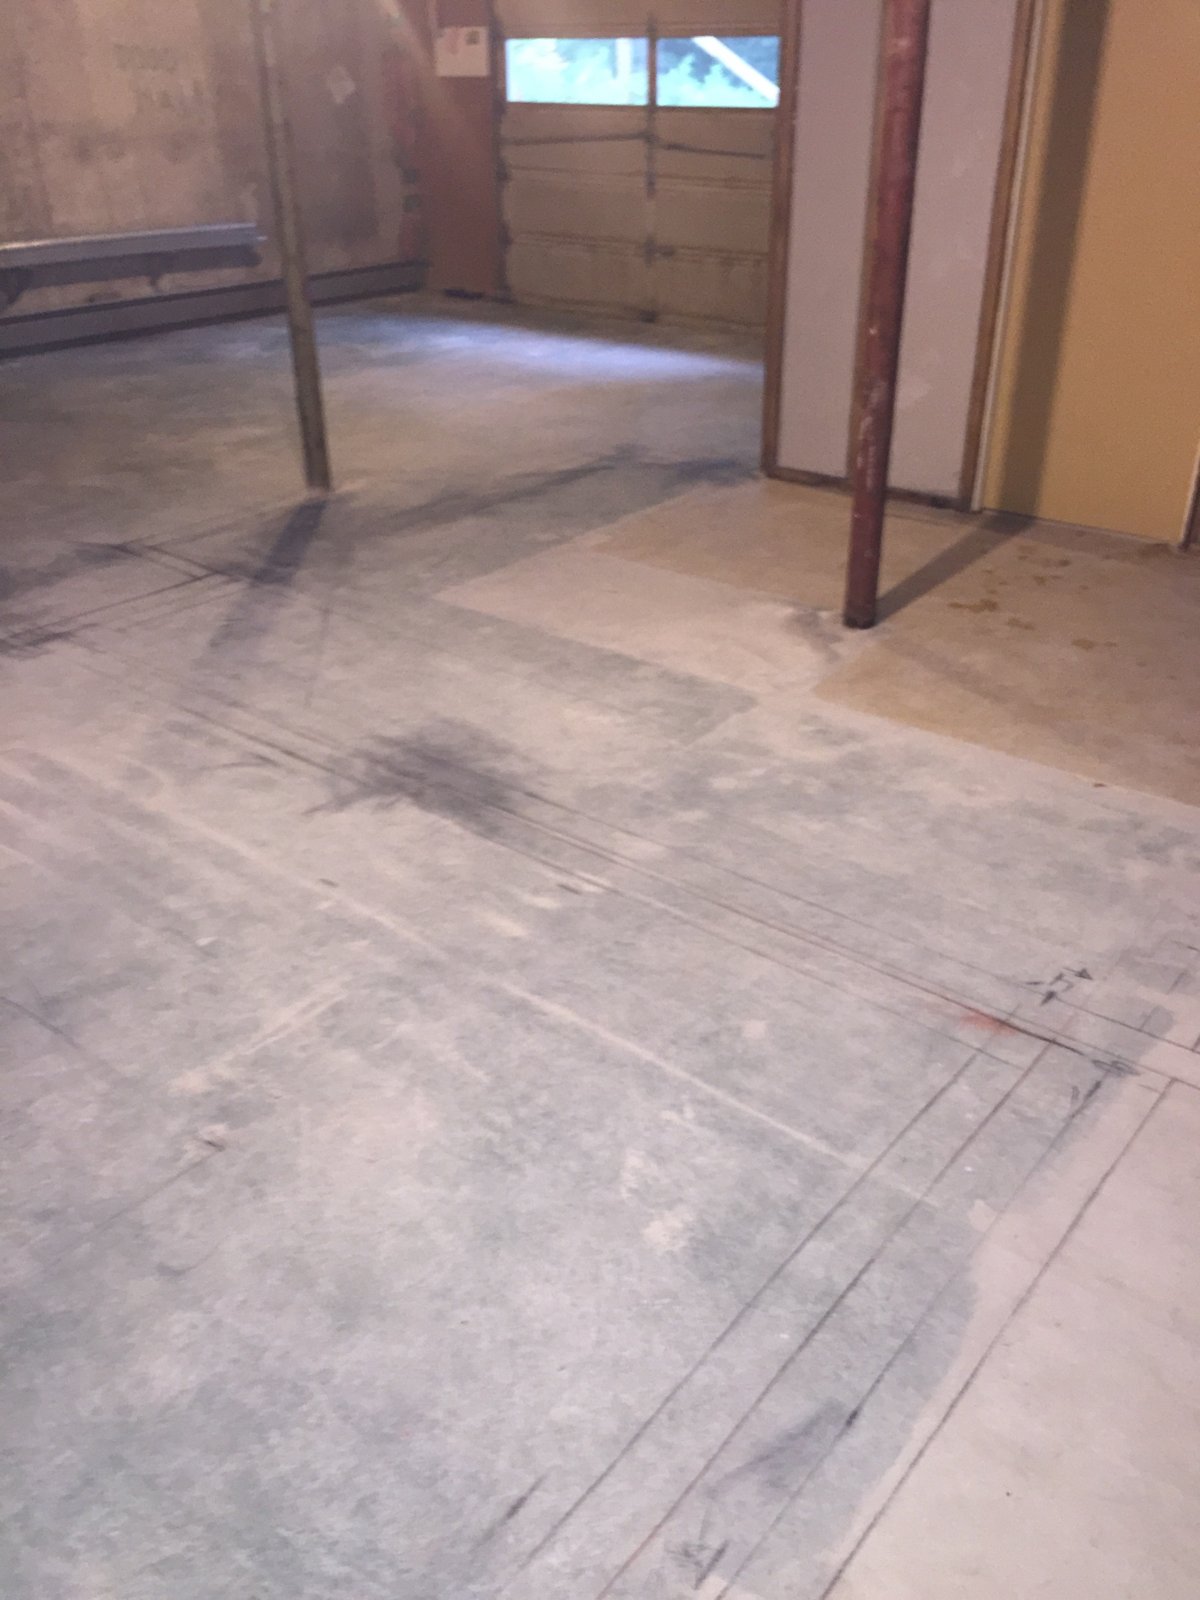
Few more pics, started drawing out the floor in pencil on the th
Few more pics, started drawing out the floor in pencil on the the concrete, to help get a real life feel for things. Even with good drawings, it's tough to conceptualize how a room will feel. Fortunately this project has decent area, and it feels a bit more roomy, than I was anticipating. But there's still drywall and treatment, so it will probably end up comfy and cozy. Took me about 6 hours to draw and redraw as I moved wall placements around. Hopefully you can see them, the pics are kinda rough.

Machine room.

Looking out from the bass trap. To the front is the hall area, and the door to the bathroom. Bottom right bass trap. Left is machine room.
Bass trap area.
Showing tha bass trap and machine rooms wall perimeter. The 4" space between the walls, is there as a placeholder, but I'd like to keep a little more than the 1.5-2" we have planed for all the exterior boundary walls.
A look at some of the possible depths of the bass trap. Ranging from 8' - 13'. Based on some calculations and just overall room layout, the trap will be 8' deep roughly. This keeps the hall framing fairly easy with one straight iso wall. The hall will have 1.5-2' deep traps full length, so things just sat nicely keeping the bass trap around the 8' depth, it's about 3.5' wide, and 7' tall roughly. This gives a chamber that resonates strongly in the 70-140 range. Still working on this part of it, and again, I'm not re inventing the wheel, The plan is to just fine tune the design in rods book to the theaters needs.
It took me a while to conceptualize this pocket or 'closet' (as I know picutre these types of traps) while maintaining the 2 leaf construction properly. It's really nothing more than a bulge in the perimeter walls, and nothing more elaborate than a closet (in its shell form). That's kinda how I see it simplified now.
The complicated part for me was the opening. We needed to maintain as much symetry as possible. If the bass trap was a sealed cavity it's easy to visuals the room in a room. With an opening it becomes part of the studios shell. I'm work g thru the mock up and am going to keep my fingers crossed, that I can get some help from some of the experts, as this bass trap design starts to become more defined. But the trap(s), like I said will probably be a side thread, because there are quite a bit of them, and I want to make sure the placement, and design, is optimal.
A lot of the existing dimensions define the project, and all the numbers seems to be lining up, to my limited understanding, so while I'm not able to predict the results comfortably, I at least feel comfortable that we are facing the right direction, and I think it will be quite nice sounding.
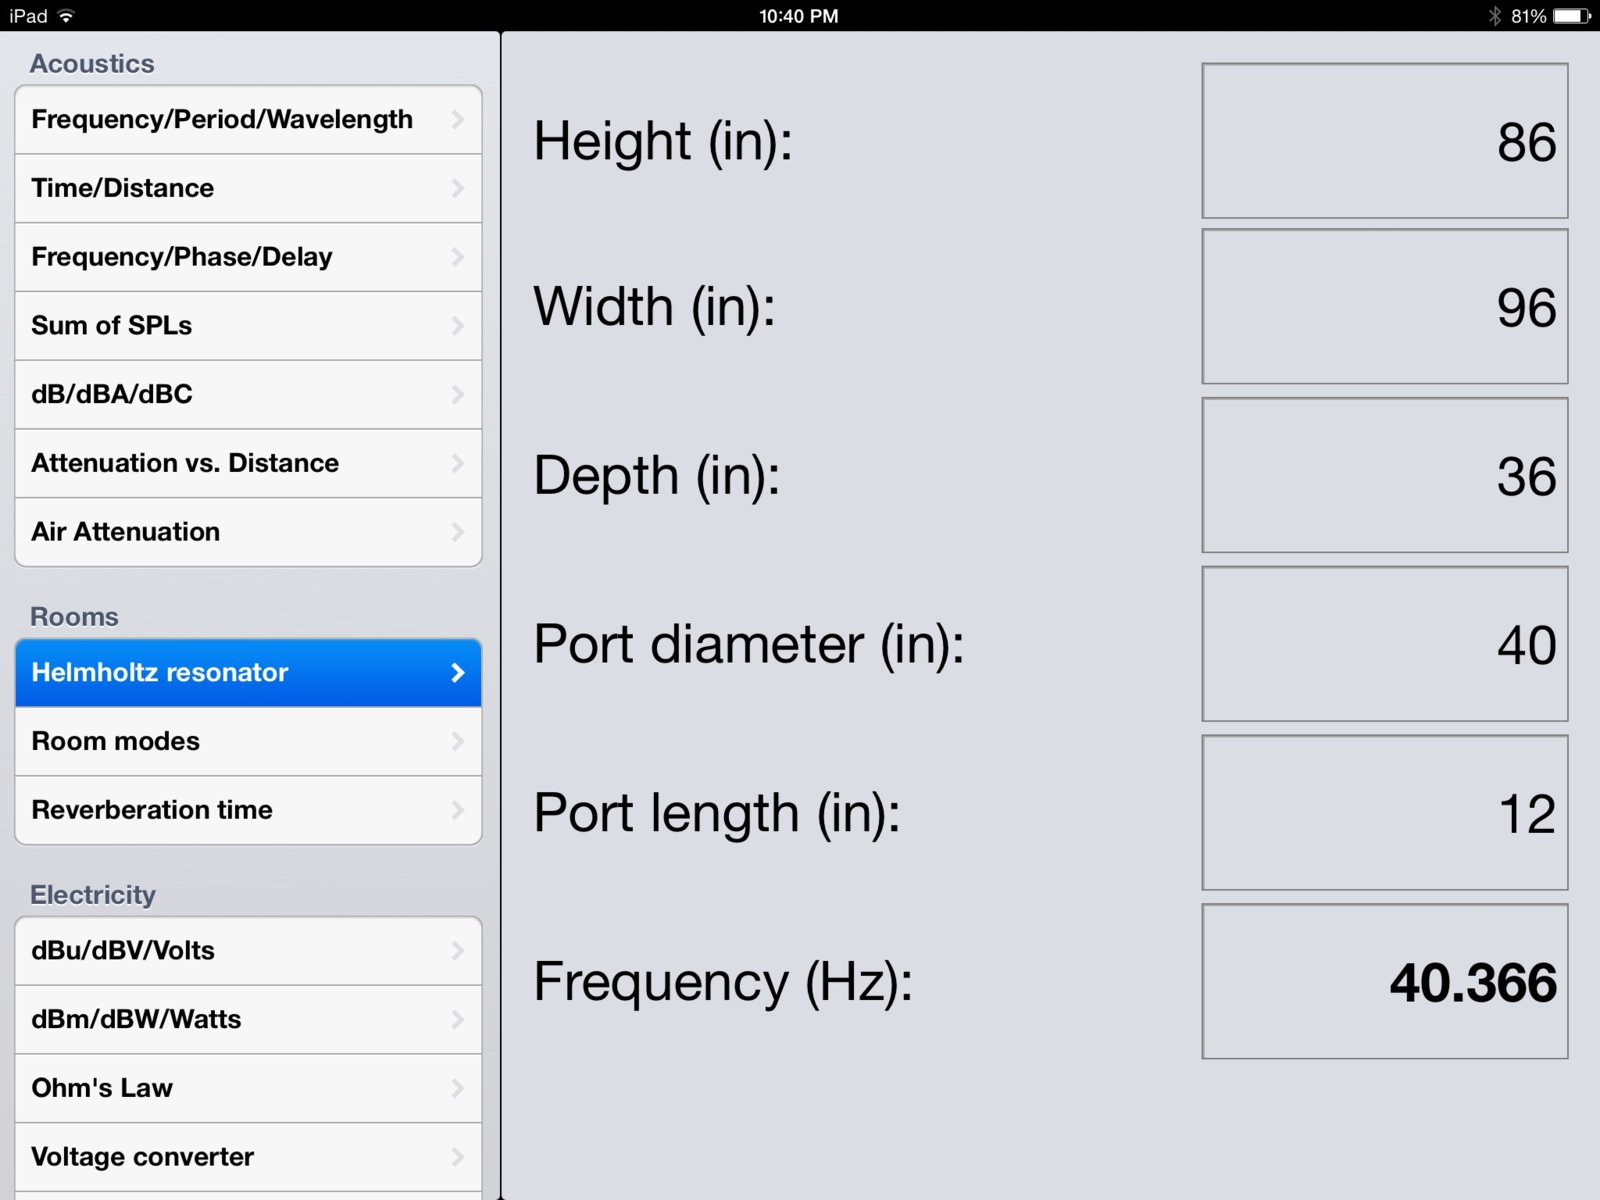
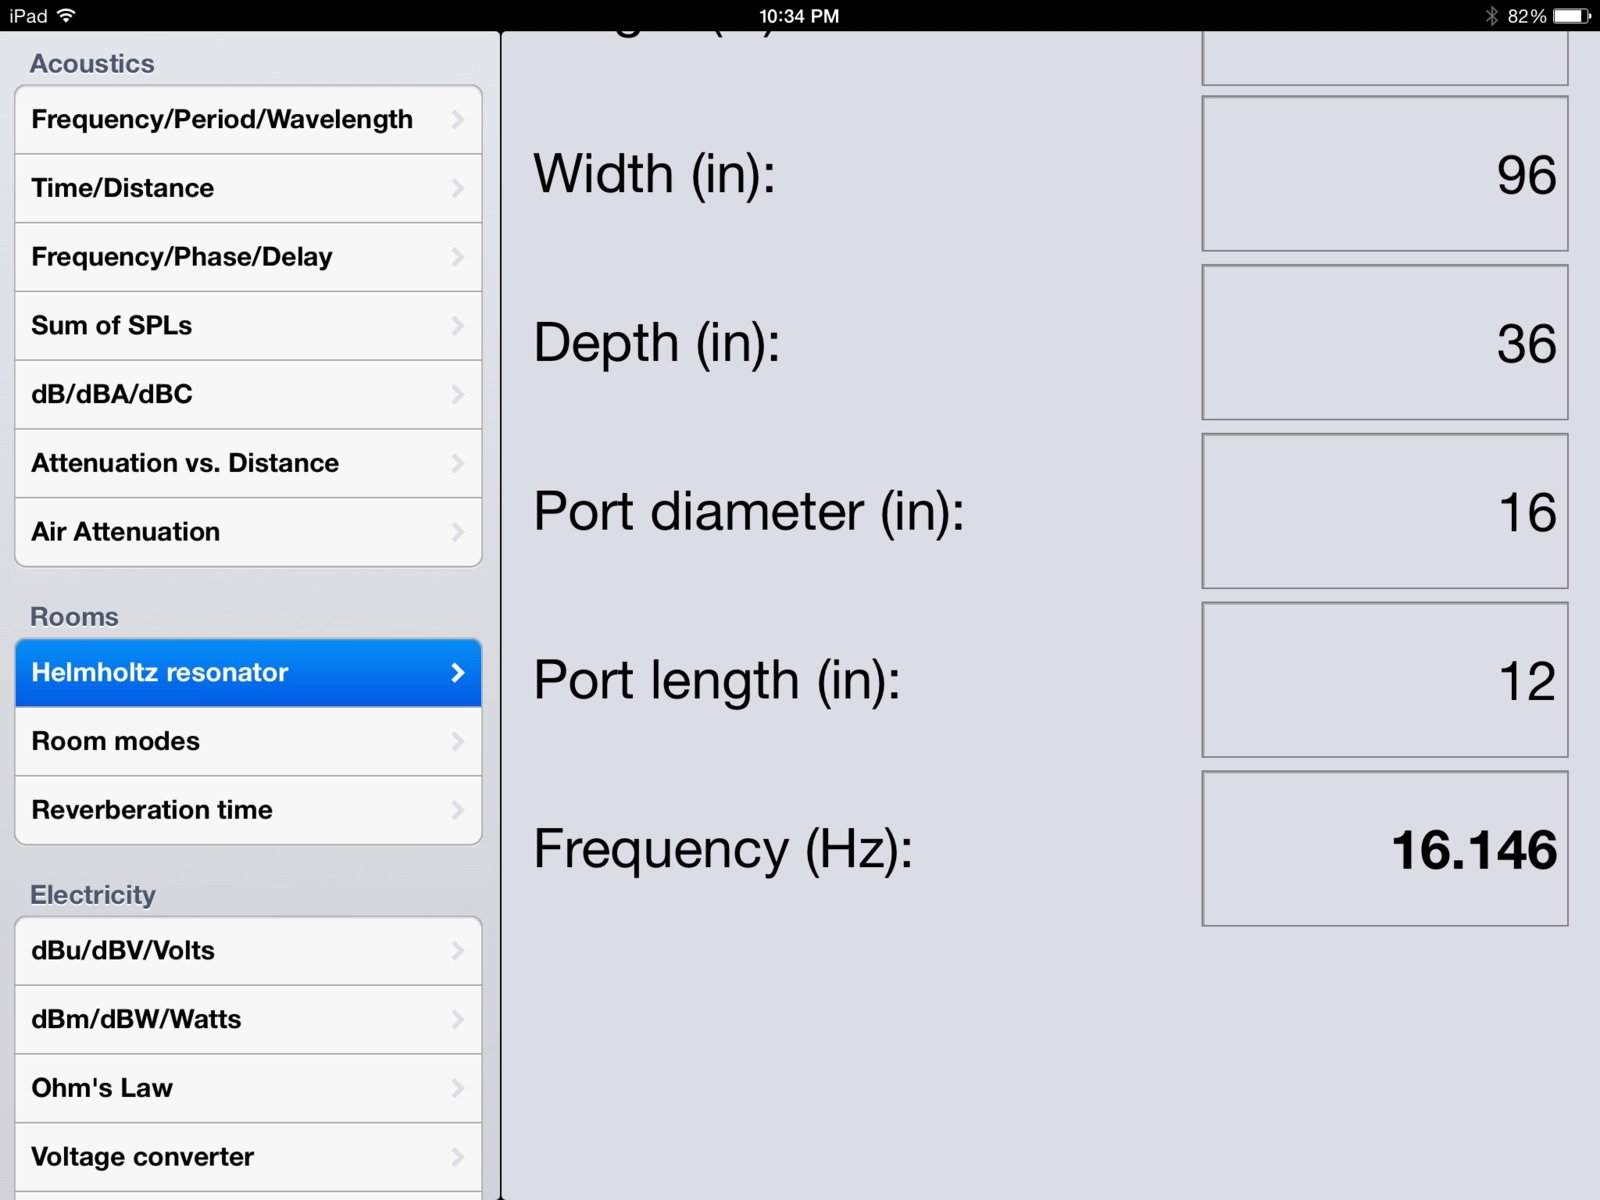
This is some calculation data based on the size of the trap. Th
This is some calculation data based on the size of the trap. This is for a sealed cavity, but I think it's interesting, if not useful. The next one is based on if it was a helmholtz resonator that big, which it will be of some sort. The thumbs, illustrate how the traps center frequency changes, relative to different parameters, like port size and depth. Also included is a basic room mode distribution screenshot. This is all fairly new to me, as I am usually doing these types of things after the fact, for fun, to see how things work in my friends places. Being able to really interpret this data, is becoming crucial. Fortunately we're looking for fairly broadband sub/low frequency stuff, at least for this front wall trap. I'm spending as much time as I can reading and watching and, well sitting thinking. And I appreciate anyone's help/thoughts/opinions, they could offer as the acoustic treatment plan is getting to the drawing stage.
I've never pre-emptively design the 'sound or sonic footprint' of a room before. Usually it's just trying to compensate for existing room issues. Or people building new things, then considering the treatment. This is what my practical experience has been with this area the past 5 or so years ago. I'm excited about this room, and I think it will be quite good.
Sound system design, especially the subs, is becoming very critical. The mains and satalites are gonna most likely be the jbls we spec'd. But after speaking w james at Blvd Pro, in NY, he's opened my mind to some of the powered subs, and there dsp tuning abilities. Meyer, L acoustics , and nexo, are in consideration.
(audiokid if there is a better way for me to be uploading images let me know. The default name of 'image' is what my iPad is generating, not sure how to change that. I'll try to limit the full size ones to important ones. Evtually I'm going to compile this all for my resume. Thank again, for letting me document this experience, I always regret not taking better photo documentaries on my prior projects.)


Attached files 
Well some stuff have been worked on! We got some wall assesmblie
Well some stuff have been worked on! We got some wall assesmblies, built and TEMP screwed in. The fun part about independent walls, it's they move around like Lego blocks for full size people lol. This has sparked my imagination for the future.
The ceiling channel clip spacing is exteremly simple, but very easily confused. There are some great install videos from the manufacturer I'll post up. There are also some very good examples, I have from this project, of some common things contractors may not see the first time in the installation instructions. Even with the best intentions, it's good to have somone there to check everything, which is my role in this case. This is where I'll extend the thank you, to the fellas who have helped me thru education, phone, and In person, answering questions that are over my head, and checking my mistakes. Thanks. Since I'm just relaxing before a session tonight, had a second figured I'd post some pics. There's a lot of specifics I need to get together and a couple of final details together before we can go any further. Some or now like the rest of it, it's only build what you know is staying. I think everyone was anxious and excited to start to feel the room.
Obviously it's ideal to have every nail planned on paper, for many reasons, not the least of which is time and money. Since this is going up a little at a time, we have decided that certain things are final, like the ISO shell perimeter. Defining the ceiling area also was huge.
The plans are coming together the acoustic treatment has been pretty much all designed, and the entry way look has been settled. The plan is to bring electricity into the rack room, and setup some speakers so the home owner can use the room, wich has been basically storage, for a year. Couple lawn chairs and some moving blankets hanging from mic stands will complete "phase 1"
At this point the rest of the specifics will be finalized and purchased, including racks, speakers, specific AC units, lighting fixtures ect.
"Phase 2" The electrical will get completely roughed in, and then it's drywall and caulking.
Then the extensive acoustic treatment, wich is fairly massive itself, dare I say Burly??? Lol
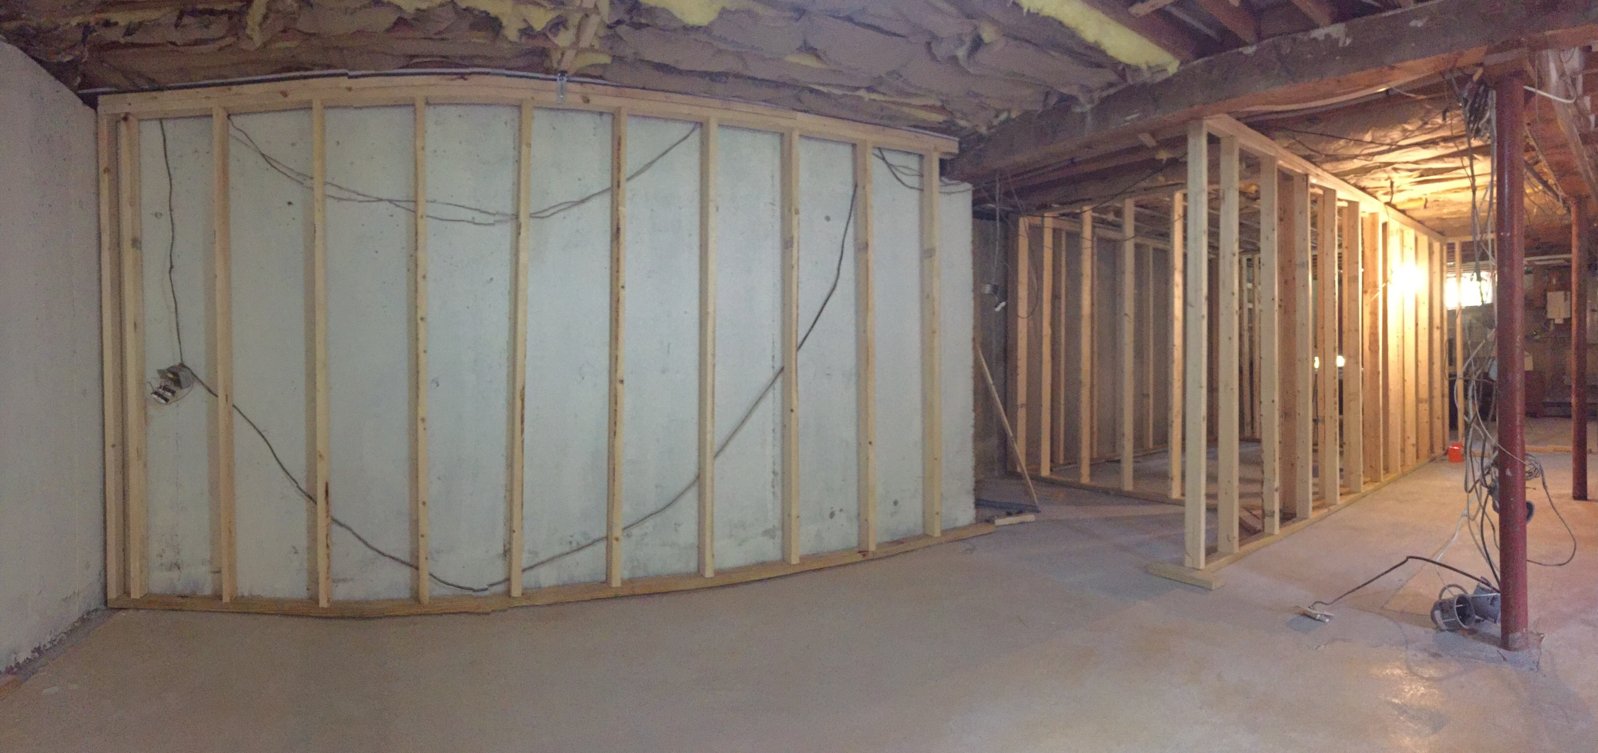
Ps. The wall isn't bowed like that, is just the camera playing tricks. These walls are cut to size, but Not attached permanently. We had some extra ISO clips which we used, the WIC clips are on the order sheet. The fireblocking is installed above the headers. This is the front/screen wall. To the right is the bass trap, hall, and rack room.
Attached files 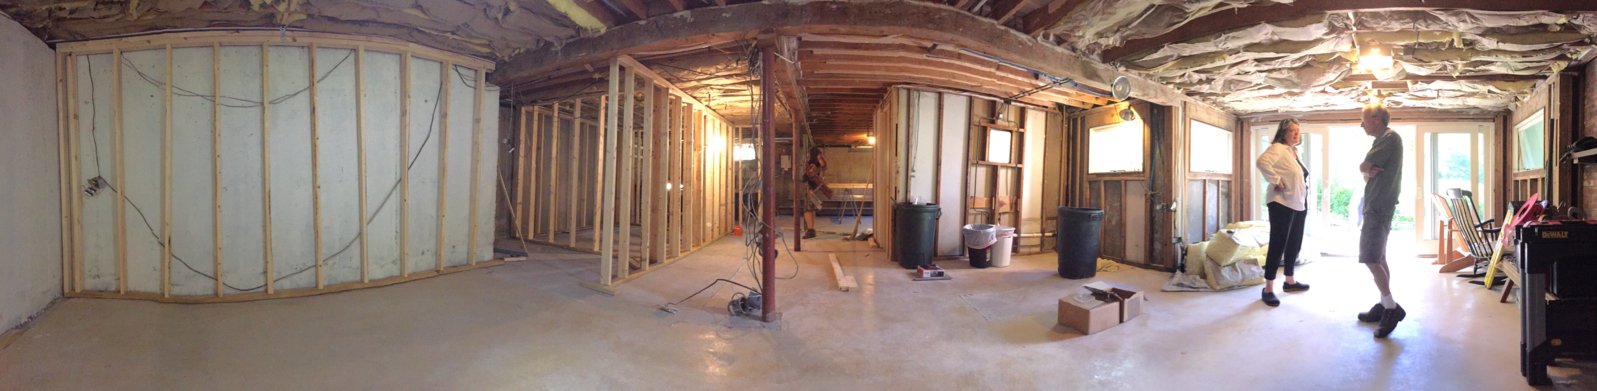
The only thing that might be a concern to me is what I see in

The only thing that might be a concern to me is what I see in this picture. The clips and hat track cross over the top of a framed wall. With weight , the track will sag. So just make certain you have allowed enough head room in this area so that you do not short circuit the isolation when the ceiling settles at this point.
Working on the plan for the electrical in the equipment room. T
Working on the plan for the electrical in the equipment room. These look like good outlets to have for the amplifiers to plug into. Built in surge protection and isolated ground. Each of the 8 amplifiers has its own dedicated circuit/breaker and is part of the overal isolated grounding.
Davedog @Brien Holcombe
Do you guys have any experience with these outlets or outlets of this type? Any thoughts on them, or alternatives?
http://www.leviton.com/OA_HTML/ProductDetail.jsp?partnumber=5380-IG§ion=39994&minisite=10251
Attached files 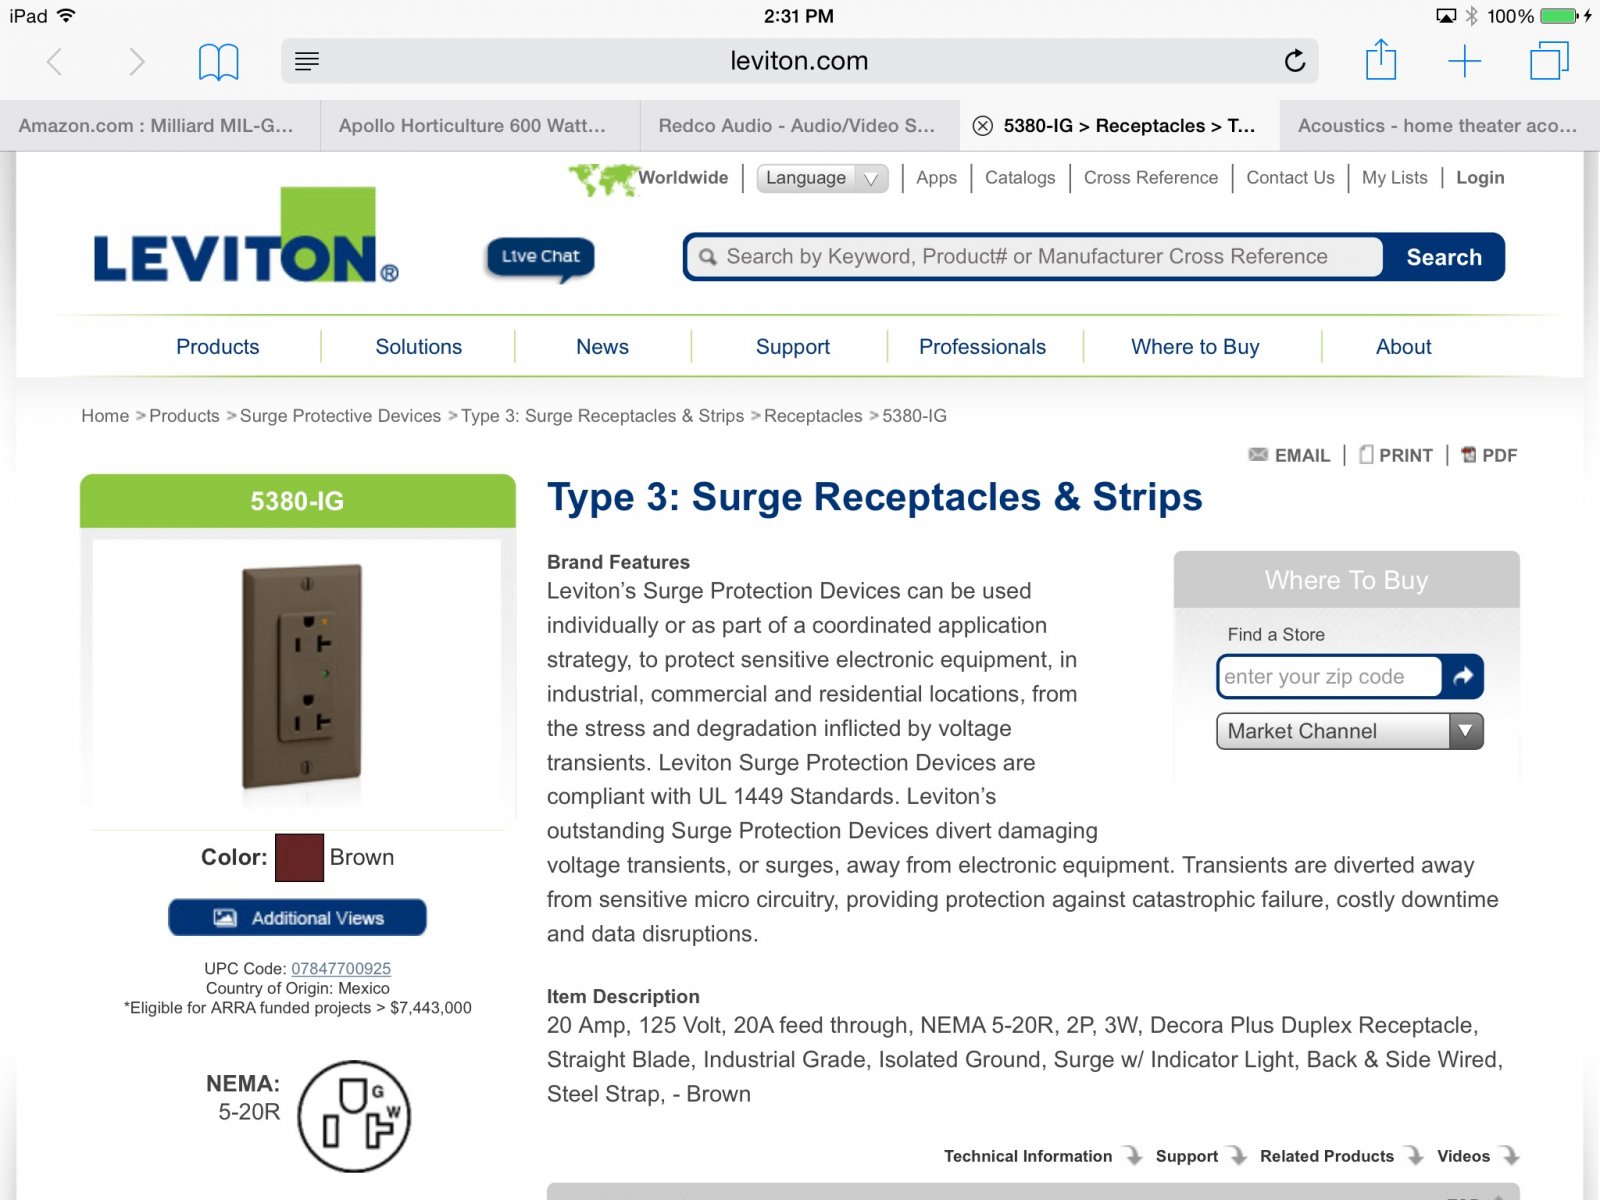

kmetal, post: 432301, member: 37533 wrote: Working on the plan f
kmetal, post: 432301, member: 37533 wrote: Working on the plan for the electrical in the equipment room. These look like good outlets to have for the amplifiers to plug into. Built in surge protection and isolated ground. Each of the 8 amplifiers has its own dedicated circuit/breaker and is part of the overal isolated grounding.
Davedog @Brien Holcombe
Do you guys have any experience with these outlets or outlets of this type? Any thoughts on them, or alternatives?
http://www.leviton.com/OA_HTML/ProductDetail.jsp?partnumber=5380-IG§ion=39994&minisite=10251
Excellent product. Expensive but in retrospect worth it for what your needs are. However.....any commercial grade or higher 20amp with a horsepower rating receptacle will fill the needs for power amps. Also...DCA amps are class "D"...ie: switching power supply and don't suffer from the surges that a transformered amp can. The inrush current on these is modulated and they start "soft". So having a surge protected receptacle at each device might be overkill. If you are regulating voltage with an isolation and balanced transformer at 'supply', then your chances of surge or 'brown-out' is greatly reduced. Especially in the power amp section. By all means regulate the computer devices in your design.
Davedog, post: 432303, member: 4495 wrote: If you are regulating
Davedog, post: 432303, member: 4495 wrote: If you are regulating voltage with an isolation and balanced transformer at 'supply', then your chances of surge or 'brown-out' is greatly reduced. Especially in the power amp section. By all means regulate the computer devices in your design.
Thanks Dave,
According to the plan if I understand it, there is no sort of voltage regulation, and no isolation transformer. Just an isolated ground. The electrician was concerned with one amp blowing up, causing problems with the others, so he wanted to have a voltage overload fail safe for each one. My thought was to put a regulator down at the panel, but I'm just not sure how necessary it is, meaning should I be needing one?
I did my second build of home theaters 2 yr ago. Audio wise, I d
I did my second build of home theaters 2 yr ago.
Audio wise, I didn't really think about the sound of movies because it's the same room as my control room. So I was more concerne about mixing purpose when I built it. I got a side wall full with shelves of movies (yeah not copies but a lot of second hand originals). The shelves act as a immense diffuser which is a good thing because the opposite wall is a staircase with a storage bellow it (full of drum parts) on which I added a few accoustic pannel for the early reflections.
Well I can go on with how I did it but it's not important. The point is that I had a control room in mind.
I threated the room accordingly and it paid off because the movies are sounding very good. The room is still a bit live but I don't hear a big verb or ping pong delays and the frequency range is somewhat flat. (at least there's no peak jumping at you).
My movie PA is far from flat and clean but it suites the purpose of what movies need and I guess being in a control room made it more enjoyable. So I'm happy !